Home
Danfoss
Air Compressor
Turbocor TT300
Danfoss Turbocor TT300 User Manual
5
of 1
of 1 rating
132 pages
Give review
Manual
Specs
To Next Page
To Next Page
To Previous Page
To Previous Page
Loading...
124 of 132
M-SV-001-EN Rev
.E
Appendix B
Compr
essor T
roubleshooting
Flow
char
ts
This appendix contains flow
char
ts f
or
Compressor Opera
tion T
roubleshooting (F
igure
108) and Compressor
Voltage
Tr
oubleshooting
(Figur
e 109 and Figur
e 110).
Figur
e 108 - Compressor
Operation T
roubleshooting
Flow
chart
123
125
Table of Contents
Table of Contents
5
List of Tables
8
List of Figures
9
Proprietary Notice
11
Introduction
13
Purpose
13
Organization
13
Commitment to Quality
14
Safety Summary
14
Danger Notification
14
Caution Notification
14
Note
14
Precautions
14
Figure 1 - Danger Notification Example
14
Figure 2 - Caution Notification Example
14
Figure 3 - Note Example
14
Refrigerant Type
15
R134A/R513A
15
R1234Ze
15
Electrical Isolation of the Compressor
15
Table 1 - Refrigerant Used with Danfoss Turbocor Compressors
15
Handling Electronic Static Devices
16
ESD Protection/Grounding
16
Figure 4 - ESD Label
16
Figure 5 - Mains Plate and Ground Post
17
Figure 6 - Compressor Grounding Points
17
DC Bus Test Harness Installation and Removal
18
Figure 7 - DC Bus Test Harness Diagram
18
Figure 8 - DC Bus Harness Connection Diagram
18
Figure 10 - Connect Test Harness to Soft Start Board
19
Figure 9 - Soft Start Board
19
Installation of the DC Bus Test Harness
19
Figure 11 - Connect Test Harness to Compressor
20
Figure 12 - Cable Passage
20
DC Bus Test Harness Use
21
Removal of the DC Bus Test Harness
21
Table 2 - Expected DC Bus Voltage
21
Compressor Fundamentals
22
Main Fluid Path
22
Motor and Power Electronics Cooling
22
Table 3 - Compressor Fluid Paths
22
Figure 13 - Compressor Fluid Paths
22
Figure 14 - Cooling Inlet Adaptors
23
Figure 15 - Compressor Motor and Power Electronics Cooling (TT300/TG230 Serial Cooling)
24
Figure 16 - Compressor Motor and Power Electronics Cooling (All Models Except TT300/TG230 Serial Cooling)
25
Capacity Control
26
Compressor Energy and Signal Flow
26
Figure 17 - Compressor Energy and Signal Flow Connections (TT300/TG230 Shown)
27
Figure 18 - Compressor Energy and Control Flow Block Diagram
28
Compressor Components
29
Component Identification
29
Table 4 - Compressor Component Identification (Covers On)
29
Figure 19 - Compressor Components Identification (Covers On)
29
Table 5 - Compressor Component Identification (Covers Off) (TT300/TG230)
30
Figure 20 - Compressor Component Identification (Covers Off) (TT300/TG230)
30
Table 6 - Compressor Sensors, Cables, and Indicators (TT300/TG230)
31
Figure 21 - Compressor Sensors, Cables and Indicators (TT300/TG230)
31
Table 7 - Compressor Component Identification (Covers off ) (TT350/TT400/TT500/TT700/TG310/TT390/TT520)
32
Figure 22 - Compressor Component Identification (Covers off ) (TT350/TT400/TT500/TT700/TG310/TG390/TG520)
32
Table 8 - Compressor Sensors, Cables, and Indicators (TT350/TT400/TT500/TT700/TG310/TG390/TG520)
33
Figure 23 - Compressor Sensors, Cables, and Indicators (TT350/TT400/TT500/TT700/TG310/TG390/TG520)
33
Compressor - Removal and Installation
34
Refrigerant Containment
34
Compressor - Removal
34
Compressor - Installation
34
Figure 24 - Major Revision "E" Compressor Fittings
36
3-Phase Main Voltage Input Terminal Block
37
Function
37
Connections
37
Figure 25 - Main AC Input Terminal TT300/TG230
37
(Left) TT350/TT400/TT500/TT700/TG310/TG390/TG520 (Right)
37
Verification
38
Figure 26 - Measuring the AC Input Voltage on the AC Input Terminals
38
Figure 27 - Measuring 3-Phase AC Input (TT300/TG230 Only)
38
Removal and Installation
39
Table 9 - Expected AC Voltage Range
39
Figure 28 - Terminal Block Bus Bars (TT350/TT400/TT500/TT700/TG310/TG390/TG520)
39
Figure 29 - Terminal Block Bus Bars (TT350/TT400/TT500/TT700/TG310/TG390/TG520)
39
Figure 30 - AC Input to Scrs (TT300/TG230)
40
Figure 31 - Terminal Block Spacers
40
Soft Start Board
41
Function
41
Figure 32 - Screws Securing Terminal Block to Casting
41
Connections
42
Verification
42
Figure 33 - Soft Start Board
42
Removal and Installation
43
Figure 34 - Mains Input
43
Silicon-Controlled Rectifier
44
Function
44
Connections
44
Verification
44
Figure 35 - SCR Connections (TT300 - Left/Tg230 - Right)
44
Table 10 - SCR Diode Values
45
Table 11 - SCR Gate Resistance Ranges
45
Figure 36 - Silicon-Controlled Rectifier Terminals
45
Removal and Installation
46
Figure 37 - J17 Connector
46
DC Bus
48
Function
48
Figure 38 - DC Bus Components Identification
48
Connections
49
Verification
49
Removal and Installation
49
Figure 39 - Soft Start Cable Harness to DC Bus
49
Figure 40 - Removing Attaching Hardware from DC Bus Bars (TT300/TG230 Pictured)
50
Figure 41 - Removing DC Capacitor Assembly (TT300/TG230)
50
Figure 42 - Insulating Mylar on Inverter (TT300/TG230 Only)
51
Inverter
52
Function
52
Connections
52
Figure 43 - Inverter Connections
52
Verification
53
Figure 44 - Inverter Connections (TT300/TG230)
53
Removal and Installation
54
Figure 45 - Driver Board Screw Removal
54
Figure 46 - Driver Board Removal
54
Figure 47 - Long Spring Pin Locations
55
Figure 48 - Spring Pin Identification
55
Figure 49 - Spring Pin Removal
56
Figure 50 - Seated Spring Pins
56
Figure 51 - Driver Board Placement
56
Figure 52 - Initial Tightening Pass Sequence
57
Figure 53 - Final Torque
57
Figure 54 - Removing the Inverter (TT300/TG230 Shown)
58
Motor
59
Function
59
Motor Protection
59
Connections
59
Figure 55 - Connection to Stator
59
Verification
60
Figure 56 - Stator Thermistor R/T Curve 1
61
High-Voltage DC/DC Converter
62
Function
62
Connections
62
Figure 57 - DC/DC Converter Connections
62
Verification
63
Figure 58 - J3 24VDC Output Connector
63
Removal and Installation
64
Backplane
64
Function
64
Figure 59 - HV DC/DC Converter Removal
64
Backplane Connections and Test Points
65
Figure 60 - Backplane Connections and Test Points
65
Figure 61 - LED Locations
65
Removal and Installation
66
Table 12 - Backplane Test Point Values
66
Figure 62 - Removing the Backplane
66
Serial Driver
67
Function
67
Connections
67
Verification
67
Removal and Installation
68
Solenoids and Actuators
68
Function
68
Connections
68
Figure 63 - Cooling Valve Bodies
68
Verification
69
Table 13 - Solenoid Actuator Coil Resistance Ranges
69
Figure 64 - Motor Cooling Solenoid Actuators
69
Figure 65 - Motor Cooling Solenoid Cable Connector
69
Removal and Installation
70
Figure 66 - Solenoid Cooling Path (TT300/TG230 Shown)
70
Igv
71
Function
71
Connections
71
Figure 67 - IGV Connections
71
Verification
72
Removal and Installation
72
Figure 68 - IGV Motor Feed through
72
Bmcc
73
Function
73
Connections
73
Figure 69 - Disconnecting Power to the IGV Motor
73
Verification
74
Removal and Installation
74
Figure 70 - BMCC Insertion Guides
74
Compressor Interface Module
75
Function
75
Connections
75
Figure 71 - Compressor Interface Module Ports
75
Figure 72 - Compressor Interface Module Jumper Locations
75
Verification
77
Removal & Installation
78
Figure 73 - Removing the Compressor Interface Module from the DIN Rail
78
Bearing Pulse Width Modulator Amplifier
79
Function
79
Figure 74 - Bearing Control Signal Flow
79
Connections
80
Figure 75 - Bearing Power Feed Throughs and PWM Connection Port
80
Figure 76 - Bearing PWM Amplifier
80
Verification
81
Figure 77 - Connecting Leads to PWM Connector and HV- Test Point
82
Figure 78 - Connecting Leads to PWM Connector and HV+ Test Point
82
Removal and Installation
83
Figure 79 - Removing the PWM Amplifier
83
Magnetic Bearings
84
Function
84
Figure 80 - Radial Magnetic Bearings
84
Figure 81 - Axial Magnetic Bearing
84
Connections
85
Verification
85
Figure 82 - Bearing Power Feed Throughs
85
Table 14 - Magnetic Bearing Coil Resistance Values
86
Figure 83 - Rear Bearing 6-Pin Orientation (TT300 Serial Numbers <081015110 Only)
86
Figure 84 - Front Bearing 4-Pin Orientation
86
Table 15 - Bearing Amperage Ranges
87
Figure 85 - Front and Rear Bearing Feed Throughs with Molex Connectors
87
Figure 86 - Compressor Monitor Tool
87
Bearing Sensors
88
Function
88
Connections
88
Figure 87 - Bearing Sensor Feed Throughs
88
Figure 88 - Bearing Sensor Cables
88
Verification
89
Cavity Temperature Sensor
89
Function
89
Connections
89
Table 16 - Bearing Sensor Coil Resistance
89
Figure 89 - Bearing Sensor Pin Locations
89
Verification
90
Figure 90 - Cavity Temperature Sensor Terminal
90
Figure 91 - Temperature Vs. Resistance
90
Removal and Installation
91
Figure 92 - Cavity Temperature Sensor Removal
91
Pressure/Temperature Sensor
92
Function
92
Connections
92
Verification
92
Figure 93 - Pressure/Temperature Cable Terminals
92
Removal and Installation
93
Figure 94 - Pressure/Temperature Sensor Pin Locations
93
Troubleshooting
94
Alarm and Fault Indications
94
Alarm Types
94
Fault Types
94
Table 17 - Alarm Types
94
Table 18 - Compressor Fault Types
95
Table 19 - Motor Fault Types
96
Table 20- Bearing Fault Types
96
Troubleshooting with the Service Monitoring Tools Software
97
Figure 95 - SMT Tool Suite Launcher Strip
97
Table 21 - Service Monitoring Tools Icons
97
Compressor Fault Troubleshooting
98
Figure 96 - Fault Trigger Methods
99
Table 22 - Compressor Faults
100
Motor Faults/System Status
102
Table 23 - Motor Faults
102
Bearing Status
103
Table 24 - Bearing Status
103
Bearing Calibration
104
When to Calibrate the Bearings
104
Performing a Calibration
104
Figure 97 - Bearing Calibration Tool
105
After Calibration Is Complete
106
Create a Calibration Report
106
Calibration Report Analysis
107
Figure 98 - Bearing Calibration Flow
108
Compressor Connection Status Indications
109
System and Compressor Level Troubleshooting
109
Compressor Voltage Troubleshooting
109
Determining the Cause of an Energy Drain
111
Determining the Cause of Blown Soft Start Fuses
112
Troubleshooting an Open Interlock
113
Troubleshooting the Inverter
113
Maintenance
114
Preventive Maintenance Tasks
114
Table 25 - Preventive Maintenance Tasks
114
Moisture Prevention Measures
115
Required Items
115
Figure 99 - Module Removal
115
Figure 100 - Motor Cooling Valve Solenoids
116
Figure 101 - Neoprene Gasket Removal
116
Figure 102 - Dielectric Grease under Gasket
117
Figure 103 - PWM Connectors
117
Figure 104 - Dielectric Grease on Screws
117
Figure 105 - Motor-Winding Sensor Dielectric Grease Application
118
Figure 106 - Motor Bus Bar Screws
119
Figure 107 - SCR Screw Dielectric Grease Application
119
Appendix A Acronyms/Terms
121
Table 26 - Acronyms/Terms
121
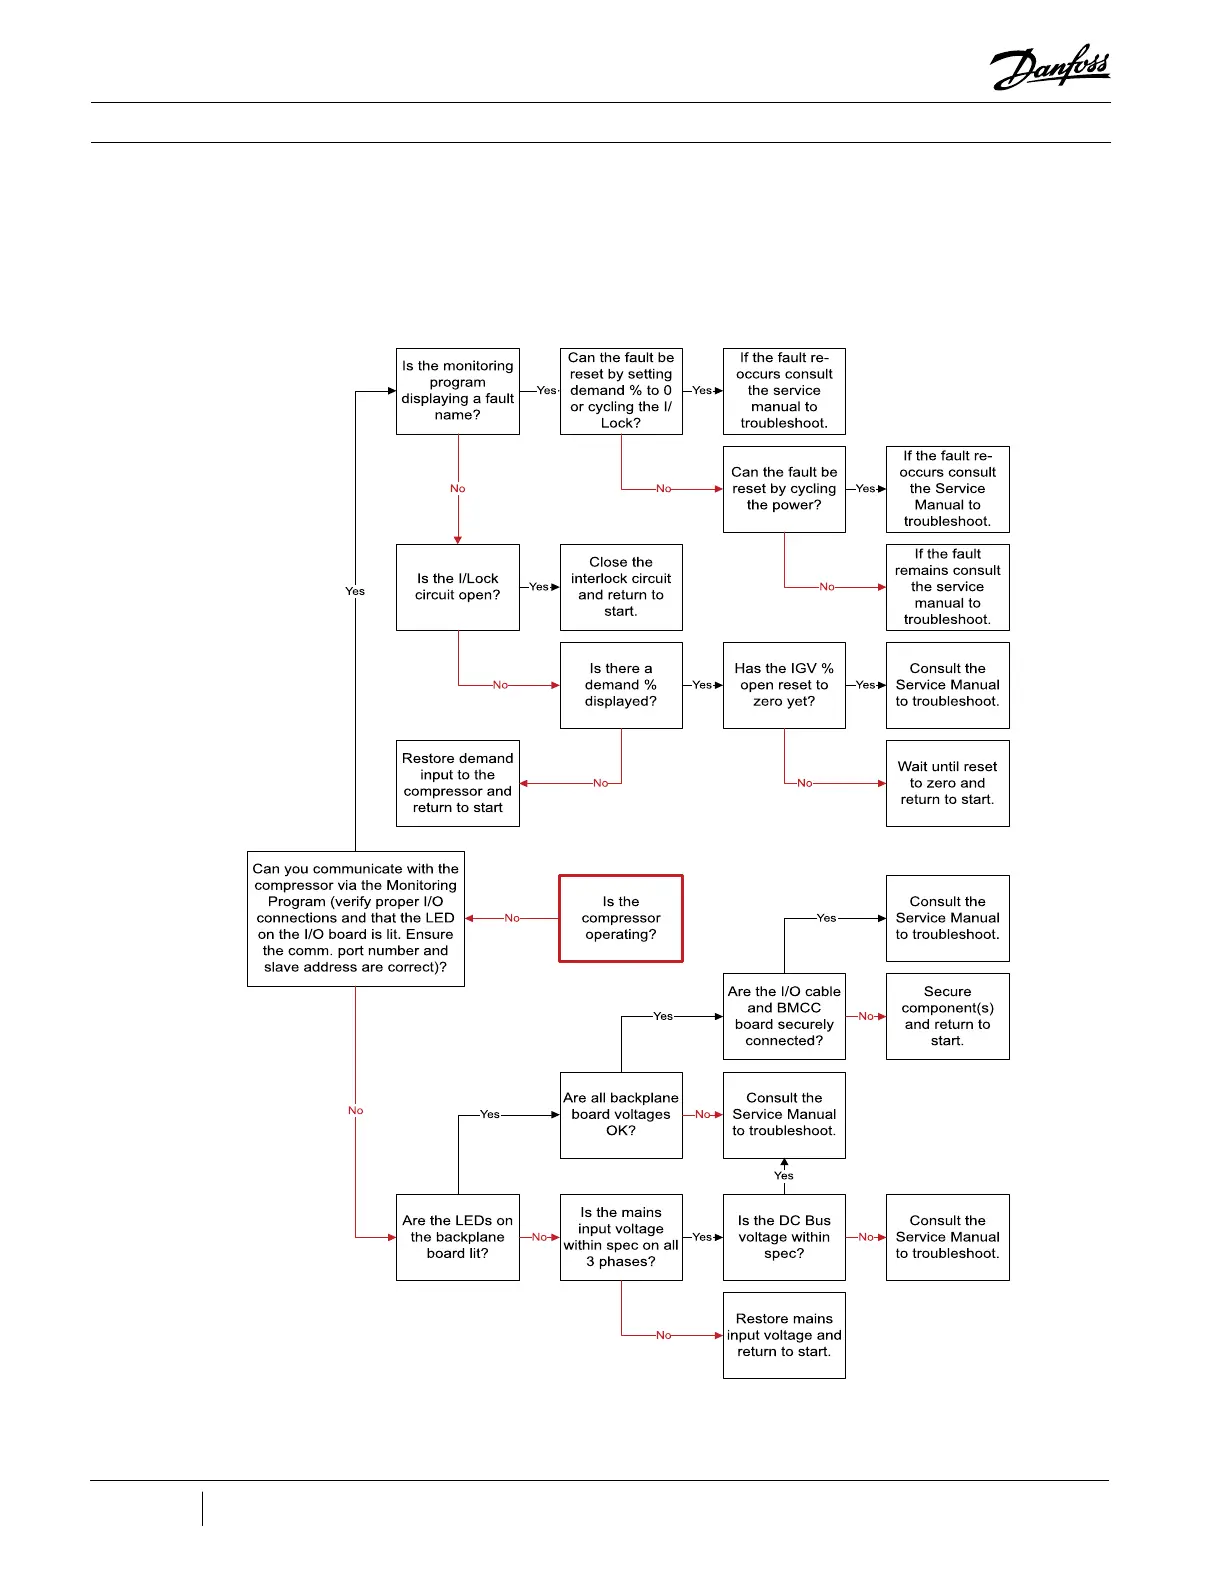
Appendix B Compressor Troubleshooting Flowcharts
124
Figure 108 - Compressor Operation Troubleshooting Flowchart
124
Figure 109 - Compressor Voltage Troubleshooting Chart 1
125
Figure 110 - Compressor Voltage Troubleshooting Chart 2
126
Appendix C Compressor Test Sheet
127
5
Based on 1 rating
Ask a question
Give review
Questions and Answers:
Need help?
Do you have a question about the Danfoss Turbocor TT300 and is the answer not in the manual?
Ask a question
Danfoss Turbocor TT300 Specifications
General
Brand
Danfoss
Model
Turbocor TT300
Category
Air Compressor
Language
English
Related product manuals
Danfoss Turbocor TT350
132 pages
Danfoss Turbocor TT-300
68 pages
Danfoss Turbocor TT Series
294 pages
Turbocor Twin-Turbine TTS Series
114 pages
Danfoss Turbocor VTT Series
165 pages
Danfoss TGS490
114 pages
Danfoss TTS350
294 pages
Danfoss TGS310
114 pages
Danfoss TGH285
114 pages
Danfoss TTS700
294 pages
Danfoss TTS300
294 pages
Danfoss TTS400
294 pages