43
Accessories
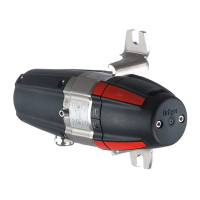
8 Position the mounting bracket onto the
gas transmitter and fix it with six screws
M5 x 10 and washers.
9 Consider the flow direction when
positioning the mounting bracket and the
splash guard (if available).
The gas inlet must point towards the flow
direction in the duct.
10 Put the gas transmitter onto the duct and
loosely attach the mounting bracket to the
duct harness with the three screws
M6 x 16, washers and nuts.
● Moisten the gasket in the duct with water
to facilitate the assembly.
● Press the gas transmitter into the gasket
up to the stop.
● Tighten the three screws.
● Then mount the gas transmitter to the
duct harness on the opposite side using
two screws M6 x 16, washers and nuts.
● Check the system for sufficient gas
tightness.
Put the gas transmitter into maintenance
mode position:
10 Loosen all five screws M6 x 16 at the
mounting bracket.
● Pull the gas transmitter out of the gasket
and rotate the gas transmitter by 90
o
.
● Tighten two screws again.
NOTICE
The flow direction in the duct and the cor-
rect orientation of the splash guard are
essential for a correct measurement.
05323886_01.eps
9
8
05423886_01.eps
10
 Loading...