4 | www.eddy.com
Reddy Overview
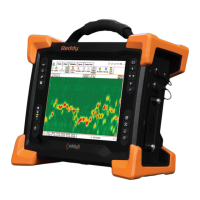
3. Wi-Fi indicator
This indicator displays the Wi-Fi status.
When the indicator is lit, the Reddy Wi-Fi
is enabled. When it is off, the Wi-Fi is
disabled.
4. Alarm indicator
This indicator is used to display user-
programmed errors. The indicator remains
unlit until it detects a predefined error
condition, at which time it lights red.
5. Save inspection data button
Press this button to save the current
inspection data according to the dened le
naming scheme on the internal SSD. See
page 15.
6. Clear active Lissajous button
Press this button to clear the currently
active Lissajous display on the screen.
7. Probe nulling button
Press this button to null the probe currently
connected to Reddy.
8. Start/Stop acquisition button
Press this button to start or stop data
acquisition.
9. Heavy-duty bumpers
The four corner bumpers provide shock
absorption and support Reddy at an angle
when it is set on a at surface. The bumpers
are also hooked for harnessing. For details
about harnessing, see page 61.
10. Multi-touch display
10.4”, non-reective, backlit, high-resolution
display.
11. Handle
Use this handle when carrying Reddy.
12. Keypad arrow mode selection button
Use this button to select the operation
mode of the keypad arrows (13).
13. Keypad arrows
Use these arrows to navigate the Magni GO
interface according to the selected mode.
14. Enter button
Unused at this time.
15. Change active view button
Press this button to activate a different view
than the one currently active.
16. Data display button
Use this button to center or best t the data
on the Reddy screen. A short press centers
data on the screen, while a long press ts
the data.
17. Maximize/Minimize view button
Use this button to maximize or minimize
the active view.
18. Change layout button
Use this button to change the Magni GO
layout to another predened layout.