64
4 Let go of your mouse button. Click and
drag your mouse again to form the height
of your lettering.
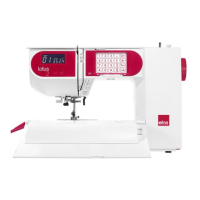
You see the Circle baseline text box.
5 In the Upper and Lower boxes, enter your
lettering.
6 Click OK.
You see the lettering appear in the design
workspace.
7 You can alter the text by shifting the
beads at the base of each letter.
If you add or remove letters, the text will
be adjusted accordingly without altering
the height of the existing letters.
Converting TrueType®
lettering to Satin stitches
For a different look, try converting your
TrueType® lettering to Satin stitches.
To convert TrueType® lettering to Satin
stitches:
1 Choose File—New to create a new file.
For more information, see "Creating New
Designs".
You see a new design window.
2 In the Lettering Toolbar, click one of the
Lettering tools: Text , Line Angle ,
or Circle .
3 Form the text baseline.
For more information, see specific
sections on how to create the Lettering
tool you want to use.
4 Complete the baseline.
The lettering appears in the design
workspace.
5 Click the Segment Settings tool on
the ribbon.
You see the Segment Settings property
pages.
If you want the upper portion of the
circle's lettering to be on the top, make
sure the line is facing upwards. Check
the status line for measurements.
You can also press Ctrl+E on your
keyboard and choose Properties from
the menu or double-click the segment to
display the Segment Settings property
pages.