ELNA XPRESSIVE II 95
User’s Guide
To add a machine command:
1 Select the segment.
2 Click the Segment Settings
tool on
the ribbon.
You see the Segment Settings property
pages.
3 Click the Commands property page.
4 In the Command list, select one of the
following commands:
• Select Trim to trim the thread.
• Select Stop to stop the machine.
• Select No Command to not add
commands.
5 Click OK.
Applying lock stitches
You can apply predefined and custom lock
stitches using the Commands property page.
You can apply lock stitches to the start and
end of segments. You can also specify the
length of start and end lock stitches or
create custom lock stitches.
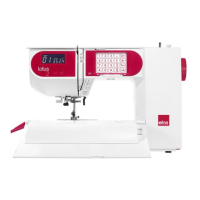
A zoomed-in view of a basic lock
stitch
To apply a lock stitch:
1 Select the segment.
2 Click the Segment Settings
tool on
the ribbon.
You see the Segment Settings property
pages.
3 Click the Commands property page.
4 In the Lock Stitch - End list, select the
type of end lock stitch you want applied to
your segment:
None
Basic
Line
5 Click OK.
The line (lock stitch type) adds 4 stitches
in a straight line. Each stitch will match
the specified lock stitch length.