FLAMIC S.R.L. 5 Via dell’Artigianato, 36035 Marano Vicentino (Vicenza) - Italy
33
Dough sheeter SF450 - SF500 - SF600 Operation and maintenance manual (translation of original instructions) – Ed. 10/2016
Rev.02 10/2017
All rights reserved. Reproduction in whole or in part of this manual is prohibited.
3.11.2 SWITCHING THE MACHINE ON AND OFF
To switch on the machine, place the power plug into a suitable electrical outlet and turn the main switch ref. 1
Figure 4 to I – ON. To switch it off, turn the main power switch ref. 1 Figure 4 to O - OFF.
3.11.3 PREPARING THE MACHINE
- Check that the wheels (if present) are locked by the brake levers (see section3.2).
- Place the benches in the horizontal work position (see section 3.6).
- Lower the guards completely (see section 3.5).
- Fill the tray ref. 5 Figure 1 with the amount of flour that is strictly necessary.
- Check that the residue collection trays have been installed and fixed in place and (only for models SF500 and
SF600) that the central residue collection tray has been properly positioned under the rolling zone (see section. 3.8)
- If necessary, remove the catch pan (see section 3.9)
- Switch on the machine (see section 3.11.2)
- Keep the rolling pin ready to wind the dough that is produced or to unwind the dough from which to obtain the dough
shapes.
3.11.4 USING THE MACHINE AS A SHEETER
1. Place the batch of dough on one of the tables. The thickness and quantity must be within the limits indicated in this
manual (section 2.6 and section. 3.11.1, point 3). Do not work the dough on the tables, either with bare hands or by
other means (e.g. beating it with a rolling pin): the benches are not designed to withstand excessive forces and/or
shocks.
The temperature of the dough to be rolled must be approximately the same as that of the working environment. The
entire batch of dough must be easily malleable. It is strictly prohibited to roll blocks of dough that are not
malleable, for example if very cold or frozen.
The manufacturer will not under any circumstances be held liable for damage caused by the failure to comply with
the instructions provided in this manual.
2. Switch on the machine (see section 3.11.2) and press the enable/start push-button ref. 2 Figure 4
3. Pass the dough between the rollers in alternate directions (section 2.4) adjusting the rolling thickness (section 2.5).
4. If you need to sprinkle flour onto the dough, take the precautions referred to in section 3.11.1, point 7 and, if
applicable, point 8.
5. Avoid handling heavy or large quantities of dough by hand that are difficult to support to avoid ergonomic
hazards and possible musculoskeletal injuries (the lower the weight to be lifted and/or the easier it is to support,
the lower the risk).
6. If a guard is raised, the machine stops. To resume processing, lower the guard, press the enable button ref. 2 Figure
4. Then activate the start and reverse controls described in section 2.4.
7. If the STOP button, ref. 3 Figure 4 is pressed, the machine stops. To resume processing, press the enable button
ref. 2 Figure 4 and then activate the start and reverse controls described in section 2.4.
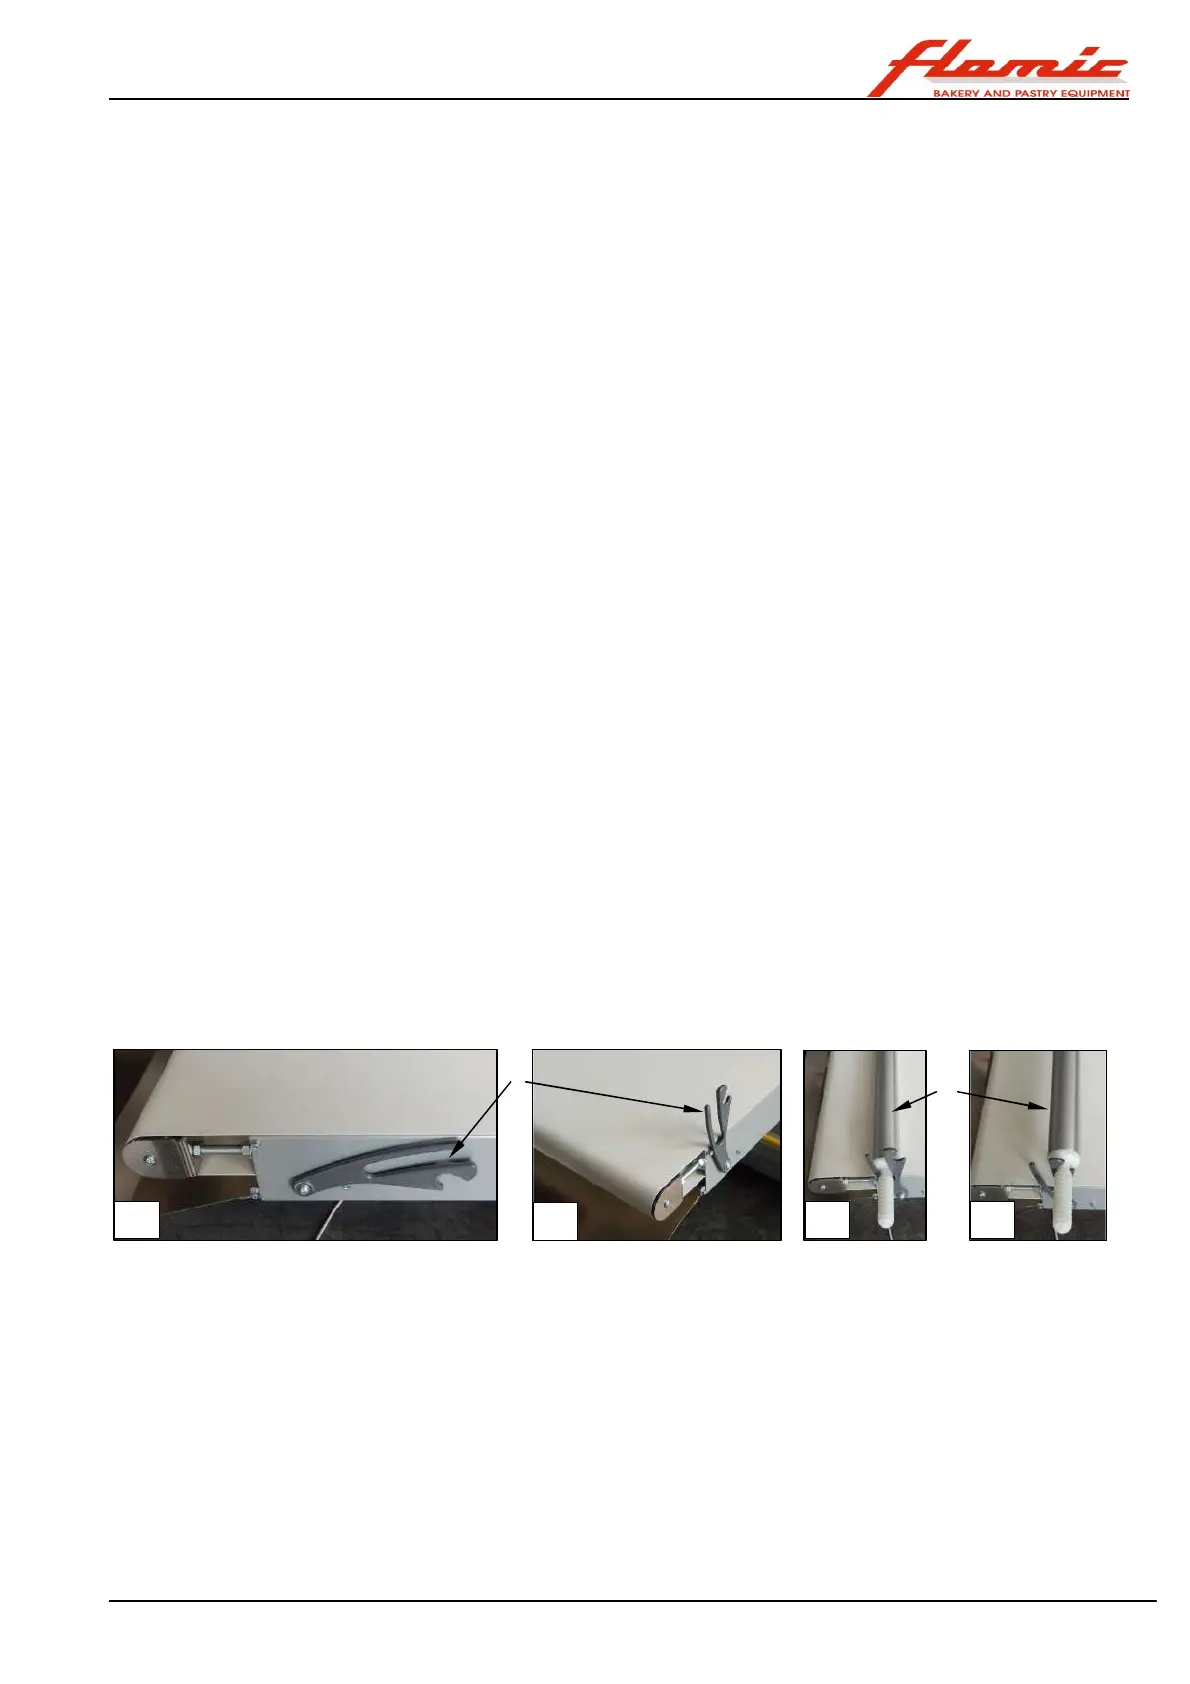
8. With reference to Figure 27, before the last pass between the rollers, raise the supports ref. 1 (photo B) of the rolling
pin ref. 2. Place a rolling pin in the deepest slot (photo C) and wrap a small section of rolled dough around it. The
rolling pin will continue to turn because of friction against the belt and wind the entire sheet of dough.
9. Once the entire sheet of dough has been wound, move the rolling pin to the upper slot (photo D) or remove it from
the machine.
10. Before restarting to roll dough, remove the rolling pins (which are either empty or full) from the machine and lower
the supports ref. 1 (photo A).
When you have finished using the machine, switch it off (turn the switch ref. 1 Figure 4 to O - OFF and clean it (section
4.10).
Figure 27 - Rolling pin and relative supports
3.11.5 USING THE MACHINE FOR PRODUCING DOUGH SHAPES FROM THE ROLLED SHEET
1. Install the cutting unit on the machine (section 3.10.1)
2. Install the cutting rollers required for the product you wish to obtain, if necessary (section 3.10.4)
3. Place the cutting unit its working position (section 3.10.1) and adjust the thicknessing rollers so that the gap between
them is greater than the thickness of the sheet of dough. The sheet of dough should not be more than 7 mm thick.
4. Place the rolling pin with the dough wrapped around it in the lowest slot of the support on the opposite bench (section
3.11.4)
5. Unroll a small amount of dough by hand
6. Start the machine so that the dough unrolls underneath the rolling pin, passes through the rollers and reaches the
cutting unit (you should obviously not reverse the direction of the belts)
7. If necessary, adjust the force that the cutting rolls exert on the bench (3.10.3)
8. Collect the pieces that are output from the cutting unit and separate them from the waste, which unless it is
contaminated can be reused to make another sheet of dough of the same type.
When you have finished using the cutting unit, remove it from the machine (section 3.10.5) and clean it (section 4.10).
1
2