© Guldmann GB-1394/11/08
48
3. InstallatIon
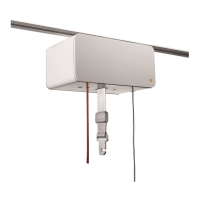
Ceiling installation, bracket assembly
Ceiling types: All types
Bracket types: Extended bracket, free length as well
as adjustable angle
• Extended bracket, pipe only.
Extended brackets, free length, are used in connection with
false ceilings.
The bracket is mainly used in rooms with high ceilings to
bring the rail system down below false ceilings to a normal
height for installation and use.
Angle-adjustable brackets are used on angled ceiling faces
when it is impossible to fit brackets straight above the rails,
for example next to ventilation pipes or other piping. In
situations where ceiling brackets and pipes are mounted
prior to the fitting of the false ceiling.
• Mark the position where the bracket is to be fitted and at
the same time measure how long the extended bracket
needs to be.
Measurements are carried out using laser equipment.
The laser is set to the height where the false ceiling is to be
installed. Then measure down at each fixing point from the
ceiling to the lower edge of the false ceiling.
• Overmeasure to allow pipes sufficient clearance under
the false ceiling.
• Then cut the pipe to size with length to spare and fit the
brackets and ceiling bracket to the pipe. When fitting
pipes to a u-clamp, drill an 8 mm (
5
/
16
") hole in the pipe
and insert an 8 mm (
5
/
16
") setscrew through the u-clamp
and the pipe and secure using a locking nut.
• The fitting of brackets in the ceiling is carried out accor-
ding to the procedure described under GH brackets. For
further information, refer to the individual type of ceiling.
• After mounting the system it may be necessary to stabi
-
lise it by fitting GH stabilising fittings as side or inclining
support.
• Fit a brackets around the pipe that hangs down, and
then measure towards the wall or ceiling.
• Cut the pipe to the right lenght, and fit it to the
”u-brackets” at the extended bracket and at the
wall/ceiling.
• Following the fitting of brackets and pipes false ceilings
can be installed. A carpenter will fit the false ceiling
around the extended pipes. It is important to inform the
carpenter that the pipes must be completely vertical.
• Following the fitting of the ceiling, mark where the pipes
need to be cut. This marking is carried out using laser
equipment. Remember to allow for the base bracket.
• Then cut the pipe to the correct length using a pipe
cutter.
• Next, fit brackets on ceiling bracket with a washer
and 10 mm (
3
/
8
") set screw; tighten with 10 mm (
3
/
8
")
lock nut.
• The bracket is then fitted to the pipe. Drill an 8 mm
(
5
/
16
") hole in the pipe and then insert an 8 mm (
5
/
16
")
setscrew through the bracket and the pipe and secure
using an 8 mm (
5
/
16
") locking nut.
• The rail is fitted to the extended bracket in the same way
as described under GH ceiling brackets.
• Use plastic rosettes around pipes against low-hanging
ceiling. These must be glued to the ceiling, e.g. with
acrylic grout.
Fitting of brackets