95 4000670450 E 04.19 USA / GB
E
- General Specifications
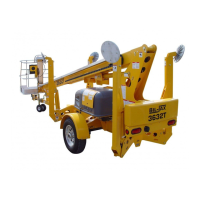
3632T - HTT13
5.2.3 - Drive and set use
5.2.3.1 - Initial Operation
Use the following procedure to operate the Drive and Set option upon arriving on site :
• Set the parking brake.
• Lower the TONGUE JACK / DOLLY WHEEL and unhitch the aerial work platform from tow
vehicle.
• Release the parking brake.
• Enter the work platform using a 3 point contact (both hands and one foot), put on a safety
harness and attach the lanyard to the ANCHORAGE (attachment point) on the side of the
platform support beam.
• Press (push) in and hold the DRIVE ENABLE ( 2 ) button on the platform (upper) control box,
move the JOYSTICK ( 1 ) in the desired direction.
• The aerial work platform will continue to move in the desired direction until the
JOYSTICK ( 1 ) or DRIVE ENABLE ( 2 ) button is released.
• Once you have reached the work location, lower the outriggers, and level the aerial work
platform using either the ground (lower) or platform (upper) control box.
N.B.-:-B
OOM FUNCTIONS ARE NOT AVAILABLE UNTIL ALL OUTRIGGERS ARE FULLY DEPLOYED AND
THE
AERIAL WORK PLATFORM IS LEVEL.
5.2.3.2 - During Operation
Utilize the Drive and Set option to advance to the next work location. Use the following
procedure to operate the Drive and Set option :
• Completely lower the platform into its "stowed" position.
• Fully retract outriggers into their "stowed" (upright) position.
N.B.-:-T
HE AERIAL WORK PLATFORM MUST BE IN ITS FULLY LOWERED "STOWED" POSITION,
BEFORE MOVING.
• Press (push) and hold the DRIVE ENABLE button on the platform (lower) control box, move
the JOYSTICK in the desired direction.
• The Aerial work platform will continue to move in the desired direction until the JOYSTICK
or DRIVE ENABLE button is released.
• To continue platform operations, lower outriggers and level the aerial work platform using
either the ground (lower) or platform (upper) control box.
N.B.-:-B
OOM FUNCTIONS ARE NOT AVAILABLE UNTIL OUTRIGGERS ARE FULLY DEPLOYED AND THE
AERIAL
WORK PLATFORM IS LEVEL.