Home
Hillstone
Control Unit
SG-6000 X-Series
Hillstone SG-6000 X-Series Reference Guide
4
of 1
of 1 rating
173 pages
Give review
Manual
Specs
To Next Page
To Next Page
To Previous Page
To Previous Page
Loading...
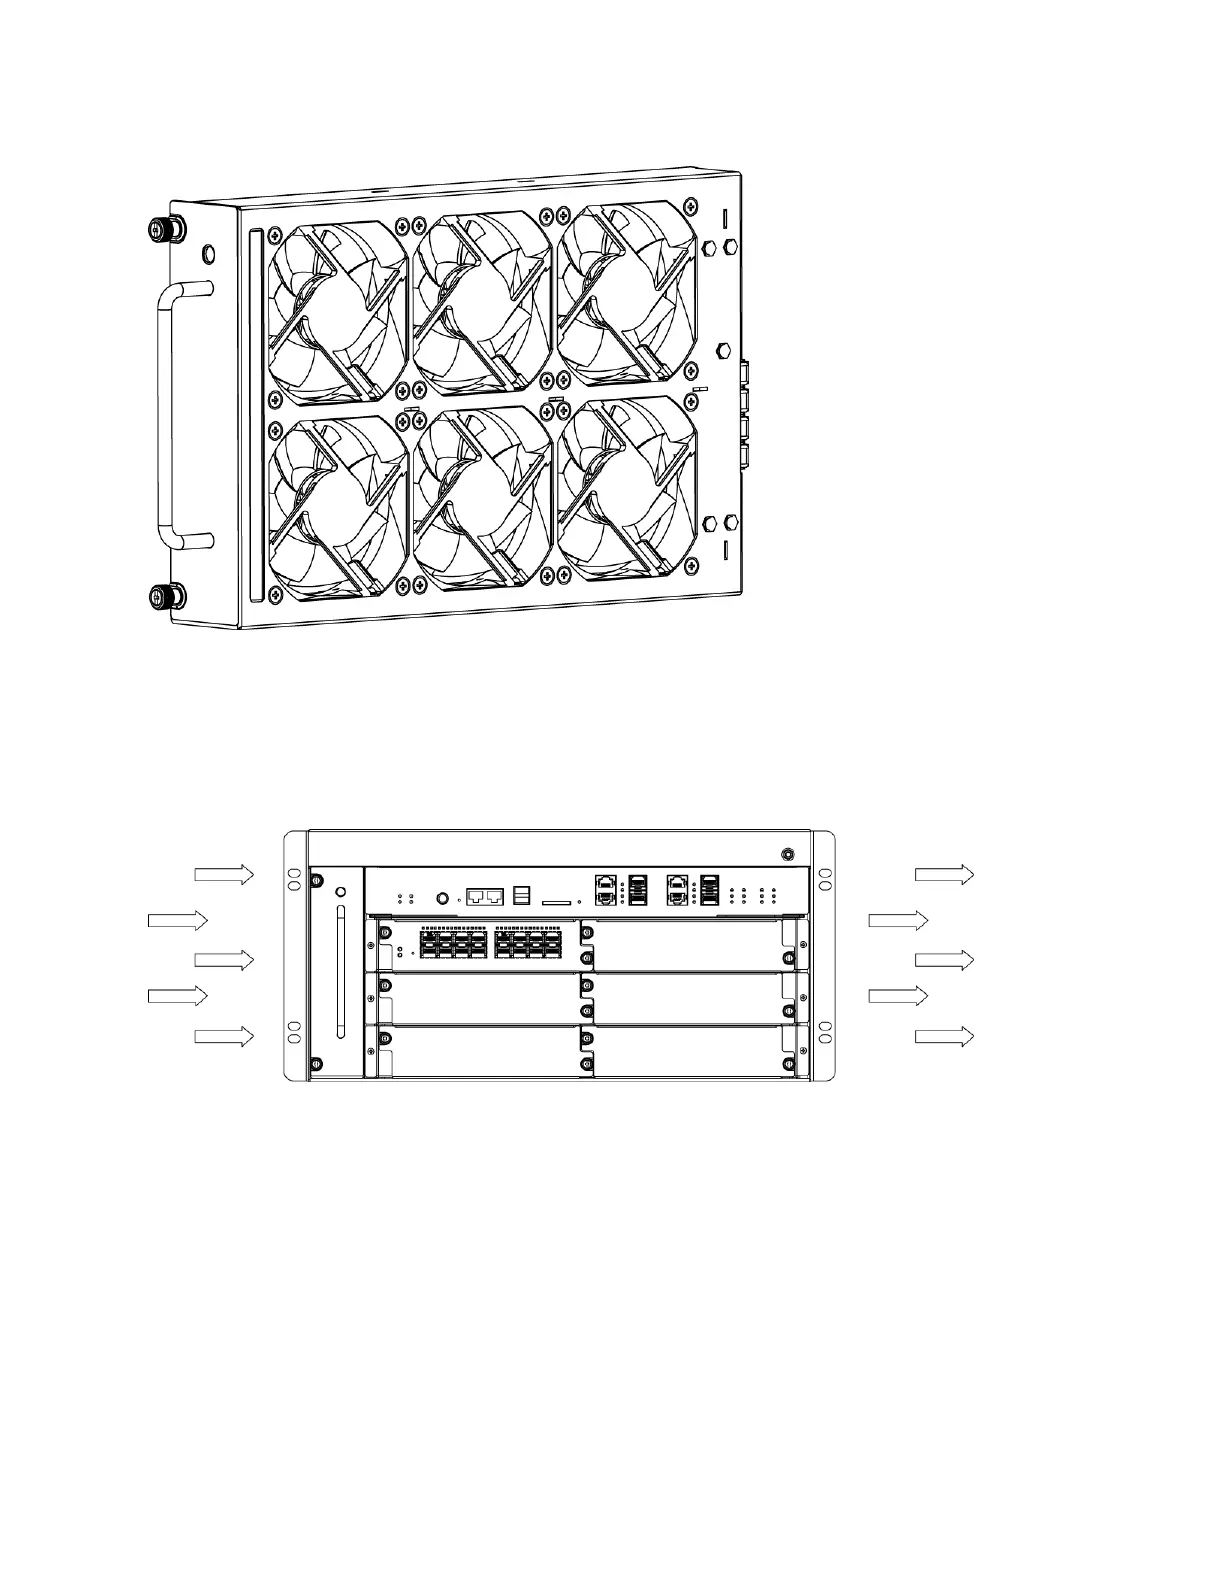
Fa
n
T
r
a
y
i
s
s
ho
w
n
a
s
bel
o
w
:
Fr
om
t
he
fr
ont
of
the
c
ha
ssi
s,
t
here
i
s
air
int
a
k
e
on
t
h
e
l
eft
si
de
of
t
h
e
de
v
ic
e.
Ai
r
i
s
pushe
d
fr
om
the
l
eft
i
n
t
a
k
e
a
nd
t
hen
goes
thro
u
g
h
the
c
ha
ssi
s
c
a
ge.
The
a
i
r
i
s
e
x
ha
us
te
d
out
t
he
ri
g
ht
of
the
chassis
.
Ai
r
Fl
ow
t
hr
ough
the
Cha
ssi
s
i
s
s
h
own
a
s
be
low
:
Chapte
r
1
Product
Prof
ile
59
70
72
Table of Contents
Default Chapter
3
Table of Contents
3
Preface
12
About this Manual
12
Document Conventions
12
Chapter 1 Product Profile
13
Contents
13
Device Chassis
13
Front Panel
17
Back Panel
20
LED Indicators
22
System Parameters
30
Overview
13
Expansion Modules
35
Scm
37
Ssm
39
Qsm
41
Iom
43
Siom
46
Swm
49
Bypass
50
Power Module
51
Instructions for Using SSM/IOM/QSM/SIOM
54
Ports
56
Console Port
56
Auxiliary Port
57
USB Port
57
Cooper Port
57
SFP Port
58
XFP Port
59
Qsfp+Port
60
SFP+ Port
62
QSFP28 Port
63
SD Card Slot
64
CLR Button
65
Cooling System
66
Chapter 2 Installation Preparations
72
Introduction
72
Installation Site Environment Requirements
72
Temperature/Humidity Requirements
72
Clearness Requirements
73
ESD Prevention
73
EMI Prevention
73
Grounding Requirements
74
Cabinet Requirements
74
Cabinet Size and Clearance Requirements
74
Cabinet Airflow Requirements
74
Rack Requirements
75
Rack Size and Strength
75
Rack Clearance Requirement
75
Rack Mounting Requirements
75
Unpacking
76
Unpacking the Package of SG-6000-X10800
76
Unpacking the Package of SG-6000-X9180/X8180/X7180/X6180/X6150
81
Other Safety Recommendations
86
Verifying the Parts Received
86
Installation Devices/Tools/Cables
86
Chapter 3 Installation
88
Overview
88
Safety Requirements
88
General Safety Warnings
89
Preventing ESD Damage
89
Fire Safety Requirements
93
Install Mounting Rail Assemblies
93
Installing the Device in a Rack
95
Tools Required
95
Before Installation
95
Installing SG-6000-X10800
96
Installing SG-6000-X9180
98
Installing SG-6000-X8180
100
Installing SG-6000-X7180
102
Installing the Device Using a Lift
102
Installing the Device Without a Lift
104
Installing Expansion Modules
105
Installing Expansion Modules of SG-6000-X10800
105
Tools Required
105
Installing an SCM/SWM
106
Installing an Ssm/Iom/Siom/Qsm/Bypass
107
Installing Expansion Modules of SG-6000-X9180
109
Installing an SCM/SWM
109
Tools Required
109
Installing an Ssm/Iom/Siom/Qsm/Bypass
110
Installing Expansion Modules of SG-6000-X8180
112
Installing an SCM
112
Tools Required
112
Installing an SIOM
113
Installing Expansion Modules of SG-6000-X7180
114
Tools Required
115
Installing an SSM
116
Installing a QSM
117
Installing an IOM
118
Installing a Bypass Module
120
Installing a Power Module
120
Tools Required
121
Installing an AC/DC Power Module of SG-6000-X10800/X9180
121
Installing an AC/DC Power Module of SG-6000-X8180
122
Installing a Power Module of SG-6000-X7180
123
Installing an AC Power Module
123
Installing a DC Power Module
124
Connecting Cables
125
Grounding the Chassis
125
Grounding the Chassis of SG-6000-X10800/X9180/X7180
125
Grounding the Chassis of SG-6000-X8180
126
Connecting the Console Cable
128
Connecting the Ethernet/Optical Cable
128
Connecting the Ethernet Copper Cable
128
Connecting the Ethernet Fiber Cable
129
Connecting an AC Power Cable
130
Connecting a DC Power Cable
131
Connecting the DC Power Cable of SG-6000-X10800/X9180
131
Connecting the DC Power Cable of SG-6000-X8180
132
Connecting the DC Power Cable of SG-6000-X7180
133
Powering On/Off the Device
133
Powering On/Off SG-6000-X10800/X9180
133
Powering On/Off SG-6000-X8180
134
Powering On/Off SG-6000-X7180
134
Verification after Installation
135
Chapter 4 Boot and Configuration
136
Introduction
136
Establishing a Configuration Environment
136
Console (CON) Connection
136
Webui
138
Telnet or SSH
138
Basic Configuration
138
Chapter 5 Hardware Maintenance and Replacement
140
Overview
140
General Maintenance
140
Tools Required
140
Replacing a Power Module
141
Replacing an AC Power Module
141
Replacing a DC Power Module
142
Replacing an Expansion Module
142
Replacing an Expansion Module of SG-6000-X10800
142
Replacing an SCM/SWM
142
Replacing an Ssm/Iom/Siom/Qsm/Bypass
143
Replacing an Expansion Module of SG-6000-X9180
145
Replacing an SCM/SWM
145
Replacing an Ssm/Iom/Siom/Qsm/Bypass
146
Replacing an Expansion Module of SG-6000-X8180
147
Replacing an SCM
147
Replacing an SIOM
148
Replacing an Expansion Module of SG-6000-X7180
149
Replacing an SCM
149
Replacing an SSM
149
Replacing a QSM
150
Replacing an IOM
151
Replacing a Bypass Module
152
Replacing the Cooling System Components
153
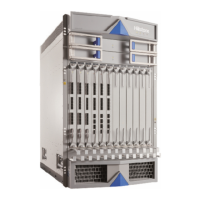
Replacing a Fan Tray
154
Replacing a Fan Tray of SG-6000-X10800
154
Replacing a Fan Tray of SG-6000-X9180
155
Replacing a Fan Tray on the Front Panel
155
Replacing a Fan Tray on the Back Panel
157
Replacing a Fan Tray of SG-6000-X8180
158
Replacing a Fan Tray of SG-6000-X7180
159
Replacing a Dustproof Net
160
Replacing a Dustproof Net of SG-6000-X10800
160
Replacing a Dustproof Net of SG-6000-X9180
163
Replacing a Dustproof Net of the Plastic Panel
163
Replacing a Dustproof Net of the Fan Tray
164
Replacing an Air Filter of SG-6000-X7180
165
Chapter 6 Troubleshooting
167
Introduction
167
Losing the Administrator Password
167
Troubleshooting Expansion Modules
167
Troubleshooting the Cooling System
168
Troubleshooting the Power System
168
Other manuals for Hillstone SG-6000 X-Series
Hardware Reference Guide
233 pages
4
Based on 1 rating
Ask a question
Give review
Questions and Answers:
Need help?
Do you have a question about the Hillstone SG-6000 X-Series and is the answer not in the manual?
Ask a question
Hillstone SG-6000 X-Series Specifications
General
Brand
Hillstone
Model
SG-6000 X-Series
Category
Control Unit
Language
English
 Loading...