Home
HP
Printer Accessories
LaserJet Enterprise 700
Page 103 (Print tasks (Mac OS X))
HP LaserJet Enterprise 700 - Print tasks (Mac OS X)
320 pages
Manual
To Next Page
To Next Page
To Previous Page
To Previous Page
Loading...
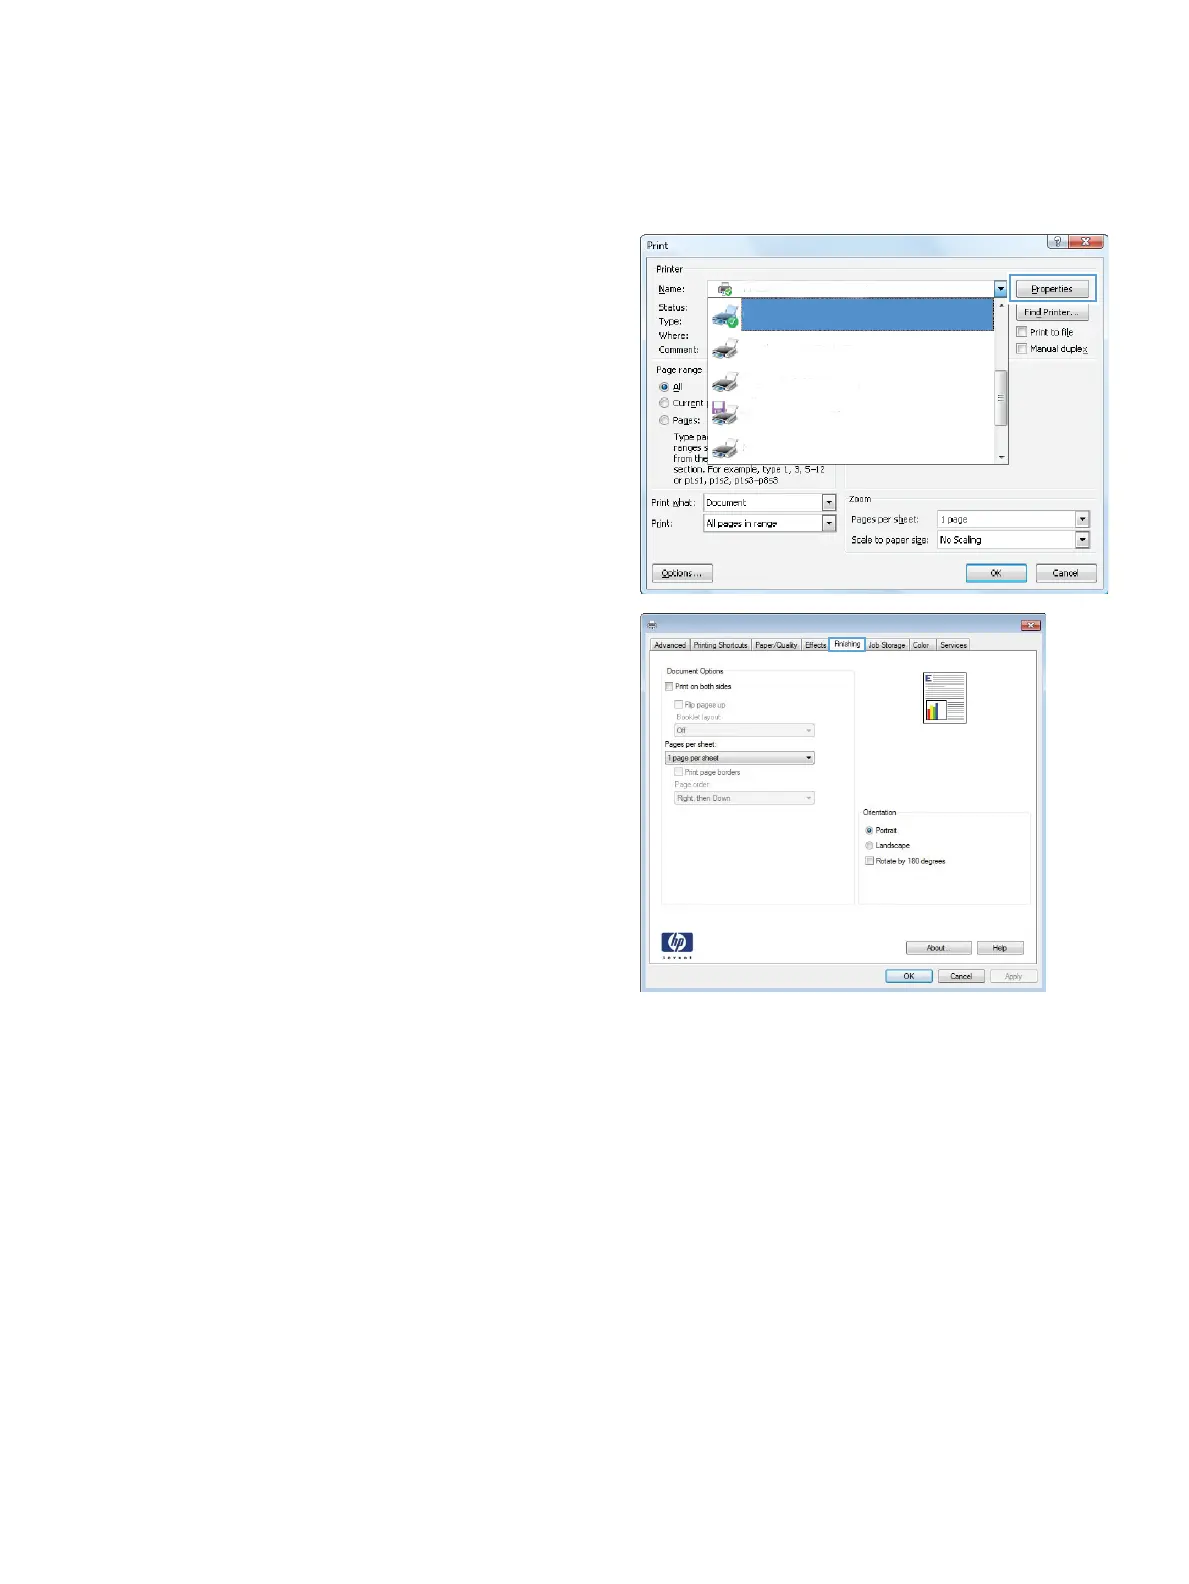
Select the page orientation (Windows
)
1.
From the so
ftware pr
ogram, sel
ect the
Print
option.
2.
Select the pr
oduct, and then click the
Properties
or
Preferences
butt
on.
3.
Click the
Finishing
tab.
ENWW
Print tasks (Windo
ws)
89
102
104
Table of Contents
Main Page
Product introduction
15
Product comparison
16
Product views
18
Product front view
18
Product back view
20
Product input options
21
Interface ports
22
Serial number and model number location
23
Control panel
24
Control-panel layout
24
Control-panel Home screen
24
Control-panel cleaning
26
Control-panel help
26
Product reports
28
Connect the product and install software
31
Connect the product to a computer by using a USB cable and install the software (Windows)
32
Connect the product to a network by using a network cable and install the software (Windows)
33
Configure the IP address
33
Install the software
34
Connect the product to a computer by using a USB cable and install the software (Mac OS X)
35
Connect the product to a network by using a network cable and install the software (Mac OS X)
36
Configure the IP address
36
Install the software
37
Input trays and output bins
39
Supported paper sizes
40
Supported paper types
44
Configure trays
46
Configure a tray when loading paper
46
Configure a tray to match print job settings
46
Configure a tray by using the control panel
46
Alternative letterhead mode
47
Tray 1
48
Tray capacity and paper orientation
48
Load Tray 1
50
Automatic paper sensing (auto-sense mode)
51
Auto-sense settings
51
Tray 2
53
Tray capacity and paper orientation
53
Load Tray 2
55
Automatic paper sensing (auto-sense mode)
56
Auto-sense settings
56
500-sheet trays
58
Tray capacity and paper orientation
58
Load the 500-sheet trays
60
Automatic paper sensing (auto-sense mode)
61
Auto-sense settings
61
3,500-sheet high-capacity tray
63
3,500-sheet high-capacity input capacity and paper orientation
63
Load the 3,500-sheet high-capacity tray
63
Standard output bin
65
Stapler/stacker (z and z+ models only)
65
Parts, supplies, and accessories
67
Order parts, accessories, and supplies
68
HP policy on non-HP supplies
69
HP anticounterfeit Web site
70
Print when a toner cartridge is at estimated end of life
71
Enable or disable the Very Low Settings options from the control panel
72
Customer self-repair parts
73
Accessories
76
Toner cartridges
77
Toner cartridge view
77
Toner cartridge information
78
Recycle toner cartridges
78
Toner-cartridge storage
78
HP policy on non-HP toner cartridges
78
Replace the toner cartridges
79
Toner collection unit
82
Replace the toner collection unit
82
Staples (stapling models only)
85
Load staples
85
Print
87
Supported print drivers (Windows)
88
HP Universal Print Driver (UPD)
88
UPD installation modes
89
Change print-job settings (Windows)
90
Change the settings for all print jobs until the software program is closed
90
Change the default settings for all print jobs
90
Change the product configuration settings
90
Change print-job settings (Mac OS X)
91
Change the settings for all print jobs until the software program is closed
91
Change the default settings for all print jobs
91
Change the product configuration settings
91
Print tasks (Windows)
92
Use a printing shortcut (Windows)
92
Create printing shortcuts (Windows)
94
Automatically print on both sides (Windows)
97
Manually print on both sides (Windows)
99
Print multiple pages per sheet (Windows)
101
Select the page orientation (Windows)
103
Select the paper type (Windows)
105
Print the first or last page on different paper (Windows)
108
Scale a document to fit page size (Windows)
111
Create a booklet (Windows)
113
Select staple options (Windows)
115
Print tasks (Mac OS X)
117
Use a printing preset (Mac OS X)
117
Create a printing preset (Mac OS X)
117
Automatically print on both sides (Mac OS X)
117
Manually print on both sides (Mac OS X)
117
Print multiple pages per sheet (Mac OS X)
118
Select the page orientation (Mac OS X)
118
Select the paper type (Mac OS X)
118
Print a cover page (Mac OS X)
118
Scale a document to fit page size (Mac OS X)
119
Create a booklet (Mac OS X)
119
Select staple options (Mac OS X)
119
Additional print tasks (Windows)
120
Cancel a print job (Windows)
120
Select the paper size (Windows)
120
Select a custom paper size (Windows)
120
Print watermarks (Windows)
121
Additional print tasks (Mac OS X)
122
Cancel a print job (Mac OS X)
122
Select the paper size (Mac OS X)
122
Select a custom paper size (Mac OS X)
122
Print watermarks (Mac OS X)
122
Color printing
124
Use the HP EasyColor option
124
Change the color options (Windows)
124
Change the color theme for a print job (Windows)
125
Change the color options (Mac OS X)
125
Manual color options
126
Match colors
126
Sample book color matching
127
Print color samples
127
PANTONE® color matching
127
Store print jobs on the product
128
Create a stored job (Windows)
128
Create a stored job (Mac OS X)
130
Print a stored job
131
Delete a stored job
131
Add a job-separator page (Windows)
132
Use HP ePrint
133
Use the HP ePrint software
134
Use Apple AirPrint
135
Connect the product to AirPrint
135
Find the product AirPrint name
135
Print from AirPrint
135
Change the AirPrint product name
136
Solve AirPrint problems
136
Use HP Smart Print (Windows)
137
Use easy-access USB printing
138
Print easy-access USB documents
138
Copy
141
Set new default copy settings
142
Make a single copy
143
Make multiple copies
144
Copy a multiple-page original
146
Collate a copy job
148
Staple a copy job
150
Copy on both sides (duplex)
151
Copy on both sides automatically
151
Copy on both sides manually
152
Reduce or enlarge a copy image
154
Make color copies or black and white copies
156
Optimize copy quality for text or pictures
157
Adjust the copy lightness/darkness
158
Set the paper size and type for copying on special paper
160
Use Job Build mode
161
Copy a book
162
Copy a photo
164
Scan/send
167
Set up scan/send features
168
Change default scan/send settings from the product control panel
169
Send a scanned document to a network folder
171
Send a scanned document to a folder in the product memory
174
Send a scanned document to a USB flash drive
175
Scan and save the document
175
Send a scanned document to one or more email addresses
178
Use the address book to send email
181
Add contacts to the address book from the product control panel
181
Send a document to email by using the address book
183
Scan a photo
186
Fax
189
Configure required fax settings
190
Fax Setup Wizard
190
Set or verify the date and time
191
Set or verify the date/time format
191
Configure fax dialing settings
192
Configure general fax send settings
193
Configure fax billing codes
194
Configure default options for fax send jobs
195
Configure fax receive settings
196
Use a fax printing schedule
197
Block incoming faxes
198
Create a blocked-fax list
198
Delete numbers from the blocked-fax list
198
Configure default options for fax receive jobs
199
Fax archiving and forwarding
200
Enable fax archiving
200
Enable fax forwarding
200
Create a speed dial list
201
Add a number to an existing speed dial list
204
Delete a speed dial list
205
Delete a single number from a speed dial list
206
Send a fax by entering numbers manually
207
Send a fax by using a speed dial
209
Search a speed-dial list by name
211
Send a fax by using fax address book numbers
212
Search the fax address book
214
Cancel a fax
215
Fax reports
216
Fax activity log
216
Billing code report
217
Blocked fax list report
217
Speed dial list report
217
Fax call report
217
Manage the product
219
Configure IP network settings
220
Printer sharing disclaimer
220
View or change network settings
220
Manually configure IPv4 TCP/IP parameters from the control panel
220
Manually configure IPv6 TCP/IP parameters from the control panel
220
HP Embedded Web Server
222
Open the HP Embedded Web Server
222
HP Embedded Web Server features
223
Information tab
223
General tab
223
Copy/Print tab
224
Scan/Digital Send tab
224
Fax tab
225
Troubleshooting tab
226
Security tab
226
HP Web Services tab
227
Networking tab
227
Other Links list
227
HP Utility (Mac OS X)
228
Open HP Utility
228
HP Utility features
228
Use HP Web Jetadmin software
230
Economy settings
231
Optimize speed or energy use
231
Set sleep mode
231
Set the sleep schedule
231
Product security features
233
Security statements
233
IP Security
233
Sign in to the product
233
Assign a system password
233
Encryption support: HP High-Performance Secure Hard Disks
233
Lock the formatter cage
234
Upgrade the product firmware
235
Solve problems
237
Solve problems checklist
238
Factors that affect product performance
240
Restore factory-set defaults
241
Control-panel help
242
Paper feeds incorrectly or becomes jammed
243
The product does not pick up paper
243
The product picks up multiple sheets of paper
243
The document feeder jams, skews, or picks up multiple sheets of paper
243
Prevent paper jams
244
Clear jams
245
Jam locations
245
Auto-navigation for clearing jams
245
Clear jams in the document feeder
246
Clear jams in the output bin area
248
Clear staple jams
248
Clear jams in the stapler/stacker
251
Clear jams in the right door
253
Clear jams in Tray 1
255
Clear jams in Tray 2
257
Clear jams in the 1 x 500-sheet feeder or the 1 x 500-sheet feeder with cabinet
258
Clear jams in the 3 x 500-sheet feeder
260
Clear jams in the 3,500-sheet high-capacity tray
262
Change jam recovery
266
Improve print quality
267
Print from a different software program
267
Set the paper-type setting for the print job
267
Check the paper type setting (Windows)
267
Check the paper type setting (Mac OS X)
267
Check the toner-cartridge status
268
Calibrate the product to align the colors
268
Print a cleaning page
268
Internal print-quality-test pages
269
Visually inspect the toner cartridge
269
Check paper and the printing environment
270
Use paper that meets HP specifications
270
Check the environment
270
Adjust color settings (Windows)
270
Try a different print driver
271
Set the individual tray alignment
272
Improve copy quality
274
Check the scanner glass for dirt or smudges
274
Calibrate the scanner
276
Check the paper settings
276
Check the paper size and type configuration
276
Select the tray to use for the copy
276
Check the image-adjustment settings
276
Optimize copy quality for text or pictures
276
Edge-to-edge copying
277
Clean the pickup rollers and separation pad in the document feeder
277
Improve scan quality
279
Check the scanner glass for dirt or smudges
279
Check the resolution settings
280
Check the color settings
281
Check the image-adjustment settings
281
Optimize scan quality for text or pictures
281
Check the output-quality settings
282
Clean the pickup rollers and separation pad in the document feeder
282
Improve fax quality
284
Check the scanner glass for dirt or smudges
284
Check the send-fax resolution settings
285
Check the image-adjustment settings
286
Optimize fax quality for text or pictures
286
Check the error-correction settings
286
Send to a different fax machine
287
Clean the pickup rollers and separation pad in the document feeder
287
Check the fit-to-page setting
288
Check the sender's fax machine
289
The product does not print or it prints slowly
290
The product does not print
290
The product prints slowly
290
Solve easy-access USB printing problems
291
The Retrieve from USB menu does not open when you insert the USB flash drive
291
The file does not print from the USB flash drive
291
The file that you want to print is not listed in the Retrieve from USB menu
292
Solve USB connection problems
293
Solve wired network problems
294
The product has a poor physical connection
294
The computer is using the incorrect IP address for the product
294
The computer is unable to communicate with the product
294
The product is using incorrect link and duplex settings for the network
295
New software programs might be causing compatibility problems
295
The computer or workstation might be set up incorrectly
295
The product is disabled, or other network settings are incorrect
295
Solve fax problems
296
Checklist for solving fax problems
296
What type of phone line are you using?
296
Are you using a surge-protection device?
296
Are you using a phone company voice-messaging service or an answering machine?
296
Does your phone line have a call-waiting feature?
297
Check fax accessory status
298
General fax problems
299
Use Fax over VoIP networks
300
Problems with receiving faxes
301
Problems with sending faxes
303
Fax error codes
305
Fax error messages on the product control panel
305
Send-fax messages
306
Receive-fax messages
307
Service settings
308
Settings in the Troubleshooting menu
308
Solve product software problems (Windows)
309
A print driver for the product is not visible in the Printer folder
309
An error message was displayed during the software installation
309
The product is in Ready mode, but nothing prints
309
Solve product software problems (Mac OS X)
311
The product name does not appear in the product list in the Print & Fax or the Print & Scan list
311
A print job was not sent to the product that you wanted
311
When connected with a USB cable, the product does not appear in the Print & Fax or the Print & Scan ...
311
Remove software (Windows)
312
Remove the print driver (Mac OS X)
313
Index
315
Other manuals for HP LaserJet Enterprise 700
Install Guide
20 pages
Warranty And Legal Guide
40 pages
Installation Guide
12 pages
Related product manuals
HP LaserJet Enterprise 600
12 pages
HP LaserJet Enterprise M4555
376 pages
HP LaserJet 4100
278 pages
HP LASERJET 2600
14 pages
HP LaserJet P4015
64 pages
HP LaserJet CF064A
20 pages
HP Color laserjet 5500
219 pages
HP LaserJet P3005 Series
218 pages
HP Color LaserJet CP2025
12 pages
LaserJet M4345 - Multifunction Printer
296 pages