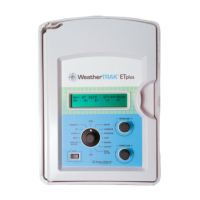
Setting Up Your WeatherTRAK ET plus
Chapter 2: Setting Up Your
WeatherTRAK ET plus
Now that you have installed your WeatherTRAK ET plus controller
and are familiar with the way to make changes to the settings, it’s
time to set up the controller.
This chapter explains:
• Setting the Irrigation Start Time,
• Setting the Water Window,
• Setting the High ET Start,
• Setting the Clock,
• Setting the Time Zone,
• Setting Auto Daylight Savings,
• Setting the Maximum Active Stations,
• Viewing the Serial Number,
• Viewing the Phase Integrity,
• Locking on a Phase,
• Displaying the Microzone,
• Displaying the WT Version,
• Setting the Stacking Option,
• Setting the Water District Number,
• Setting the Radio Antenna and
• Activating WeatherTRAK ET plus.
After you are finished with the basic set-up and have completed the
Installation and Program Settings worksheet, please call HydroPoint
Customer Service to activate your WeatherTRAK ET plus.
To start, turn the Function Selector knob to SETUP.
Chapter 2
2
13