Estimated Charging and Continuous
Operating Times
o
Charging time
BN-VC296G (accessory)
:
Approx. 5 hours
*
When the [POWER ON/OFF] switch is set to “OFF”
Memo :
0
If
you charge the battery immediately after using
while the battery is still warm, it may not be fully
charged.
0
It is recommended that you charge the battery
in an environment between 10 °C and 30 °C
(50 °F and 86 °F). The battery may not be fully
charged or the charging time may be prolonged
if charged under low temperatures (below 10 °C/
50 °F). In addition, charging the battery under
high temperature (above 30 °C/86 °F) condition
may shorten the battery life.
o
Continuous operating time
BN-VC296G (accessory)
:
Approx. 2 hrs 40 mins
(*1)
Approx. 2 hrs 50 mins
(*2)
*1
When [System] is set to “4K” and all other
settings are in factory default
*2 When [System] is set to “HD” and all other
settings are in factory default
Memo :
0
Actual
operating times may differ depending on
the age of the battery, charging condition, and
operating environment.
0
Operating time is shortened in cold
environment.
0
The operating time may shorten when power
zoom is used, accessories are connected, or
when the LCD monitor is frequently used.
0
For purchase of spare batteries and battery
charger, please contact the local dealers in your
area.
Precautions for Batteries
0
Store the battery in a cool and dry place when
not in use. Do not expose the battery to high
temperatures (such as in a car under direct
sunlight). Failure to do so not only shortens the
battery life but also damages the battery.
0
If the operating time shortens drastically even
after charging, the battery may be reaching the
end of its life. Replace the battery with a new
one.
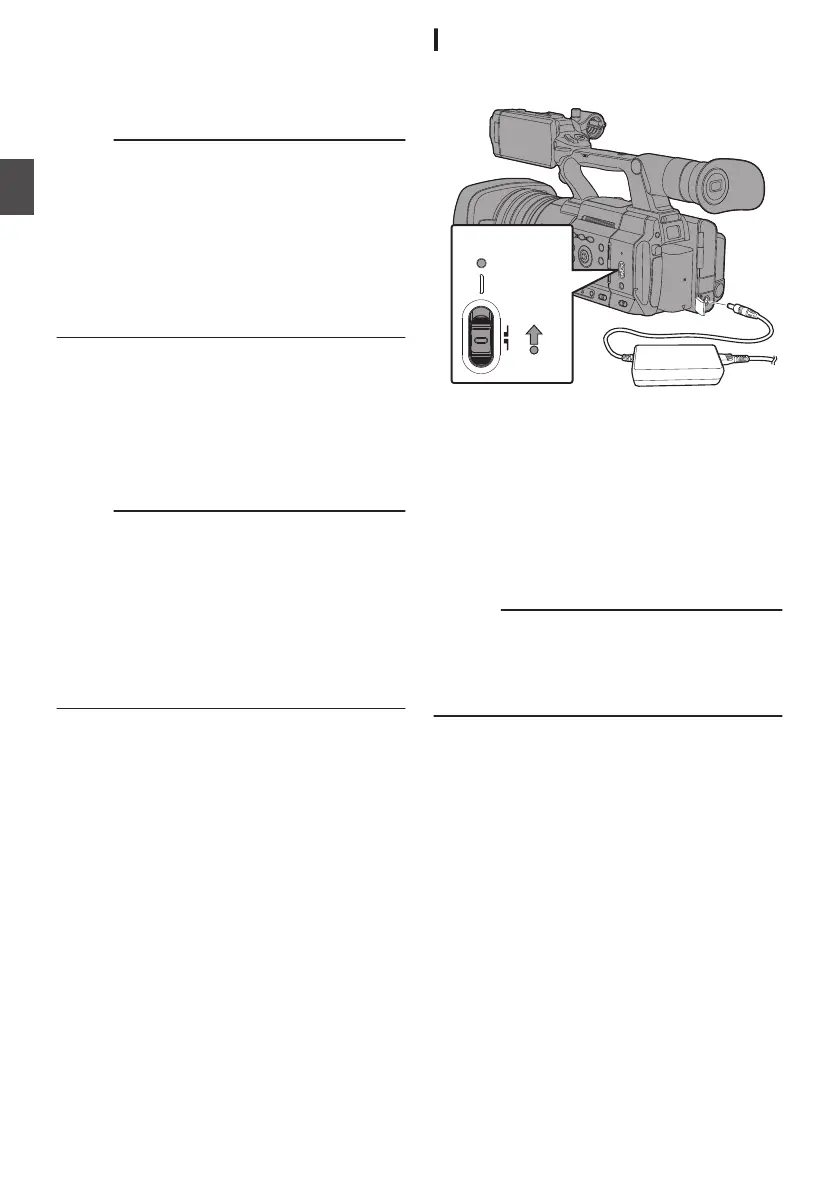
Using AC Power (DC IN Power)
Use the supplied AC adapter to operate the camera
recorder with AC power.
.
1
Connect the DC cable of the AC adapter to
the [DC]
terminal of the camera recorder.
0
Check that the power switch of the camera
recorder is set to “OFF
”.
0
Open the cover of the [DC] terminal and
connect as shown in the diagram.
2
Hold down the lock button (blue) at the
center of the [POWER ON/OFF] switch to set
to “ON”.
Power will be supplied to the camera recorder.
Caution :
0
Do not insert or remove the DC cable during
recording.
0
Do not use power supply of high voltage
fluctuation, containing noise such as ripple, or
with insufficient capacity.
Charging the Built-In Battery
0
The date/time and time code data are stored
using the built-in rechargeable battery.
0
When power is connected to the camera
recorder, the built-in battery always gets
charged. When the power is disconnected, the
battery gradually discharges.
0
The battery will be totally discharged if left
unused
for 3 months and the date/time and time
code data will be reset. When this happens, set
the [POWER ON/OFF] switch to “ON” to display
the [Initial Setting] screen, then set the date/
time.
(A P39 [Initial Settings] )
36
Power Supply
Preparations
 Loading...