Operation–Setting mode
27
5
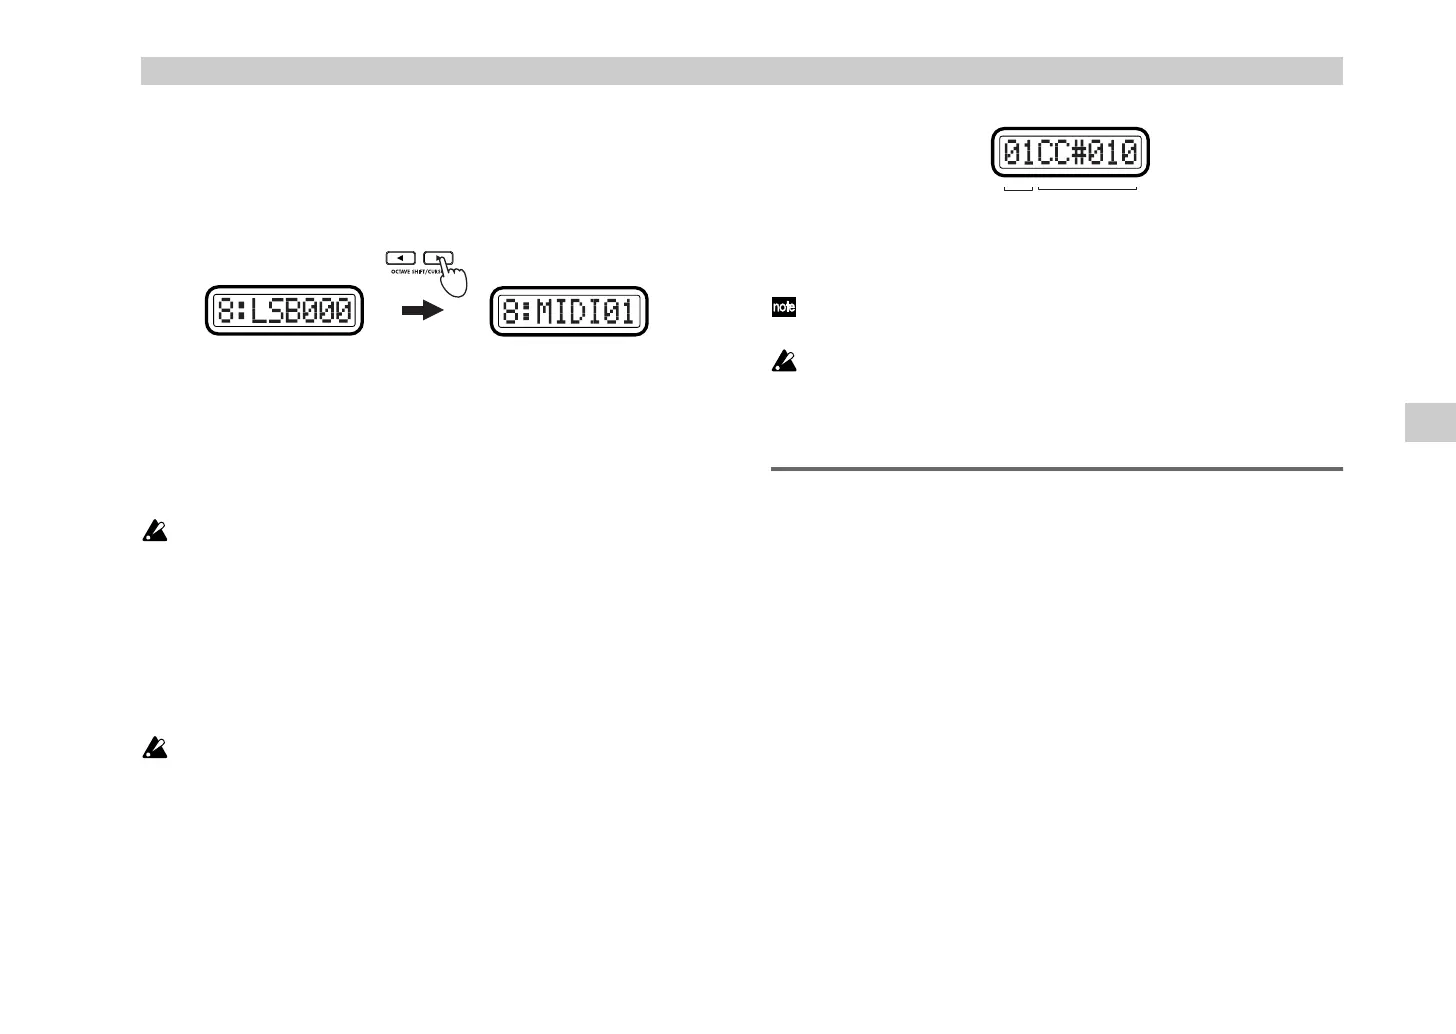
Use the [VALUE] dial or the pads to input the “LSB” value. The range
is
0–127
. “LSB” stands for “Least Significant Byte.”
6
Press the OCTAVE SHIFT/CURSOR [
®
] key to proceed to “MIDI
Channel.”
7
Use the [VALUE] dial or the pads to select the MIDI channel on which
the assigned MIDI message will be transmitted. The range is
1–16 (ch)
.
(
☞
p.4 “About the trigger pad functions–Input numerical values”)
8
Press the [ENTER] key.
The setting will be updated, and you will return to Play mode.
If you assign NRPN or RPN, you will not be able to specify the name
(“Name”). (You can specify a name only if you assign a control change.)
The sub-display will show “RPN Enc (number);” for instance, if the
RPN is assigned to encoder 1, it will show “RPN Enc1.”
Quick-assign for control changes
In Play mode, there’s a shortcut for assigning a new control change message
to an encoder. This method is valid only for an encoder which is already
assigned to a control change message.
You cannot use this method for an encoder to which you have assigned
NRPN or RPN.
1
In Play mode, hold down the [SETTING] key and turn the desired
encoder to select a new control change message.
The sub-display will show the new assignment for the encoder.
2
The new control change assignment will be updated when you release
the [SETTING] key or operate a different controller.
The MIDI channel will still be set to the “MIDI Channel” specified in the
Encoder assignment page.
If you want to keep the new assignments, you must save them in Scene
mode. If you turn off the power or select a different scene without
saving, your changes will be lost. For details, see “Scene mode - [16]
WRITE” (
☞
p.54).
[2] SLIDER (Slider assignment)
In the Slider assignment page, you can assign MIDI messages to sliders and
specify the MIDI channel on which the messages will be transmitted, etc.
You can assign a control change (CC#), RPN, or NRPN message to each
slider.
1
Hold down the [SETTING] key and press pad [2].
The [SETTING] key and pad [2] will light, and you will be in the Slider
assignment page. The main display indicates “Slider Select” (select the
slider to assign). The messages you can assign to a slider and the
assignment procedure are the same as for an encoder. For details, refer
to “Encoder assignment” (
☞
p.25).
You can use the Quick Assign procedure for sliders as well. For details,
refer to “Quick-assign for control changes” in “Encoder assignment.”
(Green)(Green)
MIDI channel Control change no.
Setting mode
%* !"