10
a: 9.5 2 mm a: 5.5 2 mm
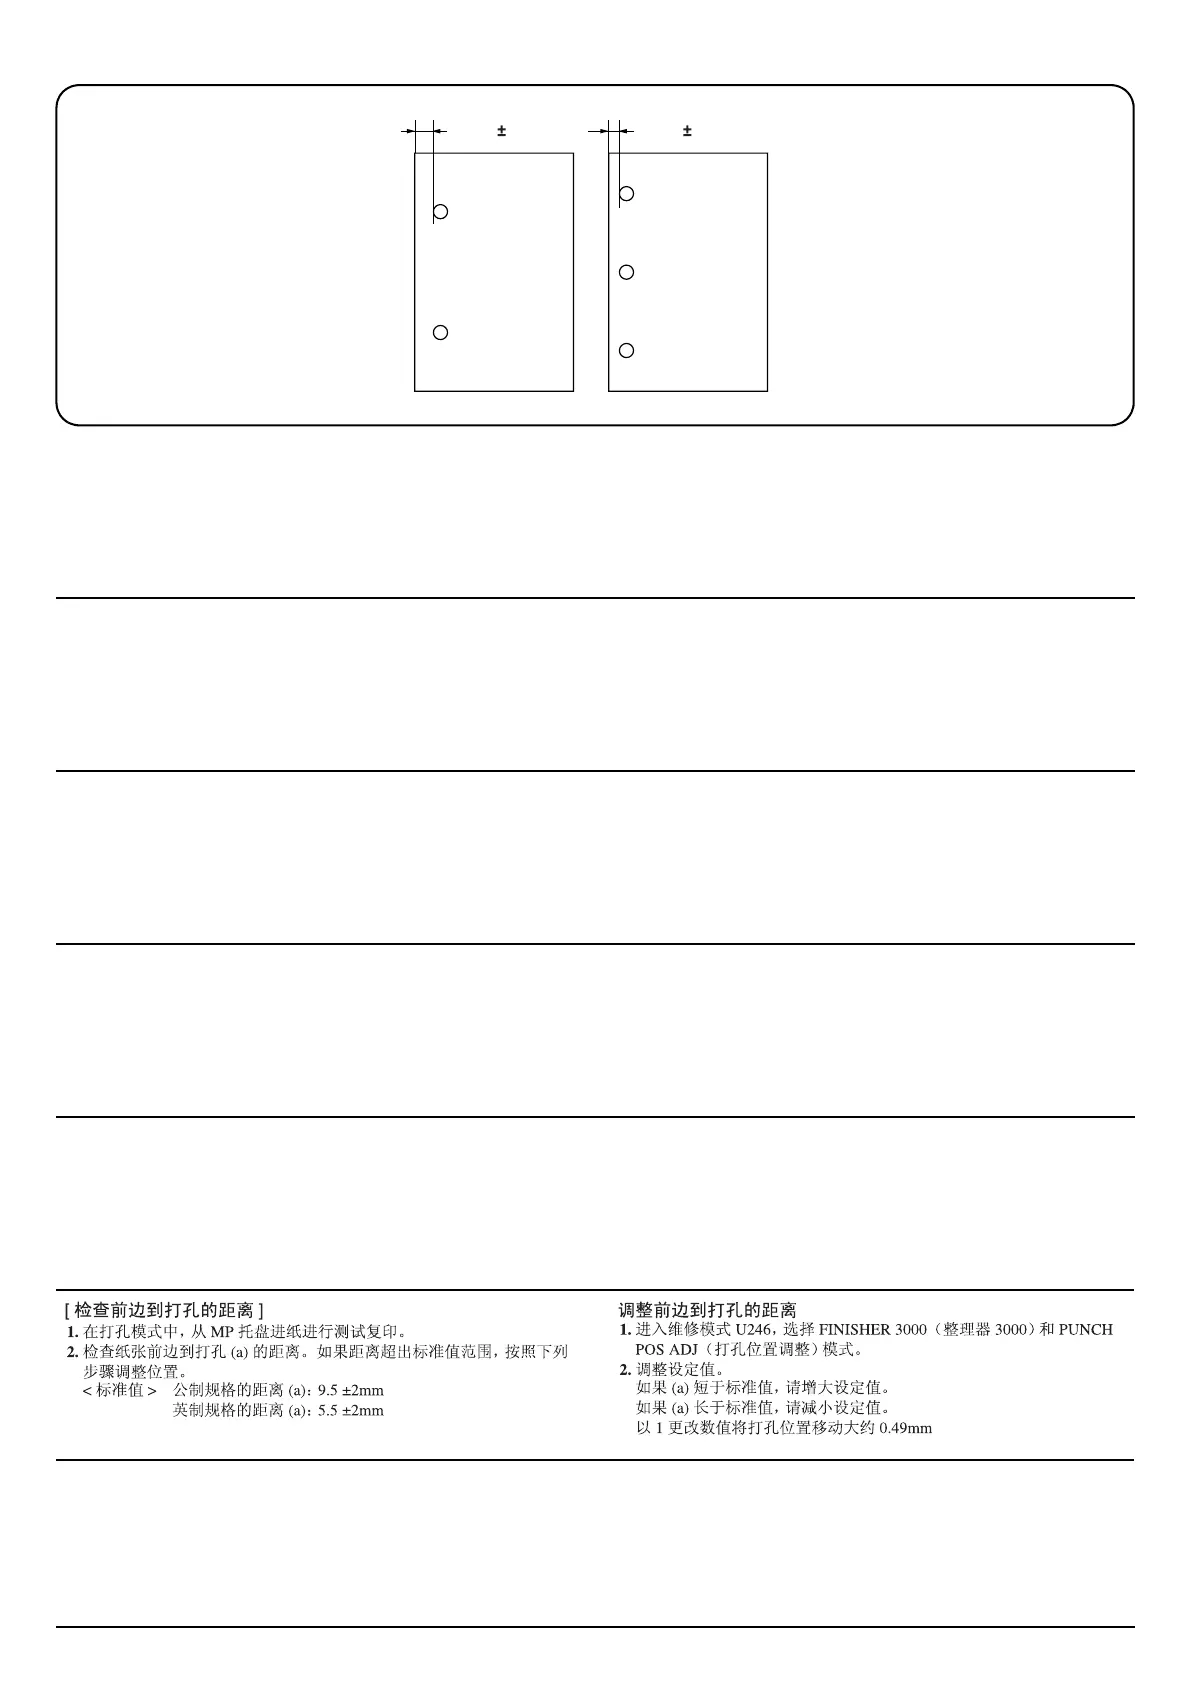
[Checking distance from leading edge to the punch holes]
1. In the punch mode, perform a test copy with paper fed from the MP
tray.
2. Check the distance from the paper leading edge to the punch holes (a).
If the distance is out of the reference range, follow the steps below to
adjust the position.
<Reference value> Distance (a) in metric specification: 9.5 ±2 mm
Distance (a) in inch specification: 5.5 ±2 mm
Adjusting distance from leading edge to the punch holes
1. Enter the maintenance mode U246, select FINISHER 3000 and
PUNCH POS ADJ mode.
2. Adjust the setting value.
If (a) is shorter than the reference value, increase the setting value.
If (a) is larger than the reference value, decrease the setting value.
Changing the value by 1 moves the punching position by approximately
0.49 mm
[Vérification de la distance du bord d’entrée aux perforations]
1. Dans le mode perforation, effectuer une copie de test avec du papier
alimenté depuis le plateau multifonction.
2. Vérifier la distance entre le bord d’entrée du papier et les perforations
(a). Si la distance se trouve hors de la gamme de référence, suivre les
étapes ci-dessous pour ajuster la position.
<Valeur de référence> Distance (a) en spécifications métriques: 9,5 ±2 mm
Distance (a) en spécifications en pouces: 5,5 ±2 mm
Ajustement de la distance entre le bord d’entrée et les perforations
1. Entrer le mode d’entretien U246, sélectionner FINISHER 3000 et le
mode PUNCH POS ADJ.
2.
Ajuster la valeur de réglage.
Si (a) est inférieur à la valeur de référence, augmenter la valeur de réglage.
Si (a) est supérieur à la valeur de référence, diminuer la valeur de réglage.
Changer la valeur de 1 pour déplacer la position de perforation d’environ
0,49 mm.
[Comprobación de la distancia del borde delantero a los
agujeros perforados]
1. En el modo de perforación, haga una copia de prueba con el papel ali-
mentado desde la bandeja MP.
2. Compruebe la distancia del borde delantero del papel a los agujeros
perforados (a). Si la distancia no se encuentra dentro del valor de refe-
rencia, siga los pasos de abajo para ajustar la posición.
<Valor de referencia> Distancia (a) en el sistema métrico: 9,5 ±2 mm
Distancia (a) en pulgadas: 5,5 ±2 mm
Ajuste de la distancia del borde delantero a los agujeros perforados
1. Entre en el modo de mantenimiento U246, seleccione FINISHER 3000
y el modo PUNCH POS ADJ.
2.
Ajuste el valor de configuración.
Si (a) es inferior al valor de referencia, aumente el valor de configuración.
Si (a) es superior al valor de referencia, disminuya el valor de configuración.
El cambio del valor en 1 desplaza la posición de perforación 0,49 mm aproxi-
madamente.
[Überprüfen des Abstands von der Vorderkante des Papiers
zu den Stanzlöchern]
1. Führen Sie im Lochermodus eine Testkopie durch, wobei das Papier
vom MP-Fach aus zugeführt wird.
2.
Überprüfen Sie den Abstand von der Vorderkante des Papiers zu den
Stanzlöchern (a). Wenn der Abstand außerhalb des Bezugswertes liegt, ist
die Einstellung gemäß den nachfolgenden Schritte durchzuführen.
<Bezugswert> Metrischer Abstand (a): 9,5 ±2 mm
Abstand in Zoll (a): 5,5 ±2 mm
Einstellen des Abstands von der Vorderkante zu den Stanz-
löchern
1. Geben Sie den Wartungsmodus U246 ein und wählen Sie dann FINI-
SHER 3000 und PUNCH POS ADJ.
2.
Regeln Sie den Einstellungswert.
Wenn (a) kleiner als der Bezugswert ist, ist der Einstellungswert zu erhöhen.
Wenn (a) größer als der Bezugswert ist, ist der Einstellungswert zu reduzieren.
Eine Veränderung des Wertes um 1 verschiebt die Lochstanzposition um 0,49 mm.
[Verificare la distanza distanza dal bordo anteriore ai fori di
perforazione]
1. In modalità di perforazione, eseguire una copia di prova con la carta
alimentata dal vassoio MP.
2. Controllare la distanza tra i fori di perforazione e il bordo anteriore del
foglio (a). Se la distanza non è compresa tra gli intervalli di riferimento,
eseguire i passaggi successivi per regolarne la posizione.
<Valori di riferimento> Distanza (a) Specificazione in unità metrica: 9,5 ±2 mm
Distanza (a) Specificazione in pollici: 5,5 ±2 mm
Impostazione della distanza dal bordo anteriore ai fori di perforazione
1. Entrare in modalità di manutenzione U246, selezionare le modalità
FINISHER 3000 e PUNCH POS ADJ (regola posizione di cucitura).
2. Regolare il valore di impostazione.
Nel caso in cui (a) sia minore del valore di riferimento, aumentare il
valore di impostazione.
Se (a) è maggiore del valore previsto, ridurre il valore di impostazione.
La modifica del valore 1 determina lo spostamento della posizione di
cucitura di circa 0,49 mm
[ パンチ穴の先端位置確認 ]
1. パンチモード、手差し給紙でテストコピーを行う。
2. パンチ穴の用紙先端からの位置 (a) を確認する。位置のずれが基準値
外の場合、次の手順で調整を行う。
<基準値> センチ仕様 (a) のずれ:9.5 ± 2mm
インチ仕様 (a) のずれ:5.5 ± 2mm
パンチ穴の先端位置調整
1. メンテナンスモード U246 にセットし、FINISHER 3000、PUNCH POS ADJ
を選択する。
2. 設定値を調整する。
(a) が基準値より短い場合:設定値を上げる。
(a) が基準値より長い場合:設定値を下げる。
1 ステップ当たりの変化量:約 0.49mm
 Loading...