dV-DOSC dV-SUB Manual V3.0 June 2005 112
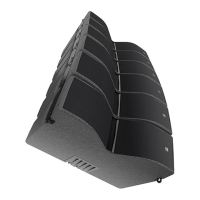
Procedure 2: Stacking with dV-BUMP or dV-BUMP2
In this case, dV-BUMP or dV-BUMP2 is placed on top of the upper dV-SUB to serve as a stacking
platform for dV-DOSC. dV-ANGLEN bars can be used for downwards tilt and from ground level,
stacking 3 dV-SUB enclosures high puts dV-DOSC at a good height so that the bottom cabinet will be
angled down into the audience. Typically downwards tilt is necessary to reduce audience shadowing
effects and to improve HF penetration into the audience.
Before stacking dV-DOSC, build the dV-SUB stack and physically secure the enclosures using dV-
ANGLESS angles between cabinets (and/or a ratchet strap around the entire stack). Physically securing
dV-SUBs will provide extra stability during the dV-DOSC stacking procedure and will also prevent
subs from moving during the show.
Place dV-BUMP into position on top of the upper dV-SUB and secure in place using a ratchet strap
around the entire stack. If dV-BUMP2 is used, use dV-ANGLESD and dV-PIN25 to secure the front
and rear attachment points.
Pre-attach two dV-ANGLE P1 or P2 bars at the rear points on dV-BUMP and select the desired tilt
angle or, alternatively, use dV-ANGLEN bars if greater than 3.75 degrees downwards tilt is required
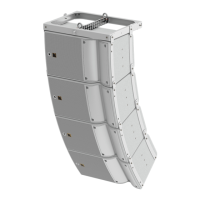
Orienting the first dV-DOSC enclosure with the rigging tabs down (grille logo in the correct
orientation), place the enclosure on dV-BUMP by mating the front rigging tabs and rear locator slots
with the locator slots and rear dV-ANGLE (P1, P2 or N) bars that were previously attached to dV-
BUMP. Attach all four points using four dV-PIN25 (front pair first, rear pair last) to secure the bottom
dV-DOSC to dV-BUMP.
The next step is to connect two more dV-ANGLE P1 or P2 bars to the rear locator slots of the
bottom dV-DOSC enclosure using two dV-PIN25. Pre-select the appropriate hole position to give the
desired tilt angle for the second enclosure.
Note: As a reference for ANGLE bar orientation, the ball/tab end of the angle bar should always be
facing outwards. The advantage of pre-selecting the angle is that the dV-ANGLE P1 or P2 acts as a
stop when the next dV-DOSC enclosure is placed. This makes it easier to secure the rear points since
less lifting is required.
Place the second dV-DOSC on top of the bottom dV-DOSC enclosure by mating the two front rigging
posts on the second enclosure and the dV-ANGLE bars that were previously mounted on the bottom
enclosure with the available locator slots. Attach the two front points using two dV-PIN25 to secure
the second dV-DOSC enclosure's front rigging posts to the bottom enclosure. Tilt the rear of the
second enclosure to the desired angle and attach the second dV-DOSC to dV-ANGLE using two dV-
PIN25.
The same procedures are followed for all other dV-DOSC enclosures of the array until stacking is
completed.