dV-DOSC dV-SUB Manual V3.0 June 2005 96
4. INSTALLATION PROCEDURES
In the following sections, detailed procedures for stacking or rigging dV-DOSC and dV-SUB are
presented. Please follow these procedures carefully and remain safety-conscious at all times.
In addition:
• Only users with sufficient rigging knowledge should attempt to install any L-ACOUSTICS
loudspeaker system intended for overhead suspension.
• Users should be familiar with the rigging techniques and safety considerations outlined in this
manual prior to installation.
• dV-DOSC and dV-SUB rigging systems are designed to comply with European Community
regulations (please see the CE conformity declarations in the appendix for specific
recommendations).
• Some countries require higher safety factors and specific rigging approvals. It is the
responsibility of the user to ensure that any overhead suspension installation of L-
ACOUSTICS systems is made in accordance with all applicable local or state regulations.
• L-ACOUSTICS is not responsible for any rigging equipment or accessories that are not
manufactured by L-ACOUSTICS.
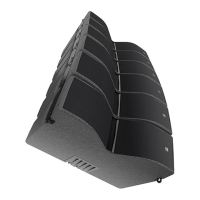
4.1 STACKED SYSTEMS
Stacking dV-DOSC Standalone
For stability reasons, the maximum number of dV-DOSC enclosures that can be stacked is 12. When
the V-DOSC bumper is used in conjunction with dV-BUMP as a stacking platforn for 12 dV-DOSC,
each screwjack can present a load of 95 kg (210 lbs). The strength of the supporting floor should be
carefully examined to determine if such a load can be supported - sheets of plywood or steel plates
can be placed under individual screwjack feet to help distribute the load. For improved stability and
load distribution, the front two screwjacks can be omitted and the two rear screwjacks only used for
downwards tilt adjustment. For improved stability in outdoor situations, ratchet strap the dV-BUMP
and V-DOSC bumper assembly to the stacking platform whenever possible.
Once the floor location for the stacked array has been determined, dV-BUMP is attached to the V-
DOSC BUMPER by mating the two locating studs on dV-BUMP with the corresponding holes on the
center cross bar section of the V-DOSC BUMPER. A steel stud and dV-PIN81quick release pin are
then used to mechanically secure dV-BUMP to the V-DOSC BUMPER at the central hole position.
Aim the stacking platform in the correct direction to provide the desired amount of array rotation on-
or off-stage. For downwards tilt, attach two screwjacks to the rear of the V-DOSC BUMPER by
setting the height adjustment blocks on the two screwjacks to the minimum position then sliding these
blocks into the locating slots on dV-BUMP (front two screwjacks are optional when the array is tilted
downwards).
Referring to the simulation results obtained in ARRAY2004 or SOUNDVISION, the screwjacks are
then adjusted to provide the required site angle for the lowest enclosure. NOTE: A digital
inclinometer is useful for performing angle measurements. If this is not available, visually sight down
dV-BUMP to ensure that the closest members of the audience will be covered.
In preparation to begin stacking, pre-attach dV-ANGLE P1 to the two rear mount points on dV-
BUMP. Select the 3.75 degree hole (middle position) and pin dV-ANGLE P1 into position using dV-
PIN25. As a reference, the tab stop of dV-ANGLE P1 should always face outwards. By selecting the
3.75 degree hole, this sets dV-BUMP perpendicular to the face of the bottom cabinet and allows the
site angle of dV-BUMP to serve as an aiming reference for correct focus.
Orienting dV-DOSC with the rigging tabs down (i.e., grille logo in the correct orientation), place the
bottom enclosure on dV-BUMP by mating the front rigging tabs and rear locator slots with the locator
slots and rear dV-ANGLE bars that were previously attached to dV-BUMP. Attach all four points using