46
46
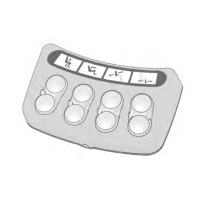
3. Begin programming the desired sequence:
When using Switchbox Layout 1 (sticker D), Layout 2 (sticker E) or Layout 3 (sticker F):
a) Press and hold Button #1, #2 or #3 to select the desired pre-defined sequence.
b) The left part of the symbol above the button will glow green.
c) Release the button after the left part of the symbol turns red.
• LEDs 1 and 3 will glow green once a standing sequence has been selected.
When using Switchbox Layout 4 (sticker G), two different standing sequences can be stored:
To store the selected sequence in the “Left” Stand Icon:
a) Press and hold Button #1, #2 or #3 to select the desired pre-defined sequence.
b) The left part of the symbol above the button will glow green.
c) Release the button after the symbol turns red.
• LEDs 1 and 3 will glow green once a standing sequence has been selected for the “Left” Stand Icon.
To store the selected sequence in the “Right” Stand Icon:
d) Press and hold Button #5, #6 or #7 to select the desired pre-defined sequence.
e) The right part of the symbol above the button will glow green.
f) Release the button after the symbol turns red.
• LEDs 2 and 3 will glow green once a standing sequence has been selected for the “Right” Stand
Icon.
Programming VS - Specific Attributes