5959
Performing Manual Actuator Calibration
1. Begin in the seating system in a “normal driving” position (not tilted, not elevated, not at floor.)
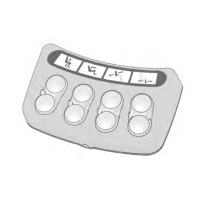
2. Press and hold buttons 6 and 8 on the ICS Switchbox while turning on the wheelchair.
3. Once all the LEDs on the ICS Switchbox show in a green toggling pattern, release the buttons.
4. Press button 6 to move the elevator fully down. Don’t release the button until the actuator makes a
“hard stop” at the lowest seat elevator position.
5.
Press button 2 to move the elevator fully up. Again, don’t release the button until the actuator makes
a “hard stop” at the highest seat elevator position.
6.
Press button 5 to move the Tilt actuator to its fully un-tilted position. Don’t release the button until the
actuator makes a “hard stop” at the lowest seat elevator position.
7.
Press button 1 to move the Tilt actuator to its fully tilted position. Again, don’t release the button until
the actuator makes a “hard stop” at the highest seat elevator position.
8.
Press button 5 to move the Tilt actuator to its middle position (less than 30° tilt). Leave the tilt at this
position for the remainder of the manual calibration process.
9.
Press button 3 to move the Terra actuator to its fully extended position (away from the floor.) Don’t
release the button until the actuator makes a “hard stop” at the fully extended position.
10.
Press button 7 to move the Terra actuator to its lowest position (towards the floor.) Again, don’t release
the button until the actuator makes a “hard stop” at the at the lowest position.
11.
Turn the chair off to save the calibration information and to exit the calibration mode. Turn the chair
back on to restore normal functionality.
12.
Test the functionality of all of the actuators one at a time
After Manual Calibration is completed, confirm that the LEDs on the switchbox appropriately
indicate the correct drive restrictions when the seat is at different heights.
Programming K450 - Specific Attributes