73
73
Servicing Smart Actuator Calibration
3. Automatic calibration (Corpus II & Corpus 3G)
NB! The actuator must not be removed from the seat during automatic calibration, as the end
positions are detected when the actuator reaches a mechanical stop, causing the current to exceed
the current limit. Automatic calibration cannot be performed on chairs with “old ICS programs” < v.30
(december 2010) or for functions where the actuator is equipped with SoftPot.
NB! The actuator movement must be appropriate for the function and must not be mechanically
obstructed by any external object or addition.
NB! If the seat is equipped with manual backrest, this must be positioned in its most forward position
(to make maximum stroke of the tilt possible).
NB! If the seat is equipped with a fixed seat post and no tilt, the leg rest actuator must be removed
in one end when performing the calibration. The piston must be prevented from rotating in the end
position, using for example a screwdriver through the fixing hole.
4.
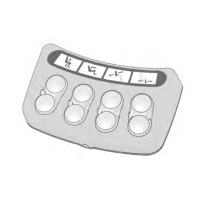
Press button 4 to activate automatic calibration. LEDs 7 and 8 will flash green.
5. For Corpus APE & Corpus VS go to #8
For Corpus II & Corpus 3G
Decide what needs to be calibrated using button 2, 3 or 4.
Button 2 activates calibration of Tilt.
Button 3 activates calibration of Tilt+Backrest.
Button 4 activates calibration of Tilt+Backrest+Legrest.
Calibration is only performed on functions with Smart Actuators.
6. If you press button 3 or 4, each actuator will be calibrated in turn. Once calibration is complete, the
seat will return to a “normal” seat position, and all the LEDs flash green and there will be a short
audible signal if calibration has been successful.
Corpus 3G with manually adjustable backrest: When the tests comes to the seat back, it’s waiting
(LED 7 is flashing yellow) for you to manually fold the back rest to the rearmost position. When the
backrest is in its rearmost position, press button 7 and when LED 6 blinks, manually fold the back
rest to the its forward position. After that, the automatic calibration continues.
If calibration is unsuccessful, the LED for the actuator in question flashes red.
7.
Restart the chair. Run a seat test.
Automatic calibration is now complete.