28Live ViewXT Camera System Manual |
Finally, if you long press on one of the exposure settings (Shutter Speed,
Aperture, ISO) at the bottom of the touch screen, you get a menu list with
values to scroll through and select. This is a nice option if you quickly need to
change the Shutter Speed or ISO value a large step.
Exposure Simulation
By default, the Live View feed on the IQ4’s screen is using Exposure
Simulation which means that the brightness of the Live View image will reflect
the actual exposure settings (Shutter Speed, Aperture, and ISO values) and
thus the final exposure of the captured RAW files. The advantage of this
feature is that you can adjust shutter speed, aperture and/or the ISO value
until the desired exposure level is achieved based on the Live View feed.
Note you can enable the Auto gain feature instead of using Exposure
Simulation. Auto gain will optimize the Live View image to show a bright and
even exposure of the subject regardless of what exposure settings you have
set. The Auto gain feature will be explained on the following page.
Using the Exposure Adjustment Aids
It is highly recommended to take advantage of the dierent exposure
adjustment aids that Live View provides like the Exposure Meter or the live
histograms. The Exposure Meter is present in the top-middle part of the Live
View feed and gives an indication of whether the current exposure is deemed
to correct, too dark or too bright. It will update as you change the exposure
settings.
For even more precise feedback, it is recommended to enable the RGB
Histogram, RAW Histogram and RAW Clipping Warnings that are explained
below.
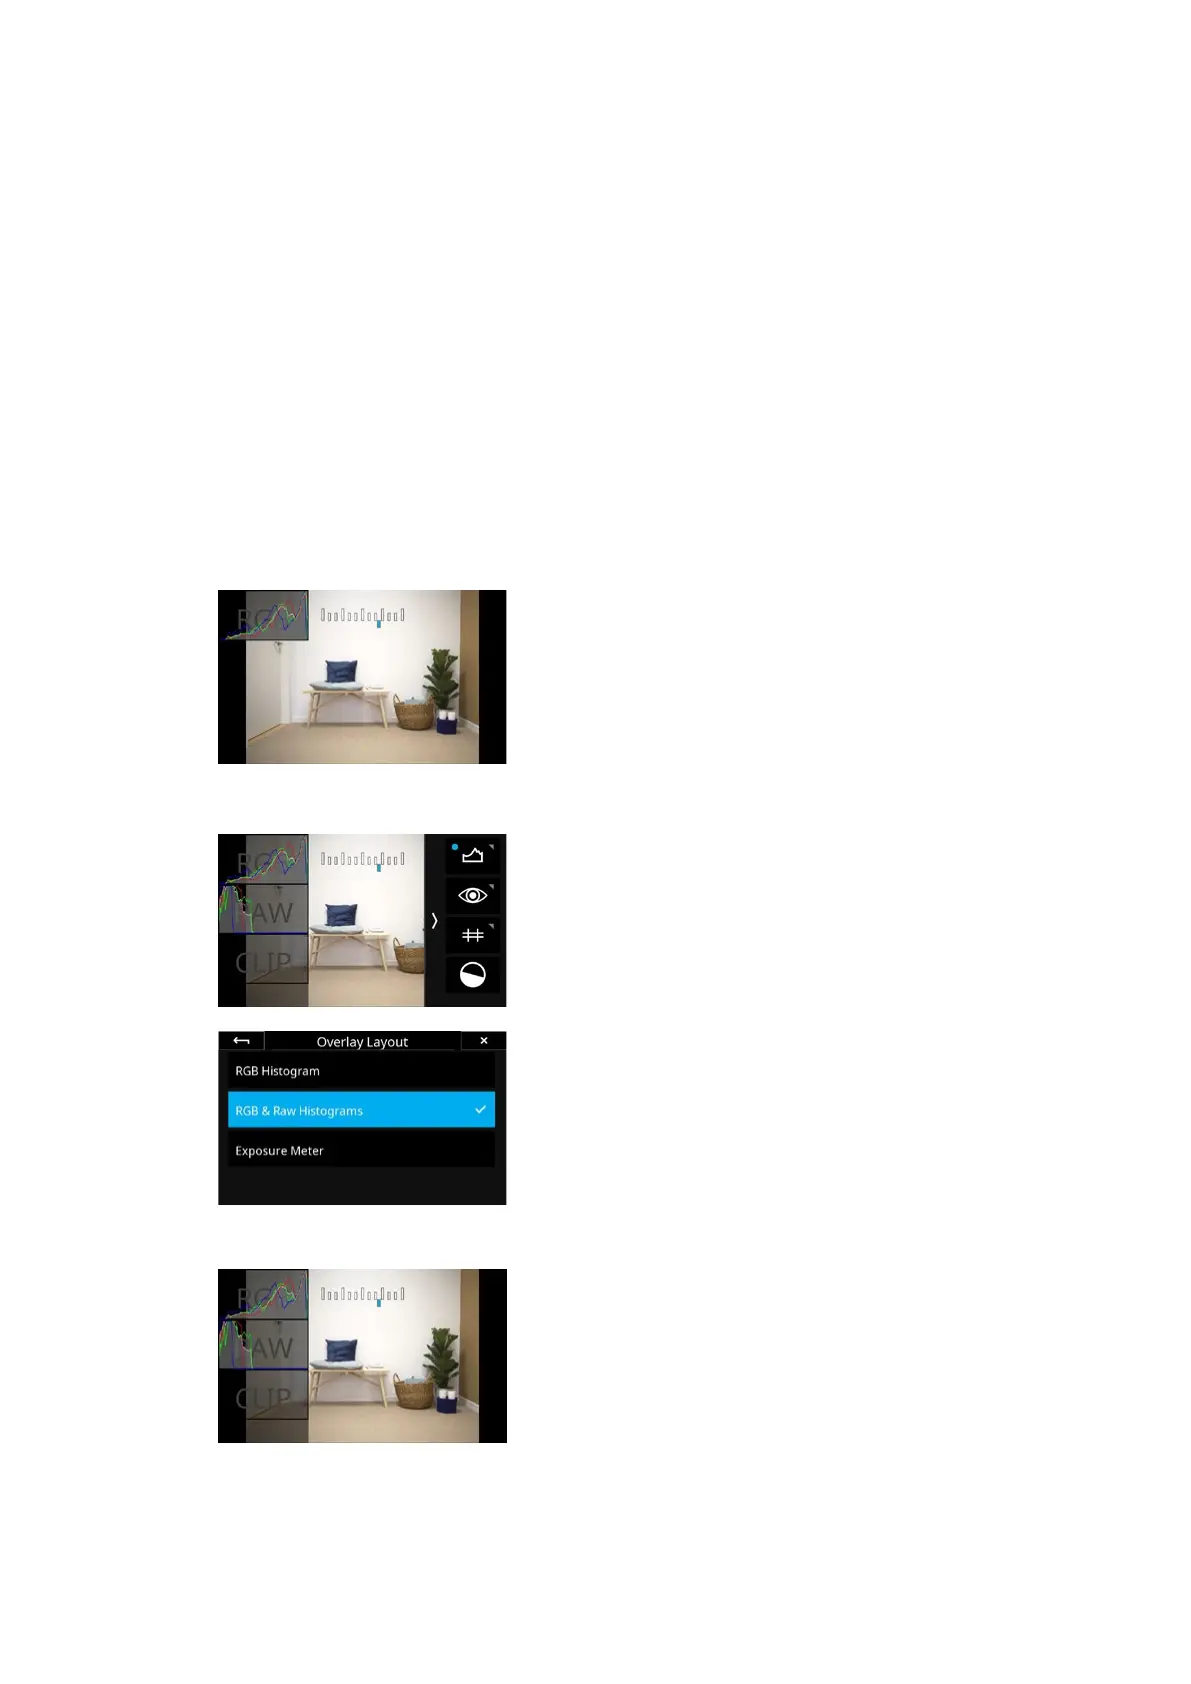
Live RGB and RAW Histograms
You can enable a live RGB and RAW histogram in Live View to help evaluate
the exposure based on the current settings. The histograms will reflect the
results of the captured image and are excellent tools to ensure that you get a
proper exposure and doesn’t clip either the shadows or the highlights.
You enable the live RGB and RAW histograms by swiping in from the right side
of the touch screen while in Live View and toggle the feature on by tapping on
Histogram icon.
You can configure whether you only want to see the Exposure Meter, the RGB
Histogram with the Exposure Meter or in addition also want to see the RAW
Histogram and RAW Clipping Meter as overlays. This is set up by long-
pressing on the Histogram icon and choosing the desired options from the
menu (see left).
Once the live RGB Histogram and live RAW Histogram is active, you can adjust
shutter speed, aperture and/or the ISO value until the desired exposure level is
achieved. Note that the histograms are disabled if you are using the Auto gain
feature explained on the next page.
Live RAW Clip Warning
The live RAW Clipping warning in Live View indicates the amount of raw data
that are being clipped for each for the color channels (Red, Green and Blue).
Once a blue, green or red pixel is clipped, the bar will start to light up for the
corresponding color channel. A full bar indicates that several pixels in the
image are clipped in that color channel while a single bar indicates that only
one or few pixels are clipped. This feedback will let you decide to what degree
you might accept some partial clipping since Capture One can recover details
in the highlights as long as not all three color channels are clipped.
Once the Clip Warning Tool is enabled, adjust shutter speed, aperture and/or
the ISO value until the highlights are no longer clipped. Note that the warnings
are disabled if you are using the Auto gain feature explained on the next page.