Home
Ricoh
Printer
SP 3710DN
Field Service Manual
Page 72
Ricoh SP 3710DN - Page 72
278 pages
Manual
To Next Page
To Next Page
To Previous Page
To Previous Page
Loading...
4.Replacement and
Ad
justment
60
3.
Remove the sensor cover [A].
4.
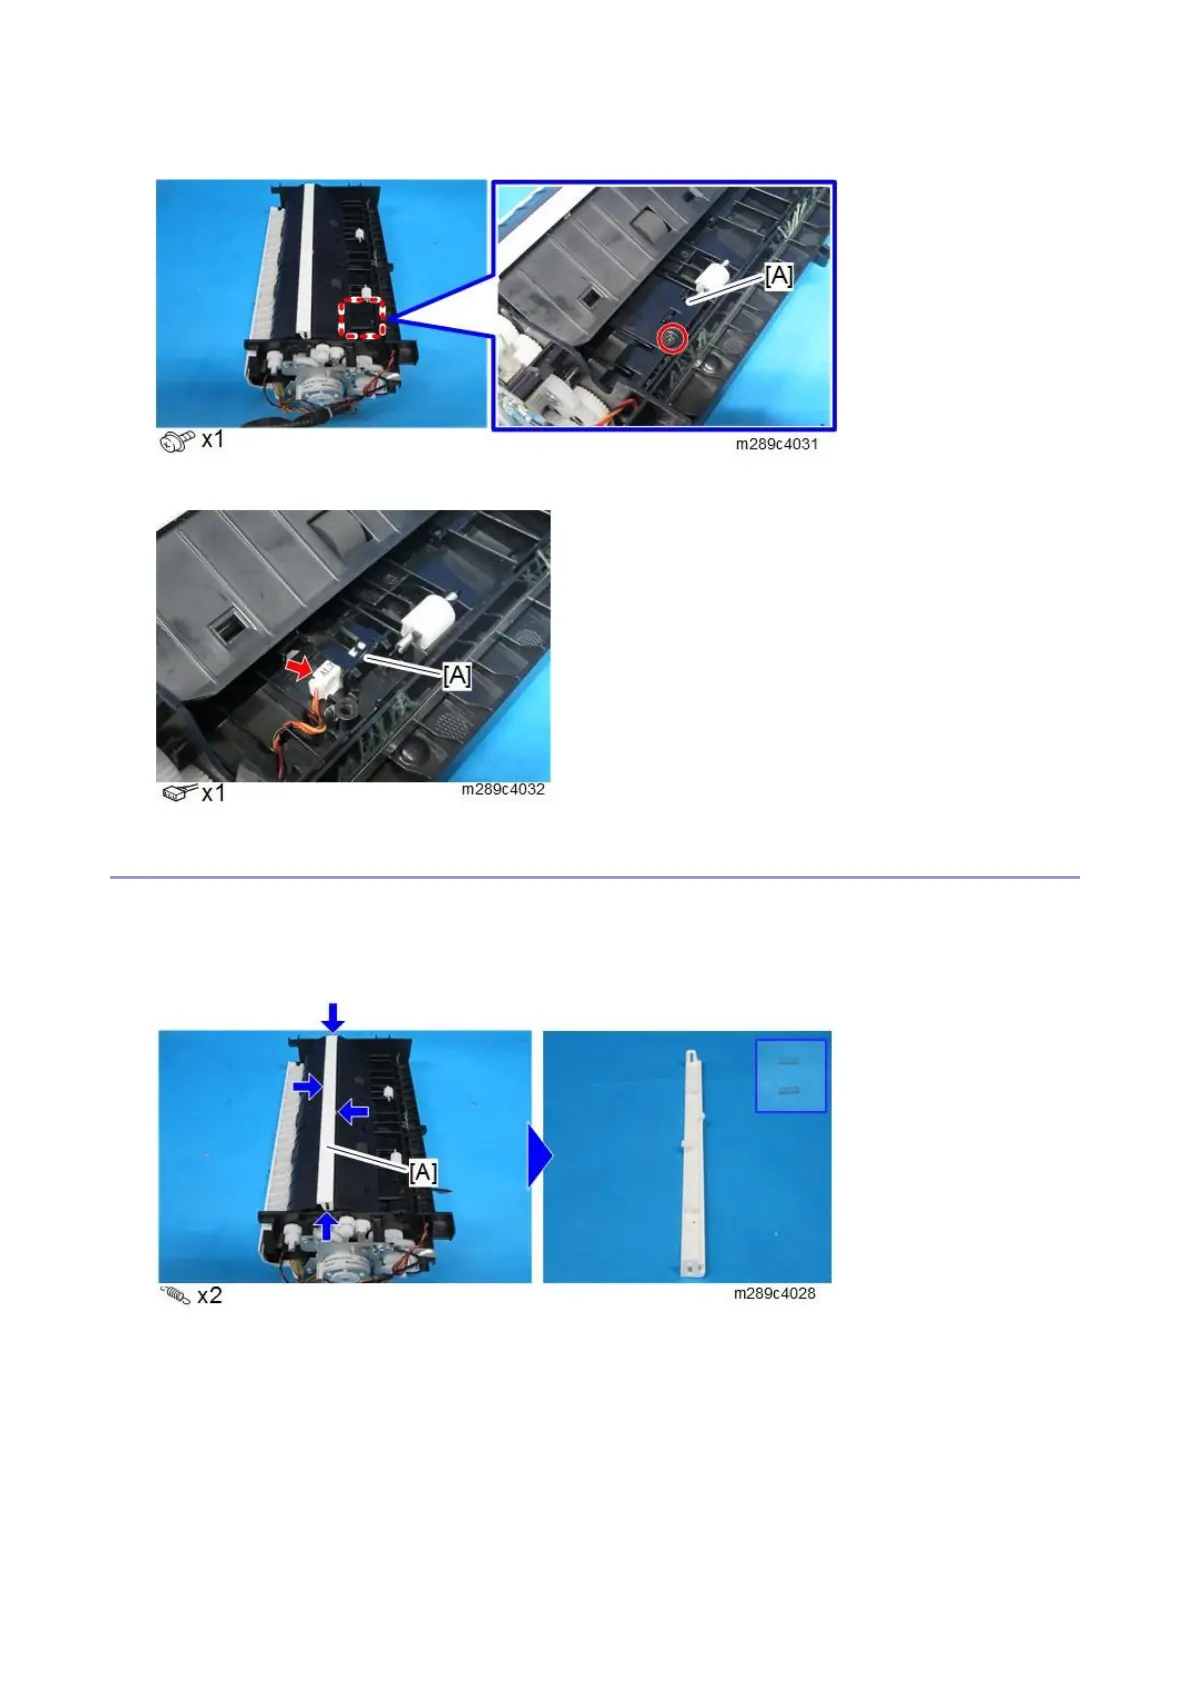
Remove the original set sensor [A].
ARDF Feed Sensor
1.
Remove the
ARDF drive unit (
ARDF Motor
).
2.
T
urn the
ARDF drive unit over
.
3.
Remove the pressure plate [A] (4 hooks).
71
73
Table of Contents
Main Page
Table of Contents
13
Default Chapter
3
Important Safety Notices
3
Symbols and Abbreviations
9
1 Product Information
18
Machine Codes and Peripherals Configuration
18
Main Frame
18
Options
18
Printer
18
Specifications
19
2 Installation
20
Installation Requirements
20
Environment
20
Main Machine Installation
20
Moving and Transporting the Machine
20
Settings for @Remote Service (for Printer Models)
22
Service Menu
24
Check the Network Environment
25
Settings for @Remote Service (for MF Models)
27
3 Preventive Maintenance
31
Preventive Maintenance Tables
31
Image Quality Standards
32
Paper Transfer Quality Standards
34
4 Replacement and Adjustment
35
General Cautions
35
Exterior Covers (Printer Models)
36
Front Cover
36
Left Cover
37
Rear Cover
39
Right Cover
40
Top Cover
41
Operation Panel Unit
43
Exterior Covers (MF Models)
44
Front Cover
44
Left Cover
45
Rear Cover
48
Right Cover
48
Top Cover
50
Scanner Unit (Only MF Models)
53
Scanner Unit
53
Operation Panel Unit
55
ADF/ARDF Unit (Only MF Models)
58
ADF Unit (for Four-Line LCD Models)
58
ARDF Unit (for Touch Panel Models)
65
Laser Unit
74
Caution Decal Locations
74
Laser Unit Thermistor
74
Paper Feed
76
Friction Pad
76
Paper Feed Roller
76
By-Pass Feed Solenoid
77
Paper End Sensor
77
By-Pass Feed Roller
78
By-Pass Feed Roller Friction Pad
80
By-Pass Feed Sensor
80
Paper Feed Clutch
81
Relay Clutch
81
Registration Clutch
82
Registration Roller
82
Registration Sensor
88
Image Transfer
90
Transfer Roller
90
Quenching Lamp
91
Toner End Sensor
91
Fusing and Exit
93
Fusing Unit
93
Fusing Upper Cover
95
Thermostat
95
Fusing Lamp
96
Fusing Thermistor
96
Hot Roller Stripper Pawls
98
Paper Exit Sensor
99
Duplex
100
Duplex Sensor
100
Drive
101
Main Motor
101
Drive Unit
102
Duplex Motor
104
Electrical Components
105
Main Board
105
Psu
108
Cooling Fan
109
Hvp
109
Environment Thermistor
110
ID Chip Board
110
Front Cover Switch, Rear Cover Switch
111
USB Port (Only for MF Models)
111
FCU (Only for Fax Models)
112
Speaker (Only for Fax Models)
112
Image Adjustment
114
Registration Adjustment
114
5 System Maintenance
115
Maintenance Mode (for Four-Line LCD Models)
115
Menu List
115
Overview
115
Menu Description
122
Maintenance Mode (for Touch Panel Models)
126
Menu List
126
Overview
126
Smart Organizing Monitor (SOM)
141
Overview
141
Menu List
142
Fax Service Test (Only for Fax Models)
162
Fax Service Test Menu
162
Menu List
162
Reports
164
To Print the Reports
164
Types of Reports
164
Report Examples
165
Test Page
168
Test Pattern Printing
169
Updating the Firmware
171
Before Updating the Firmware
171
Updating the Main Firmware
172
Troubleshooting
174
Capturing the Debug Logs
180
6 Troubleshooting
182
Self-Diagnostic Mode
182
Self-Diagnostic Mode at Power on
182
Service Call
183
SC 2Xx (Laser Optics Errors)
183
Service Call Conditions
183
SC 4Xx (Image Transfer and Transfer Errors)
185
SC 5Xx (Motor and Fusing Errors)
185
SC 6Xx (Communication and Other Errors)
190
Error Messages
191
Overview
191
Fax Error Codes
199
Fax Error Code Structure
199
Fax Error Code Table
200
Jam Detection
202
Paper Jam
202
Original Jam (ADF/ARDF)
203
Image Quality
205
Problem at Regular Intervals
205
Other Problems
206
Dark Lines in Halftone Areas at 75Mm Intervals
206
Recycled or Thin Paper Is Severely Curled after Printing
206
When Fluorescent/ LED Lamps Flicker (Only for 100V Models)
206
Stain Appears in the Right and the Left Edges
207
Poor Printing (Offset)
208
Low Image Density on Solid Images
209
Wrinkles Appear When Using Limp Paper
209
Mottled Image on Solid Images
210
Toner Scattered on Horizontal Lines
210
7 Detailed Descriptions
211
Guidance for those Who Are Familiar with Predecessor Products
211
Product Overview
213
Component Layout
213
Drive Layout
214
Paper Path
214
Component Layout (Printer Models)
215
Component Layout (MF Models)
218
ADF/ARDF (for MF Models)
223
Overview
223
Mechanism
224
Scanner (for MF Models)
226
Mechanism
226
Overview
226
Printing Process
227
Overview
227
Laser Exposure
228
Mechanism
228
Overview
228
Print Cartridge (AIO)
230
Overview
230
Mechanism
231
Paper Feed
235
Mechanism
235
Overview
235
Image Transfer
239
Overview
239
Mechanism
240
Fusing and Exit
242
Overview
242
Mechanism
243
Duplex
248
Mechanism
248
Overview
248
Electrical Components
250
Overview
250
Energy Save
253
Energy Saver Modes
253
Table of Contents
257
1 Specifications
258
General Specifications
258
System (for Printer Models)
258
System (for MF Models)
260
Copier (Only for MF Models)
263
Scanner (Only for MF Models)
264
Fax (Only for Fax Models)
265
Supported Paper Sizes
266
2 SP Mode Table
268
3 Setting for Paas (Only for CHN)
269
Paas Setup Procedure
269
Switch to Paas Mode
269
Paas Registration
270
Unregistering Paas
273
Changing Registered Device/ Main Board
274
Check the Network Environment
274
Overwrite Registration on Server
274
Switch to Paas Mode
274
Technical Tips
278
Other manuals for Ricoh SP 3710DN
User Guide
208 pages
Service Manual
333 pages
Related product manuals
Ricoh SP 377DNwX
160 pages
Ricoh SP 320DN
160 pages
Ricoh SP 3400N
288 pages
Ricoh SP 330DN
208 pages
Ricoh SP 3600dn
100 pages
Ricoh SP 311SFN
4 pages
Ricoh Aficio SP 3500N
4 pages
Ricoh Aficio SP 300DN
32 pages
Ricoh Aficio SP 3400N
2 pages
Ricoh Aficio SP 3410DN
2 pages
Ricoh Aficio SP 3510DN
4 pages
Ricoh SP C440dn
100 pages