The width of the timing signal from the CFD is set by another DC voltage (0 to +5V) which can likewise either be supplied by
the corresponding poti and probed via the LEMO connector (JP13 set, default) or by directly supplying this DC voltage (JP13
off). Thus the width can be adjusted between 10 and about 100ns. Note that there is only one control for both channels on
each DLATR board.
If the LEDs next to each DLATR in-/output connector group (on the right side) is not lit please verify the DC voltages on
the reading points near the power switch on the front panel. If these are present and within the specified range (see Chapter 3.4)
refer to Chapter 3.5 (opening the ATR19) and insure that the corresponding board is properly installed.
If the DC voltages on the reading points near the power switch on the front panel are not within specification verify the mains
power or the external DC supply (see Chapter 3.4)
Before starting a measurement the “walk” of the CFD on all boards can be adjusted. This is generally not necessary and in case
of the DLATR2.0 the walk level is factory-set and the walk adjust button is disabled.
If you want to calibrate the walk (for all other boards) at the beginning of a measurement please follow these steps:
Switch off the high voltage on the detector
Verify that the noise level is low and that there are no signals from the CFD outputs.
Press the walk button for at least 1 second.
Wait at least 15s for the automatic walk adjust
Then apply voltage to the detector and start/resume your measurement
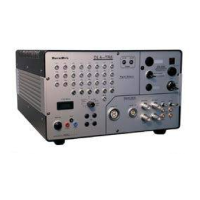
3.4 Connecting and operating the ATR19
Before connecting the ATR19 to any cable please ensure that the AC mains power from your socket complies with the setting
of the switch on the rear panel (not for ATR19-2).
The setting “230” complies with a mains power of 200-250V AC, 50-60Hz, main fuse: 250mA, time lag
The setting “115” complies with a mains power of 100-125V AC, 50-60Hz, main fuse: 500mA or 630mA, time lag
Warning: A wrong setting can lead to damage of the ATR19 and/or any connected appliances
After connecting the mains power through the standard mains cable input on the rear panel turn on the module with the switch
on the front panel. Please verify that the DC voltages on the reading points on the front panel are between 5.5V and 6.5V -
positive and negative - and that all LEDs are lit. If the DC voltages are not present please check the mains voltage and the main
fuse in the mains connector, replace the fuse if necessary. The main fuse is located above the mains input socket (see Chapter
3.9, not for ATR19-2).
If the main fuse, the switch position and the main power seem to be ok, please follow the steps in Chapter 3.5 for opening the
ATR19 and verify the separate fuses for positive DC (1.6A, swift) and negative DC (2.5A, swift), replace fuses if necessary. The
fuses are located on the voltage adapter board (see also Chapter 3.9, not for ATR19-2).
If you want to use the external ±6V DC input (default for ATR19-2) instead of an internal mains power adapter please follow
the steps in Chapter 3.5 for opening the ATR19 and remove the internal cable connector from the mains adapter to the external
input. If you have ordered the ATR19 for use without AC mains adapter (e.g. ATR19-2), the cable is already connected in the
correct way. For operating the ATR19 DC voltages -6V on pin 5 and +6V on pin 8 (2A each) are required, pin 1 and 2 must
be grounded.
*
The ATR19 can also be supplied externally with ±5.2V (or ±5V) via the same connector. In this case the jumpers JP7 and JP10
(located under each DLATR board) have to be removed.
Attention: A few of the earliest ATR19, which have been delivered to customers, allow an external DC supply only with ±5.2V
(JP7 and JP10 removed). If in doubt please contact
RoentDek to insure that your module can also be operated with ±6V
and JP7 and JP10 set.
*
Adequate DC supply and cabling can be achieved from the SPS1(b) modules with a corresponding cable.
Page 40 of 83 MCP Delay Line Detector Manual (11.0.1304.1)