ENGLISH
8787
PPhhoottoo 模模式式:: 設設定定檢檢視視選選項項
設設定定 DDPPOOFF((數數位位列列印印順順序序格格式式))功功能能
舅可以使用支援 DPOF 功能的印表機自動列印已錄製的相片圭案0
只能在小型 SD 賓設定 DPOF0
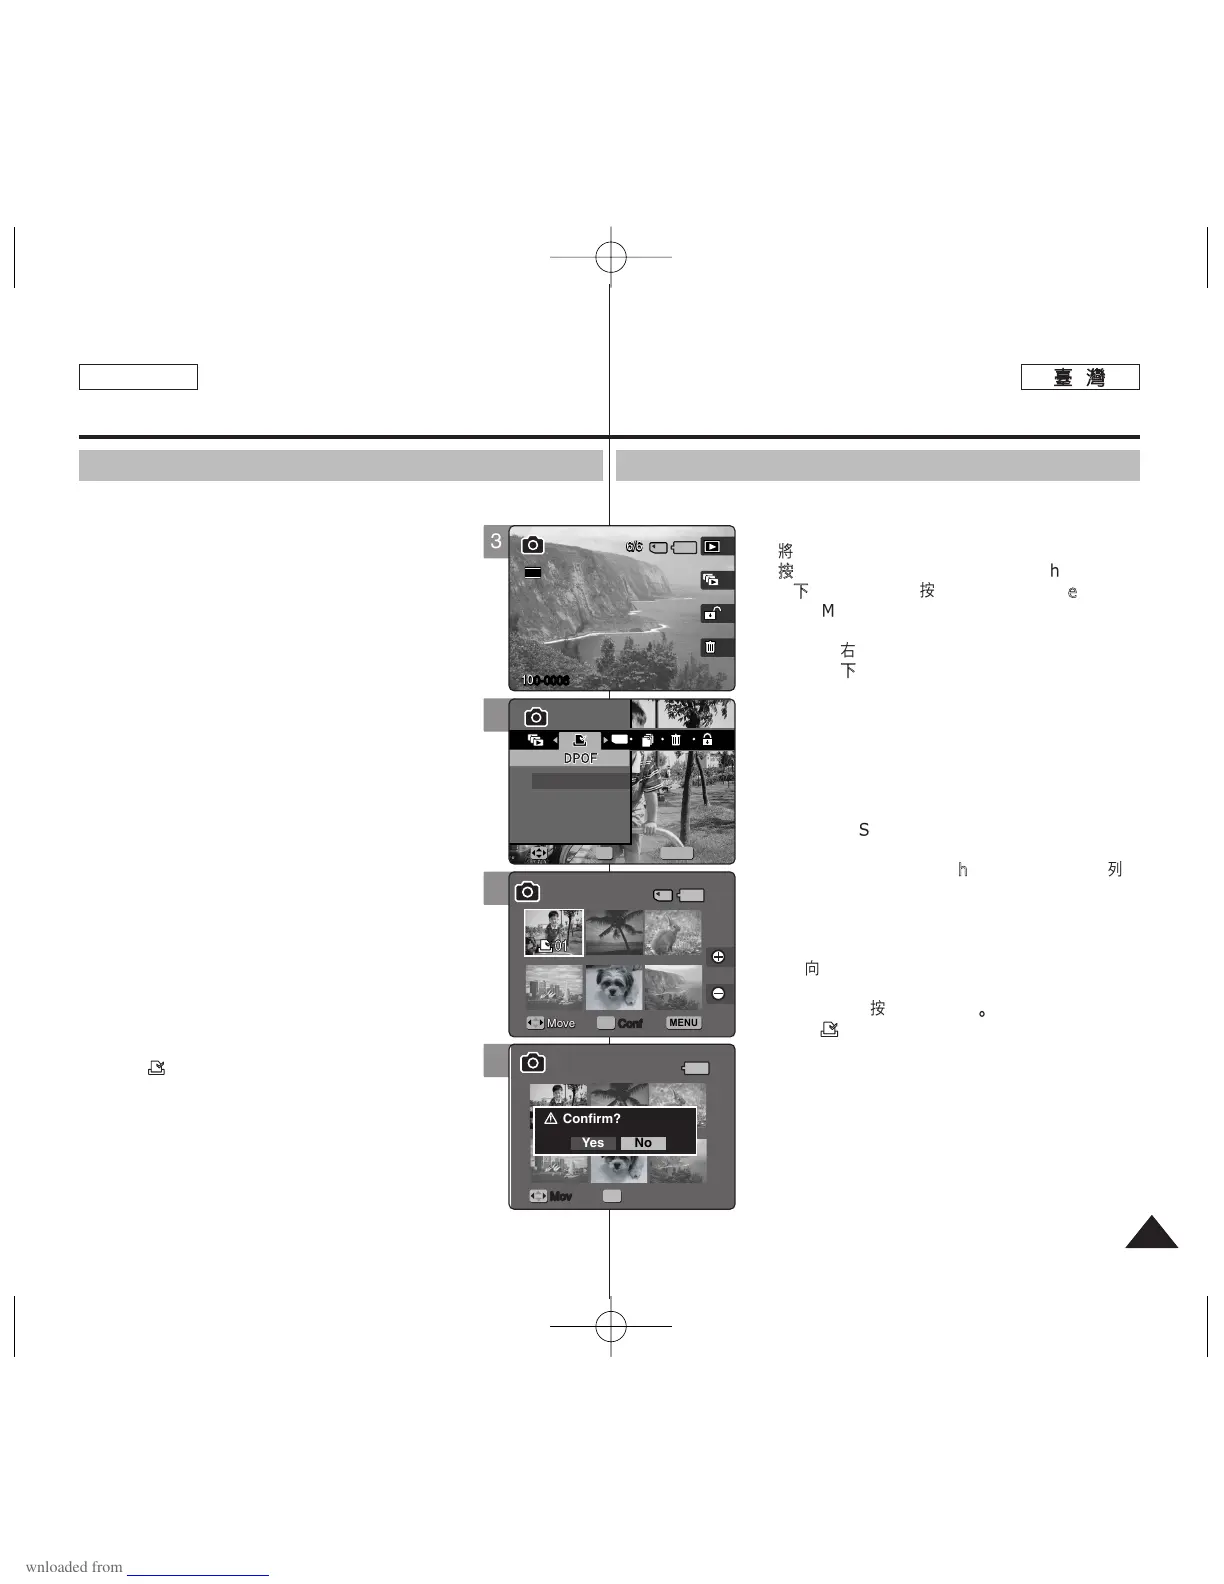
11..
將將模模式式轉轉盤盤轉轉到到
PPhhoottoo
模模式式00
22..
按按下下 [[PPOOWWEERR]] 按按瞿瞿以以開開啓啓 MMiinniikkeett
PPhhoottoo00
33..
按按下下 [[SShhoorrttccuutt
11]] 按按瞿瞿切切換換到到 PPhhoottoo
VViieeww 模模式式00
44..
按按下下 [[MMEENNUU]]
按按瞿瞿00
◆ 選單螢幕將會顯示0
55..
向向左左或或向向右右移移動動搖搖桿桿以以選選取取 <<DDPPOOFF>>00
66..
向向上上或或向向下下移移動動搖搖桿桿以以選選取取選選項項,,然然後後按按搖搖桿桿 ((OOKK))
按按瞿瞿00
◆
<<SSeelleecctt>>
: 多個視圖螢幕將會出現,舅可以選
取要設定 DPOF 列印的相片圭案0
◆
<<AAllll>>
: 所有的圭案將會標記爲 DPOF 列印0
如果選取 <All>,“DPOF All?”訊息將會顯示0
向左或向右移動搖桿選取所要的選項,然後按下
搖桿 (OK) 按瞿以確認0
77..
如如果果選選取取 <<SSeelleecctt>>,,多多個個視視圖圖螢螢幕幕將將會會出出現現00
向向左左//右右//上上//下下移移動動搖搖桿桿以以選選取取要要設設定定的的相相片片圭圭案案00
88.. 使使用用 [[SShhoorrttccuutt
33]] 和和 [[SShhoorrttccuutt
44]] 按按瞿瞿設設定定列列
印印略略數數00
◆ 向左或向右移動搖桿移到其他相片,然後重複這
些步驟以設定 DPOF0
99..
““CCoonnffiirrmm??””訊訊息息將將會會在在舅舅按按下下搖搖桿桿 ((OOKK))
按按瞿瞿時時顯顯示示00
◆ 向左或向右移動搖桿以選取 <Yes> 或
<No>,然後按下搖桿 (OK) 按瞿以確認0
1100..
按按 [[MMEENNUU]]
按按瞿瞿以以結結束束選選單單00
◆ <>圖示將會在具有 DPOF 設定的相片上顯
示0
[
附附註註
]
✤ 如需關於使用 DPOF 印表機的詳細資訊,請參閱産
品說明0
✤
使用支援 DPOF 功能的印表機,可以讓使用者不必使
用電腦卽可直接列印儲存在小型 SD 賓上的相片圭案0
✤ 當選單螢幕顯示時,按 [Record/Stop] 按瞿將可以
結束選單0
Photo Mode :
Setting the Viewing Options
Setting the DPOF (Digital Print Order Format) Function
You can automatically print a photo file recorded with a printer that supports
DPOF. Setting the DPOF is only available mini SD card.
1. Turn the Mode Dial to Photo mode.
2. Press the [POWER] button to turn on the Miniket
Photo.
3. Press the [Shortcut 1] button to switch to Photo View
mode.
4. Press the [MENU] button.
◆ Menu screen appears.
5. Move the joystick left / right to select <DPOF>.
6. Select an option by moving the joystick up / down
and then press the joystick (OK).
◆ <Select>: Multi-view screen appears and you can
select photo files to set DPOF printing.
◆ <All>: All photo files will be marked with DPOF printing.
If <All> is selected, the message “DPOF All?” appears.
Select the desired option by moving the joystick left / right
and then press the joystick (OK) to confirm.
7. If <Select> is selected, Multi-view screen appears.
Select the photo files to set by moving the joystick
left / right / up / down.
8. Set the number of prints by using the [Shortcut 3]
and [Shortcut 4] buttons.
◆ Move to another photo by moving the joystick left / right
and repeat the steps to set DPOF.
9. The message “Confirm?” appears when you press the
joystick (OK).
◆ Select <Yes> or <No> by moving the joystick left / right
and then press the joystick (OK) to confirm.
10. Press the [MENU] button to exit the menu.
◆ < > icon is displayed on the photos with DPOF
setup.
[ Notes ]
✤ Please refer to the product instructions for further details on
DPOF printer use.
✤ Using a printer that supports DPOF allows users to directly
print photos stored in a mini SD card without a PC.
✤ While the menu screen is displayed, pressing the [Record / Stop] button will
exit the menu.
5