1. Disconnect the module from the electrical supply:
l AC mains supply: disconnect the mains cable.
l 48VDC supply: first, disconnect the power cord from the 48VDC source. Next, on the
module, remove the protective cover 1, then use a screwdriver to disconnect the three
supply wires.
2. Remove the module: push the release lever sideways toward the extraction handle, and use
the handle to pull the module. Take hold of the case of the module and remove it completely.
3. Insert the new module with the product label facing upwards. When the module is fully
inserted, push until you hear a “click” that indicates that the module is locked in place. Verify
that the module is locked in place by pulling gently on the extraction handle: the module
must not move.
4. Attach the new module to the electrical supply:
l AC mains supply: plug in the mains cable.
l 48VDCsupply: with the power cord disconnected from the 48VDC supply, use a
screwdriver to attach the three wires of the power cord to the module 1 then reattach
the protective cover. The wires must be connected to the 48VDC module as shown above.
Next, connect the power cord to the 48VDC source.
Each PSU module is equipped with a light showing its state (two colors: green/red for the AC
mains module, blue/red for the 48VDC module):
• Module working correctly
l module connected to a power source but not installed in a firewall: green (AC mains)/blue
(48VDC).
- SN2100 and SN3100 (halted):
l module installed but not connected to a power source, and the other module is installed
and connected: green (AC mains)/blue (48VDC), blinking.
l module installed and connected to a power source: green (AC mains)/blue (48VDC),
blinking.
- SN2100 and SN3100 running:
l module installed and connected to a power source: green (AC mains)/blue (48VDC), not
blinking.
l module installed and not connected to a power source: red, blinking (+ buzzer).
• Module not functioning correctly
l module connected to a power source: red, not blinking.
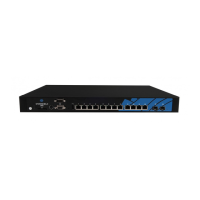
SN6100
SNS - PRODUCT PRESENTATION AND INSTALLATION 2019
APPENDIX D: CHANGING A POWER SUPPLY MODULE (SN2100, SN3100 AND SN6100)
Page 62/66 sns-en-SNrange_installation_guide-2019 - 09/2019