The powering of the next3 starts with the battery. The unit cannot be powered by AC or solar
without battery. Verify that the PV DC switch is open and there is no voltage presence on the
AC wires.
When supplying the 48Vdc voltage on the battery connection, the next3 device beeps and
all lights turn on for a few seconds. After that, your next3 installation is in the following state:
• The next3 is OFF (no AC voltage on the AC load connector)
• The red LED (with“!” sign) is permanently light on, because the next3 is OFF (LED2)
• The battery is connected (battery symbol is light on) (LED6)
• The voltage production on Ac Load is disabled (house symbol is light off) (LED5)
• The solar chargers are disabled (PV array symbol is light off) (LED7)
• The connection to Ac Source is disabled (grid/genset symbol is light off) (LED3)
• The Ac Flex is disabled (both grid/genset and house symbols are light off) (LED4)
• The nx-interface lights-up and start his boot process.
6.1 INITIAL CONFIGURATION
A next3 installation requires an initial configuration with the wizard. This must be done with the
nx-interface. Be sure to have it on your installation for the first commissioning.
The next3 will not start its operation without this first configuration.
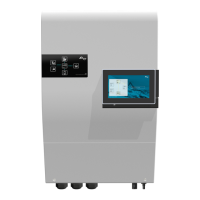
6.2 FRONT PANEL BUTTON
In the middle of the front panel, the ne[xt] part is a button with the following functions available
depending on how long the button is pressed:
• Short push: clear error(s), stop beeping
• 1 second < push < 3 seconds: ON/OFF of next3 and all its functions.
• 3 seconds < push < 5 seconds: stop/start of inverter and AC side. This way, the solar can still
charge the battery.
• 5 seconds < push < 7 seconds: enable/disable of the buzzer.
• 7 seconds < push: if you keep pushed more than 7 seconds, the button has no effect when
you release it.
You can hear a beep after ~1sec, ~3sec, ~5sec and ~7sec and you can release the button to
achieve the associated function at that moment. The front panel button can be
deactivated/activated via the nx-interface (but it’s not advised).
To power ON the next3 and all its functions: push the front panel button until you hear the first
beep (or use the ON/OFF button of the nx-interface). After this, your next3 installation is in the
following state (please note that it takes ~5sec to start all converters):
• The next3 inverter is ON.
• The “!” red LED is permanently off, because the next3 is now ON
• The battery is connected (battery symbol is light on)
• The voltage is provided to Ac-Loads (house symbol is light on)
• The solar chargers are enabled (PV array symbol is light on if the solar chargers are working,
or blinks once if the solar chargers are not working because there is no sun)
• The connection to Ac Source is enabled (grid/genset symbol is light off or light on depending
on your configuration)
• The Ac Flex is enabled (grid/genset and house symbols are light off or light on depending on
your configuration)
Your installation is now in operation!