3-97
Chapter 3
INSTALLATION AND SETTING PROCEDURES (HARDWARE)
9.3. Setting Procedures
9.3.1. Setting an initial impedance value
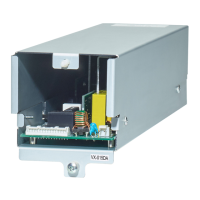
Step 1. Detach the front panel.
Remove 4 xing screws for front panel and detach
the front panel.
VX-3000F front
Fixing screws for front panel
1
RUN indicator
VX-3000F
(Front panel detached)
Per 1 sec. Per 5 sec.
Impedance initialize key
2
2
3
There is a high voltage section inside the power
amplifier's filter. Never insert your finger or
metallic objects inside the unit.
Notes
• Set the failure detection function to ON using the VX-3000 Setting Software before setting the initial impedance
value. Be sure to set the failure detection function to ON in advance. Otherwise, you cannot set the initial
impedance value. (See the separate Setting Software Instructions, "Surveillance Function.")
• Be sure to perform this setting after completion of connection work.
• Be sure to reset the initial impedance value if any wiring or connection has been changed after completion of
the setting.
• When measuring the speaker line impedance, be sure to stop all broadcasts in advance.
Measuring cannot be made correctly when audio signals are being output.
Step 2. Press the Impedance initialize key.
Impedance measurement starts. Blinking
cycle of the RUN indicator (the second LED
from the top of the 8 LEDs arranged vertically
on the right side) changes from 1-second
intervals to 5-second intervals.
Step 3. Wait until the RUN indicator returns to normal
state (ashing in 1-second intervals).
Step 4. Replace the front panel.
Secure it using 4 xing screws for front panel .