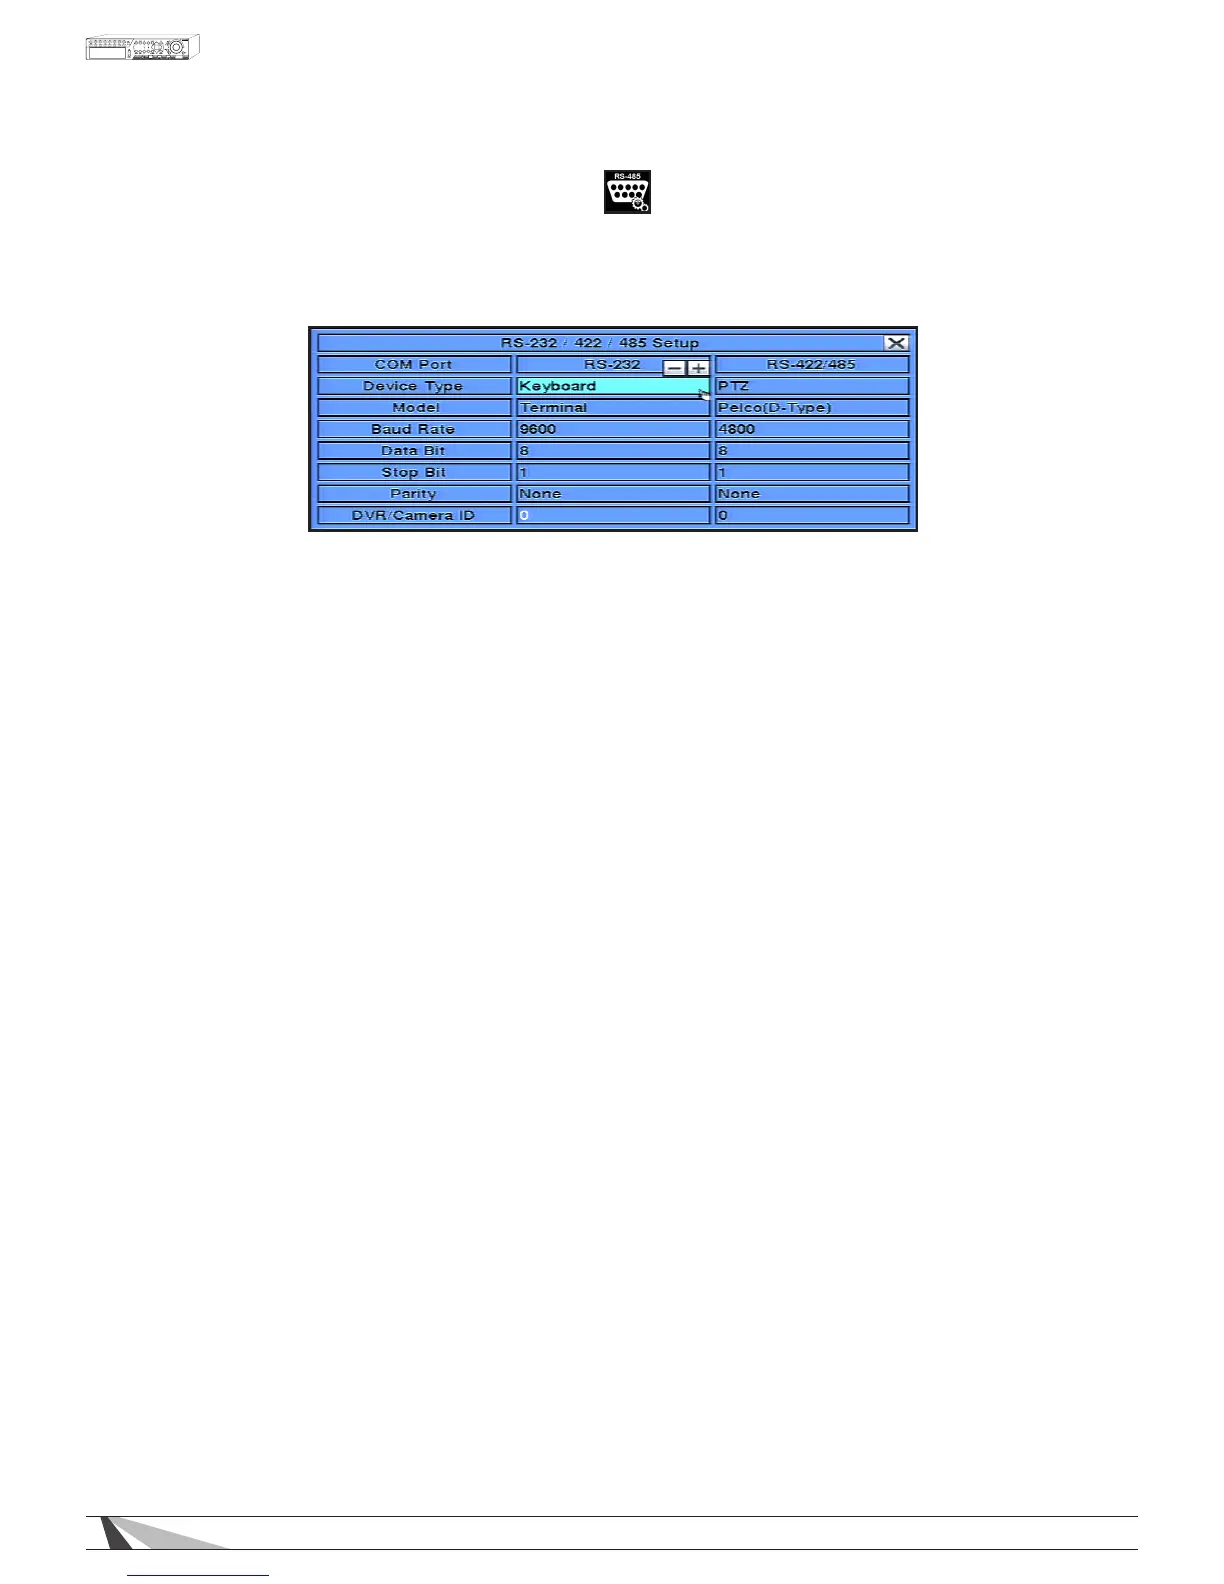
6.10. COMMUNICATION PROTOCOL SETUP
The RS-232 Setup allows the administrator to congure control of the DVR from an automation system via the
RS-232 DSUB connection. The RS-422/485 Setup allows the administrator to congure DVR control of PTZ camera
operation via the RS-422/485 screw terminal connections. Please refer to the manuals for the connected devices
(typically PTZ cameras) to properly set the options in RS-232 and RS-422/485 Setup.
RS-232 COM PORT
A list of available commands and syntax can be found in the RS-232 Protocol document located in the support
tab on the product page.
To navigate and operate this menu:
•▲▼◄►
In the Setup Menu, press these buttons on the front panel of the DVR or remote control to select the RS-
232/422/485 icon, and then press ENTER to display RS-232/422/485 Setup. Alternatively use the mouse to
select an item.
•ESC
Press the ESC button on the front panel of the DVR or remote control to escape from this menu and
return to the main menu. Alternatively use the mouse to exit the sub menu by clicking on the “X.”
If the contents in this menu have been modied, a Save dialog box will be displayed requesting the
user to save the changes. Press ENTER on the front panel of the DVR or remote control to exit and
save, ESC to exit without saving. Another method to escape is to use the mouse to “right-click,” and
exit the sub menu.
ThefollowingisabriefdescriptionforeachitemintheRS-232MENUanditsspecicoperations:
NOTE: All RS-232 Port settings are congurable.
•COMPORT
Non-congurable eld. Indicates whether the RS-232 or RS-422/485 Com Port options are selected.
•DEVICETYPE
Press the +/- buttons on the front panel of the DVR or on the remote control to change the device type
Alternatively use the mouse to select the appropriate setting. OPTIONS: PTZ, keyboard, PTZ+keyboard or (Not
Available).
NOTE: RS-232 device must be set to keyboard. 422 485 device must be set to PTZ
•MODEL CONFIG FOR 422485
Press +/- buttons to change the supported model (or protocol). Alternatively use the remote control to
change this setting. OPTIONS: Terminal(EX. VT-100) and Control Protocol.
•BAUDRATE
Press +/- buttons on the front panel of the DVR or on the remote control to change the Baud Rate
Alternatively use the remote control to change this setting. OPTIONS: 1200, 1800, 2400, 4800, 9600, 19200,
38400.
•DATABIT
Press +/- buttons on the front panel of the DVR or on the remote control to change the Date Bit Alternatively
use the remote control to change this setting. OPTIONS: 5, 6, 7, 8.
•STOPBIT
Press +/- buttons on the front panel of the DVR or on the remote control to change the Stop Bit Alternatively
use the remote control to change this setting. OPTIONS: 1,2.
•PARITY
Press +/- buttons on the front panel of the DVR or on the remote control to change the Parity. Alternatively
use the remote control to change this setting. OPTIONS: None, Odd, Even.
•DVR/CAMERAID
Set the PTZ ID for the DVR. It must not conict with other devices connected to the RS-485 network. Press +/-
buttons to change the ID. Alternatively use the remote control to change this setting.
 Loading...