3-6
Chapter 3: Maintenance
Aug 2012
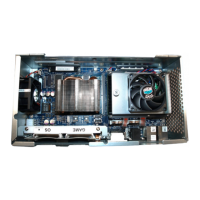
3 Holding the CPU Fan Assembly, tilt it slightly upward, Figure 3-11 (A), place it into the game,
and slide it backwards, Figure 3-11 (B), making sure the notches of the replacement CPU Fan
Assembly, Figure 3-11 (C), line up properly with the screws located on either side of the Heat
Sink, Figure 3-11 (D).
Figure 3-11 Tilting CPU Fan Assembly (top left), sliding into game (top right), lining up notches (bottom left),
notches lined up with Heat Sink screws (bottom right).
4 Tighten the CPU Fan thumbscrew, Figure 3-12 (A), to secure the CPU Fan Assembly.
Figure 3-12 Loosening and removing CPU Fan thumbscrew.
5 Tuck the wire alongside of the housing.
 Loading...