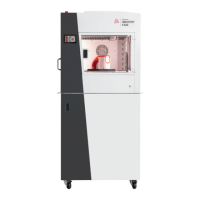
44 | 3DGence INDUSTRY F340
The 3DGence INDUSTRY F340 printer does not require any additional drivers. The only program required to operate the
device is the 3DGence Slicer software that generates a machine code. For more information on 3DGence Slicer refer
to the SOFTWARE chapter.
1.1. Updating rmware
Printer drivers are subject to periodic update. It is important that drivers are always updated to the newest version.
The latest printer driver is available at:
www.3dgence.com – tab: Support – Software/Firmware
The procedure of rmware update proceeds as follows:
1. Download the rmware le from the website above (the proper le has the .hex extension).
2. Download the free Xloader program to upload rmware to the printer driver.
3. Plug in an USB cable to printer USB port.
4. Plug in an USB cable to computer USB port.
5. Wait until new hardware installer operation is completed, if it has been started automatically. Pay attention to and
memorize the port number assigned to the printer, e.g. COM4.
6. In Xloader program in Hex le box mark the newly loaded rmware le.
7. In COM port box mark the port assigned to the printer. In Device box set the Mega(ATMEGA2560) option. Remaining
information should be left unchanged.
8. Press the Upload key. Loading the new software may take a few minutes. During the loading process, printer display
can show colorful artifacts (graphical noise), this is however completely normal. Update success will be conrmed by an
appropriate message displayed on the computer screen.
9. Now you can disconnect the USB cable from the printer and turn off the printer.
10. Turn on the printer and perform Factory Reset. Next perform Heatbed scan.
III PREPARING TO OPERATION
1. INSTALLING 3DGence Slicer
2. CONNECTING AND TURNING THE PRINTER ON
CAUTION: The printer must be connected to the mains with parameters meeting the requirements dened in the Connection
specications!
UNPACKING THE PRINTER
The 3DGence INDUSTRY F340 printer is protected for transportation with a wooden box integrated with its pallet. Use a
pallet truck, possibly with a jack to carry the box to the installation site.
CAUTION: Because the device is pretty heavy – 140 kg – use caution while moving and installing the device. Do not make
any attempts to install or move the device with fewer than 4 persons. Failure to observe the installation tips can result
in serious injuries or damage to the device!
Position the printer on a level, stable (solid) surface!
Unpacking the printer:
1. Break safety belts.
2. Remove the top cover of the box and then its sides.
3. Unscrew 5–40 mm screws from the front of OSB and remove the OSB.
4. Unscrew all the timber.