User Manual – General instruction for use
USER MANUAL • X-MIND prime • (19) • 01/2020 • NXMPEN010C
1. Ask the patient to remove all metallic objects located in the area to be X-rayed
(necklaces, earrings, glasses, hairpins, removable dental prosthesis, etc.). Ensure
that there are no thick garments in the area to be X-rayed (coats, jackets, ties, etc.).
2. Ask the patient to put on the protective apron, or something similar, making sure it
does not interfere with the trajectory of the X-ray beams.
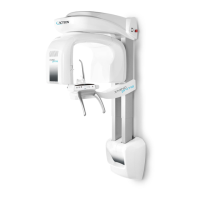
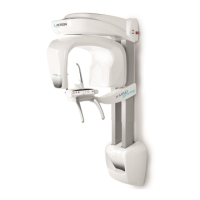
3. Place the patient in a standing position at the TMJ positioner. With the "Column
movement" keys (1/2 - Figure 10), raise/lower the column until the TMJ positioner is
aligned with the patient's nose.
Warning
During the patient positioning, make sure the equipment cannot collide with any
object in the room.
4. Position the patient with the temple clasps (asking him to place his hands on the
front support).
5. Instruct the patient to close his eyes.
6. Press the "Luminous centring devices" key (2 - Figure 10). Two laser beams will light
up the sagittal medial plane line and the horizontal line for the Frankfurt plane
reference (the plane that identifies a line that ideally links the ear hole - the auditory
meatus - with the lower part of the orbital fossa). Using the sagittal medial plane
laser (45 - Figure 29) as the reference, position the patient's head in such a way that
the sagittal medial plane is lit by the corresponding laser beam. The reference of the
Frankfurt plane can be used to make sure the head of the patient remains in the
same position when the exam is taken with the mouth either open or closed.
Note
The laser centring devices remain on for approximately 2 minute; the shutdown
can be anticipated by pressing the "Luminous centring devices" key (2 - Figure
10) or, with alignment complete, by pressing the "Patient entrance" key (6 -
Figure 10) to begin preparation for exposure.
7. Close the temple clasps; this will help the patient to stay in a correct position. During
this phase, check the patient has not changed position.
8. Press the "Patient Entrance" (6 - Figure 10) key to confirm the parameters. The
luminous centring devices switch off and the rotating arm goes to the exam start
position. Once alignment has been completed, the green LED "Ready for X-ray" (3
- Figure 10) lights up to indicate that pressing the X-ray button once more will start
the radiation phase.
9. Ask the patient to: keep their lips closed, keep perfectly still and not look at the
rotating arm during movement.
Note
With paediatric patient it is recommended to have a greater attention in taking
exams. Useful information and a specific checklist can be found at the Image
Gently website (www.imagegently.org).
In general with child and adolescent patients, before taking the exposure it is
suggested to run the exam in test mode in such a way to show the young
patient how the unit works and make them feel comfortable.