v
Figures
Figure 1: GS970M/10 and GS970M/10PS packaging ........................................................................................................... 8
Figure 2: GS970M/18 and GS970M/18PS packaging ........................................................................................................... 9
Figure 3: GS970M/28 packaging......................................................................................................................................... 10
Figure 4: GS970M/28PS packaging .................................................................................................................................... 11
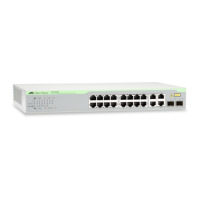
Figure 5: GS970M/10 front panel ........................................................................................................................................ 12
Figure 6: GS970M/10 back panel........................................................................................................................................ 13
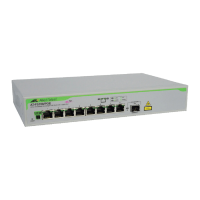
Figure 7: GS970M/10PS front panel ................................................................................................................................... 14
Figure 8: GS970M/10PS back panel ................................................................................................................................... 15
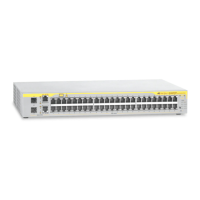
Figure 9: GS970M/18 front panel ........................................................................................................................................ 16
Figure 10: GS970M/18 back panel...................................................................................................................................... 17
Figure 11: GS970M/18PS front panel ................................................................................................................................. 18
Figure 12: GS970M/18PS back panel ................................................................................................................................. 19
Figure 13: GS970M/28 front panel ...................................................................................................................................... 20
Figure 14: GS970M/28 back panel...................................................................................................................................... 21
Figure 15: GS970M/28PS front panel ................................................................................................................................. 22
Figure 16: GS970M/28PS back panel ................................................................................................................................. 23
Figure 17: POWER LED on a GS970M Series Switch........................................................................................................ 32
Figure 18: FAULT LED on a GS970M Series Switch .......................................................................................................... 33
Figure 19: Link/Activity/Speed and PoE LEDs..................................................................................................................... 34
Figure 20: Link/Activity/Speed and Duplex/Collision LEDs.................................................................................................. 36
Figure 21: SFP Link/Activity LEDs on a GS970M Series Switch......................................................................................... 38
Figure 22: SD card slot LED on a GS970M Series Switch.................................................................................................. 39
Figure 23: ecofriendly button on a GS970M Series Switch ................................................................................................. 41
Figure 24: Attaching the rubber feet to a switch .................................................................................................................. 54
Figure 25: Removing the rubber feet from a switch............................................................................................................. 55
Figure 26: Fitting handles to rack mount brackets............................................................................................................... 56
Figure 27: Fitting brackets to the mounting ......................................................................................................................... 56
Figure 28: Attaching cable tray brackets ............................................................................................................................. 57
Figure 29: Mounting a GS970M/10 Switch in the brackets.................................................................................................. 57
Figure 30: Mounting a GS970M/10 Switch in the rack ........................................................................................................ 58
Figure 31: Securing cables to the cable tray ....................................................................................................................... 58
Figure 32: Attaching rack mount brackets to a GS970M/10PS ........................................................................................... 59
Figure 33: Mounting a GS970M/10PS switch in an equipment rack ................................................................................... 60
Figure 34: Attaching rack mount brackets to the GS970M/18, GS970M/18PS or GS970M/28 switch................................ 61
Figure 35: Mounting a GS970M/18, GS970M/18PS or
GS970M/28 switch in an equipment rack ............................................................................................................................ 62
Figure 36: Attaching rack mount brackets to the GS970M/28PS switch ............................................................................. 63
Figure 37: Mounting a GS970M/28PS switch in an equipment rack ................................................................................... 64
Figure 38: Ridges on the AT-BRKT-J23 that the switch rests on when installed with the front panel facing up ................. 65
Figure 39: Securing the GS970M/10 switch to the wall with the front panel facing up ........................................................ 66
Figure 40: Securing the GS970M/10 switch to the wall with the front panel facing right ..................................................... 66
Figure 41: Attaching wall mount brackets to the side of the switch ..................................................................................... 67
Figure 42: Securing the switch to the wall .......................................................................................................................... 68
Figure 43: Lifting the AC power cable hook on a GS970M Series Switch........................................................................... 71
Figure 44: Plugging in the AC power cord on a GS970M Series Switch............................................................................. 71
Figure 45: Connecting the management cable to the console port of a GS970M Series Switch ........................................ 73
Figure 46: Switch initialization messages............................................................................................................................ 75
Figure 47: Switch initialization messages (continued) ......................................................................................................... 76
Figure 48: Switch initialization messages (continued) ........................................................................................................ 77
Figure 49: Removing the dust plug from an SFP slot............................................................................
.............................. 78
Figure 50: Inserting an SFP transceiver into an SFP slot.................................................................................................... 79
Figure 51: Positioning the SFP handle in the upright position ............................................................................................ 79
Figure 52: Ejecting an SFP transceiver after lowering the SFP handle to the downwards position .................................... 80
Figure 53: RJ45 connector and port pin layout.................................................................................................................... 88

 Loading...