Do you have a question about the AOR AR8600 and is the answer not in the manual?
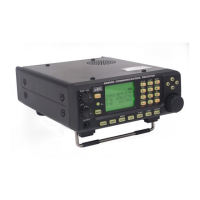
Provides an overview of the AR8600 receiver and manual usage recommendations.
Offers guidance on handling, cleaning, and protecting the AR8600 receiver.
Highlights operational considerations and key behaviour for the AR8600.
Lists the items included with the AR8600 receiver package.
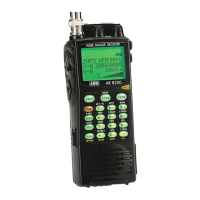
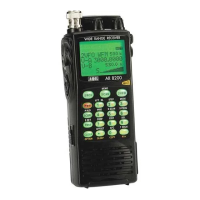
Introduces the physical controls and their primary functions on the AR8600.
Explains the function and conventions of the AR8600 keypad layout.
Details the primary functions of various keys on the AR8600.
Describes key controls like FUNC, KEY LOCK, MONITOR, and MAIN DIAL.
Covers power requirements, DC input, and optional battery for the AR8600.
Details the BP8600 NiCad battery pack, its capacity, and intended use.
Explains the procedure and time required for charging the optional BP8600 battery.
Provides important advice on NiCad battery care, charging, and longevity.
Describes how to power the AR8600 using a vehicle's cigar lighter socket.
Explains the IF output for the SDU5500 Spectrum Display Unit.
Describes the AR8600's LCD, its legends, and contrast adjustment.
Guides on connecting the supplied whip and MW bar aerials to the AR8600.
Details how to connect the DC power supply or cigar lighter lead to the AR8600.
Summarizes essential keypad and knob functions for AR8600 operation.
Explains the function of the ENTER key for data entry and confirmation.
Describes the FUNCTION key's role in accessing secondary key functions.
Details the PASS key's function for locking out frequencies in search mode.
Explains the CLEAR key's use for aborting entries or returning to previous menus.
Describes the MONITOR key's function to force the squelch open.
Explains how to engage and disengage the KEY LOCK function.
Describes the STANDBY key for switching the AR8600 on and off.
Guides on the initial power-on procedure and opening message handling.
Explains the dual VFO system (VFO-A and VFO-B) for monitoring two frequencies.
Details how to input frequencies directly using the AR8600's numeric keypad.
Explains how to correct frequency entry errors using the backspace facility.
Describes using the UP/DOWN arrow keys for frequency tuning.
Explains how to use the main rotary dial for frequency tuning.
Covers selecting different receive modes for optimal signal reception.
Details how to activate and use the AR8600's auto-mode for frequency and mode settings.
Explains how to access and select from the available receive modes menu.
Guides on adjusting the tuning step size for frequency increments.
Explains the STEP-ADJUST feature for tracking unusual band plans.
Describes how the AR8600 automatically calculates step-adjust values.
Details the methods for cancelling the step-adjust feature.
Explains how to manually set the step-adjust value.
Covers the FREQUENCY OFFSET feature for shifting frequencies.
Explains how to use factory-programmed frequency offset data.
Guides on manually programming new frequency offset data.
Details the attenuator function to reduce strong signal overload.
Explains the noise limiter feature for AM and SSB modes.
Describes the AFC feature for ensuring accurate tuning and reception.
Explains the quick memory feature for saving and recalling VFO data.
Guides on how to save current VFO data into quick memory slots.
Details how to retrieve data from the quick memory slots.
Explains the VFO scan feature for monitoring activity between two frequencies.
Covers setting the sampling time for VFO scan operations.
Describes the VFO search function to locate active frequencies between specified limits.
Guides on setting the frequency limits for VFO search.
Explains how to initiate and start the VFO search process.
Details how to resume a paused search or change its direction.
Explains the PASS feature to skip unwanted frequencies during search.
Guides on saving active frequencies found during search to memory.
Describes how to stop and exit the VFO search mode.
Introduces the VFO environment menu for customizing scan and search parameters.
Explains how to enable or disable VFO scan via the environment menu.
Details setting the delay time before resuming VFO search after a signal loss.
Describes the LEVEL squelch parameter for filtering signals based on strength.
Explains the VOICE squelch parameter for filtering signals based on audio level.
Details setting the FREE search time parameter.
Covers the AUTO STORE feature to automatically save found frequencies to memory bank J.
Explains how to delete the contents of memory bank J used for auto store.
Describes automatically saving frequencies to quick memories during VFO search.
Provides an overview of the AR8600's memory channels, banks, and their data storage capabilities.
Details the process of saving VFO frequencies and associated data into memory.
Provides a practical example demonstrating how to write data to memory.
Explains the automatic allocation of memory channels when writing data.
Covers protecting memory channels and banks from accidental overwriting.
Describes how to retrieve stored memory data from the AR8600.
Guides on reviewing and searching through stored memory channels.
Explains how to delete individual memory channels or entire banks.
Details editing, copying, moving, and swapping memory channels.
Guides on naming memory banks for better identification.
Explains how to transfer memory channel data to the VFO for monitoring.
Covers resizing memory banks and reallocating channels.
Explains how to activate the PRIORITY channel monitoring function.
Guides on selecting a different priority channel and adjusting settings.
Details how to change the memory channel used for priority monitoring.
Explains how to adjust the interval time for checking priority channel activity.
Provides an introduction to the SCAN mode for monitoring memory channels.
Offers important points to consider before starting a scan.
Guides on initiating the scan process from different operating modes.
Explains transferring an active memory channel to VFO during a scan pause.
Details how to select specific memory banks for scanning.
Explains the PASS feature to skip unwanted channels during scanning.
Guides on temporarily tagging channels to be skipped during scanning.
Describes how to remove all PASS tags simultaneously.
Explains how to delete single memory channels or entire banks.
Guides on deleting individual memory channels.
Details how to delete entire memory banks.
Explains how to link memory banks to create custom scan groups.
Introduces extra scan parameters like DELAY, LEVEL, VOICE, FREE, MODE.
Details setting the delay time before resuming scan after a signal loss.
Explains the LEVEL squelch parameter for scan filtering based on signal strength.
Describes the VOICE squelch parameter for scan filtering based on audio level.
Details setting the FREE scan time parameter.
Guides on selecting specific receive modes for scanning.
Covers write protection for memory channels and banks.
Explains the SELECT SCAN feature for creating custom scan lists.
Guides on adding channels to the SELECT SCAN LIST from memory read mode.
Details how to start and stop the SELECT SCAN process.
Explains how to customize the SELECT SCAN environment.
Guides on adding and deleting channels from the SELECT SCAN LIST.
Explains how to delete all channels from the SELECT SCAN LIST.
Describes the two types of search: VFO SEARCH and PROGRAM SEARCH.
Introduces program search banks and their configurable parameters.
Guides on initiating the program search process.
Explains how to reverse the search direction.
Details how to resume a paused search or change its direction.
Explains how to stop the search and transfer the frequency.
Guides on transferring active search frequencies to VFO or memory.
Explains how to select and recall search banks for programming or searching.
Details how to program search banks with frequency limits, modes, and steps.
Explains the PASS feature to skip unwanted frequencies during program search.
Guides on reviewing, deleting, and adding pass channels in the search pass menu.
Explains how to link search banks to create groups for scanning.
Introduces additional search parameters like DELAY, LEVEL, VOICE, FREE, AUTO STORE, DELETE J.
Details setting the delay time before resuming search after a signal loss.
Explains the LEVEL squelch parameter for search filtering based on signal strength.
Describes the VOICE squelch parameter for search filtering based on audio level.
Details setting the FREE search time parameter.
Covers the AUTO STORE feature to automatically save found frequencies to memory bank J.
Explains how to delete the contents of memory bank J used for auto store.
Guides on deleting program search data and associated pass frequencies.
Covers write protection and copying of search banks.
Guides on copying one memory channel to another location.
Details copying an entire memory bank to another location.
Explains copying a search bank to another location.
Guides on moving a memory channel, leaving the original location empty.
Details swapping data between two memory channels.
Explains how to change memory channel data like mode, frequency, and text.
Covers toggling write protection for search banks.
Guides on deleting search banks and their associated pass frequencies.
Explains how to delete all VFO frequency pass channels.
Details deleting entire memory banks.
Guides on deleting all SELECT SCAN channel tags.
Explains how to remove write protection from all memory channels.
Guides on removing PASS tags from all memory channels.
Covers protecting individual memory channels from data changes.
Guides on applying write protection during memory input.
Explains how to toggle write protect status for existing channels.
Details removing all channel protect tags.
Covers write protection for entire memory banks.
Guides on write protection for individual search banks.
Explains the global write protect feature for preventing all data changes.
Describes the menus for entering text comments for channels, banks, and searches.
Explains how to search for stored text comments within the AR8600.
Lists key combinations for quick access to menus and functions.
Describes using shortcut keys for text entry with a keypad.
Explains text entry using keypad combined with arrow keys.
Details how to set beep confirmation and error tones on the AR8600.
Guides on configuring the LCD and keypad illumination modes (CONT, AUTO, OFF).
Explains how to adjust the LCD contrast level for optimal visibility.
Covers the auto power off feature to conserve battery life.
Details configuring RS232 settings for computer control.
Explains how to enable or disable frequency display in certain modes.
Covers global write protection for all AR8600 data storage.
Guides on setting custom opening messages displayed at power-up.
Explains how to activate the band scope function for graphical display of band activity.
Details how to exit the band scope display.
Guides on adjusting the band scope's frequency span width for zoom effects.
Explains how to move the marker on the band scope display.
Describes using peak search to find the strongest signal on the band scope trace.
Guides on setting a new centre frequency for the band scope.
Explains transferring the marker frequency to VFO for monitoring.
Details the PEAK HOLD facility for building a band activity image.
Guides on saving band scope traces to memory for later retrieval.
Explains how to load saved band scope traces from memory.
Guides on setting the AR8600 to automatically switch to standby after a set time.
Explains the format and requirements for sending RS232 commands to the AR8600.
Provides an alphabetical index of RS232 commands for AR8600 control.
Offers a detailed explanation of each RS232 command and its parameters.
Guides on copying data between AR8600 units using the RS232 socket.
Provides a step-by-step procedure for cloning data between radios.
Lists the available optional slot cards for the AR8600.
Guides on correctly inserting optional slot cards into the AR8600.
Explains the procedure for safely removing slot cards.
Details registering slot cards via the OPTION menu for use.
Describes the TE8200 slot card for eliminating transmission tones.
Explains the CT8200 slot card for CTCSS tone squelch and search.
Guides on using the CTCSS tone squelch feature.
Details the CTCSS search facility to discover active CTCSS frequencies.
Describes the VI8200 slot card for recovering intelligible audio from analogue transmissions.
Explains the RU8200 slot card for recording and playback of audio.
Guides on recording audio using the RU8200 slot card.
Details how to play back recorded audio using the RU8200 slot card.
Explains the EM8200 slot card for backing up AR8600 data to external memory.
Guides on formatting the EM8200 memory card for first-time use.
Details saving and loading all AR8600 data to/from the EM8200.
Explains saving and loading all memory banks to/from the EM8200.
Guides on saving and loading specific memory banks to/from the EM8200.
Details saving and loading all search banks to/from the EM8200.
Explains saving and loading specific search banks to/from the EM8200.
Guides on saving and loading band scope traces to/from the EM8200.
Explains how to perform a soft reset on the AR8600 microprocessor.
Provides solutions for common AR8600 operational issues like no power or strange displays.
Lists important points and common problems to consider during troubleshooting.
Lists the available optional slot cards for the AR8600 receiver.
Lists available miscellaneous accessories like leads and filters.
Mentions various suitable aerials available for the AR8600.
Describes the supplied whip aerial and its use for VHF/UHF bands.
Provides advice on optimal external aerial mounting locations.
Discusses the use and connection of long wire aerials for short wave reception.
Mentions the discone aerial as a popular choice for wide VHF-UHF coverage.
Mentions the VHF civil AIRBAND FILTER for minimizing breakthrough.
Explains the importance of proper earthing for aerial efficiency and noise reduction.
Discusses VHF/UHF and short wave propagation characteristics.
Lists the AR8600's operational frequency range and input capabilities.
Details the various receive modes supported by the AR8600.
Provides sensitivity figures for different frequency bands and modes.
Lists the selectivity figures for various receive modes.
Specifies the AR8600's power consumption requirements.
Provides the physical dimensions of the AR8600 receiver.
States the weight of the AR8600 receiver.
Lists the number of memory channels and banks available.
Specifies the number of channels that can be selected for scanning.
Indicates the number of priority channels available.
States the number of search banks supported by the AR8600.
Lists the number of PASS channels available for search and VFO.
Specifies the maximum scan/search rate in steps per second.
| frequency range | 530 kHz to 2040 MHz |
|---|---|
| receive modes | WFM, NFM, SFM, WAM, AM, NAM, USB, LSB, CW |
| sensitivity 500 kHz to 2.0 MHz | AM: 3.50 µV (10dB S/N) |
|---|---|
| sensitivity 2.0 MHz to 30 MHz | SSB: 1.50 µV (10dB S/N), AM: 2.50 µV (10dB S/N) |
| sensitivity 30 MHz to 470 MHz | SSB: 0.30 µV (10dB S/N), AM: 0.70 µV (10dB S/N), NFM: 0.35 µV (12dB SINAD), WFM: 1.00 µV (12dB SINAD) |
| sensitivity 470 MHz to 1 GHz | NFM: 0.50 µV (12dB SINAD), WFM: 1.50 µV (12dB SINAD) |
| sensitivity 1.0 GHz to 1.3 GHz | NFM: 1.00 µV (12dB SINAD) |
| sensitivity 1.3 GHz to 2.039 GHz | NFM: 2.50 µV (12dB SINAD) |
| selectivity SSB/NAM | 3kHz (-6dB), 9kHz (-60dB) |
|---|---|
| selectivity AM/SFM | 9kHz (-6dB), 20kHz (-40dB) |
| selectivity WAM/NFM | 12kHz (-6dB), 25kHz (-40dB) |
| selectivity WFM | 150kHz (-3dB), 380kHz (-20dB) |
| power consumption | 350mA (nominal) |
|---|---|
| external power | 12 - 14V d.c. |
| dimensions | 155(W) x 57(H) x197(D) mm |
|---|---|
| weight | 1.5kg |