89
Using the Rhythm Guide
Advanced Use
[FF] Advances the input location using the
resolution set with “RES.”
[REW] Moves the input location back using the
resolution set with “RES.”
* With longer patterns or at higher resolutions, the content of
the pattern may not be completely viewable in the display. If
this occurs, set the cursor at the far left or far right of the
display to move it further. The screen scrolls horizontally in
the display.
* If you want to use a drum sound other that the one displayed,
move the cursor up or down. The screen scrolls vertically,
bringing other drum sounds into the display.
* With certain patterns, such as those created using Realtime
Recording, a drum sound might be input at a location with a
higher resolution than that set in “RES.” In such instances,
the “●” may be shown as being split. This type of performance
data cannot be edited in its current state. Until this is no
longer shown as split, select a finer “RES” setting first, and
then edit the data.
* You can check the input data by pressing [PLAY] to actually play
back the data. To stop playback, press [STOP]. The playback
tempo at this time is the tempo set in Step 4. Alternatively, by
pressing [TAP] four times at a steady interval, you can switch to
the tempo corresponding to that interval.
7. To change the Step Input resolution, press [EXIT],
move the cursor to the upper half of the display and
then to “RES,” then rotate the TIME/VALUE dial to
select the resolution setting.
When you press [ENTER], the cursor returns to the
lower half of the display.
8. Repeat Steps 6 and 7 as necessary to complete the
rhythm pattern.
9. When you have finished with Step Recording, then
press [EXIT] twice.
The pattern edit screen returns to the display.
10.Carry out Steps 7 and 8 (p. 87) in “Creating rhythm
patterns using Realtime Recording” to save the rhythm
pattern.
* Note that if you select a different rhythm pattern or load a
song without having saved the current settings, the recorded
data will be lost. You’ll also lose the data if the power is cut or
turned off before the data is saved.
Making corrections in rhythm
patterns (Microscope)
To make detailed corrections to rhythm patterns, use
Microscope. Microscope is a function that displays rhythm
pattern performance data as a list, allowing you to make
detailed revisions in the data.
1. In the rhythm pattern edit screen, use [CURSOR] to
move the cursor to “M SCP,” then press [ENTER].
The Microscope screen appears.
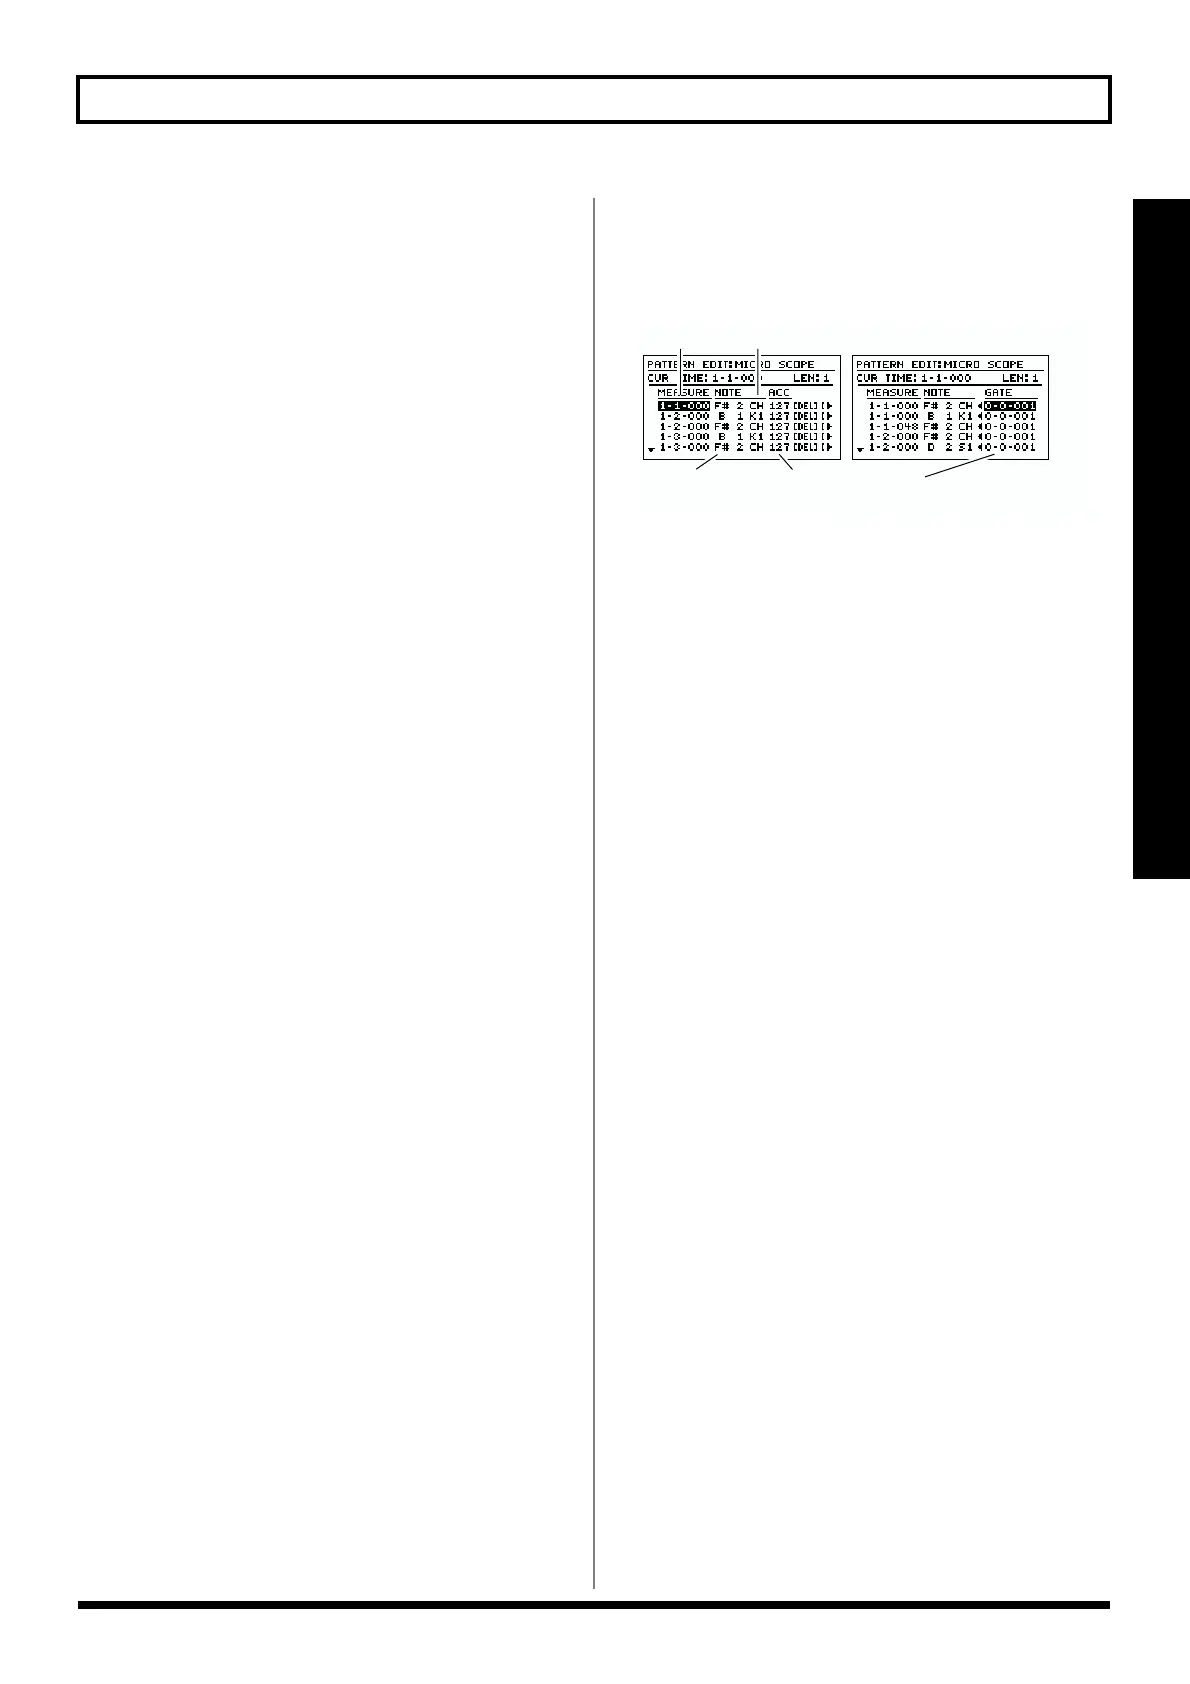
The performance data content is as shown below.
fig.R13-11
* To display [INS] [MOVE] GATE, move the cursor to the far
right side of the screen to move the screen further to the right.
* With the BR-1180/1180CD’s Rhythm Guide, drum sounds
are played with the same length, regardless of the Gate Time
settings, so you can keep the Gate Time setting at “1” at all
times. In addition, when using MIDI to play an external
sound module using the BR-1180/1180CD, refer to the
owner’s manual for the external sound module before making
the Gate Time setting.
2. Use [CURSOR] to move the cursor to the performance
data you want to edit, then rotate the TIME/VALUE
dial to edit the performance data.
When you want to move performance data
1) Move the cursor to “[MOVE],” then press [ENTER].
2) Rotate the TIME/VALUE dial to set the time position
of the destination to which the performance data is to
be moved.
3) Press [ENTER].
The performance data is moved to the new location.
When you want to delete performance data
1) Move the cursor to “[DEL],” then press [ENTER].
The performance data is deleted.
When you want to insert performance data
1) Move the cursor to “[INS]” (or to “[INSERT]” if adding
at the end of the existing data), then press [ENTER].
Performance data is inserted at the current location.
3. When you have finished using Microscope, press [EXIT].
The rhythm pattern edit screen returns to the display.
4. Carry out Steps 7 and 8 (p. 87) in “Creating rhythm
patterns using Realtime Recording” to save the rhythm
pattern.
* Note that if you select a different rhythm pattern or load a
song without having saved the current settings, the edited data
will be lost. You’ll also lose the data if the power is cut or
turned off before the data is saved.
Location
Drum Tone
Note Number
Accent
(
velocity
)
Gate Time
the length of time from when the note begins to sound,
to the time it stops playing


 To Next Page