Technical Manual
hD8625 8-
5
/
8
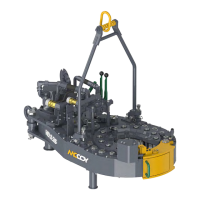
” 35K Tong
3.19
Assembly Procedures (continued...):
59. Installmechanicaldoorstop(PN101-1833)tothebottomplateofthetongnexttotheLHbrakebandretainerweldment.Securewith
two3/8”NCx2”boltsand3/8”lockwashers.
60. Installthedoorspringcylinder(PN101-0069)usingtwo1/2”x1/2”hexsocketshoulderbolts(UNC).
61. Installupperandlowerlinedbrakebandweldments(PN1050-D4-29).Secureeachbrakebandtothetoporbottomplatewitha
brakebandretainer(PN101-0140),and3/8”NCx1”hexboltsand3/8”lockwashers.Attachthefrontsofeachbrakebandweldment
tothebrakebandlugweldmentswith3/8”UNCx1-1/2”hexbolts,3/8”narrowflatwashers,and3/8”UNChexnylocknuts.These
nutandboltsetsareusedforadjustingthebrakebandtension.
62. Installthesafetydoorswitchassemblyusingthefollowingprocedure(seePp.5.30-5.31):
i. Attachsafetydoorlatchspacer(PN101-1411)tothetopofthedoorweldmentusingtwo3/8”NCx1”hexsocketheadcap
screwsand3/8”lockwashers.
ii. Attachsafetydoorlatchblock(PN101-1104)tothelatchspacerusingfour3/8”NCx1/2”shoulderbolts.
iii. Attachsafetydoorlatchblock(PN101-1103)tosafetydoorlatchplate(PN101-1410)usingthree3/8”NFx1”flatheadcoun-
tersunkcapscrews.
iv. Placethesafetydoorlatchplate(PN101-1410)ontothebottomplateofthesafetyswitchbaseandguardweldment(PN101-
1475)andaligntheboltholes.Securetothetopplateusingtwo3/8”NCx2-1/4”hexsocketheadcapscrewsandone3/8”NC
x1-1/4”socketheadcapscrew.Notethatthetwolongercapscrewsinthisstepreplacetwoofthetong’sperimeterfasteners.
v. Insertloadplunger(PNAE12-306)intoLHsafetydoorlatchblock(PN101-1103).
vi. Attachthree1/4”NPTx1/4”JICelbows(PN08-0284)totheDeltrolsafetydoorvalve(PN08-0337M).Positiona15/16”valve
locknut(PN09-0278)asshowninillustration3.H.9,andsecurethesafetydoorvalvetothesafetydoorlatchblockusingthe
valvelocknut.
IllustratIon 3.H.9: tong assemBly - safety Door valve InstallatIon
vii. Attachthetopplateoftheswitchguard(PN101-1474)totheswitchguardweldmentusingthree3/8”UNCx1”hexboltsand
3/8”lockwashers.
63. InstalltheLH&RHrigidslingmountinglugs(LH=PN101-0113,RH=PN101-0115)usingtwo3/8”NCx1-3/4”hexboltsand3/8”
lockwashers,andtwo1/2”NCx1-1/4”hexboltsandlockwashersperside.
64. Slidethemasterliftinglink(PN02-0516)overtheadjustmenthelix(PN1053-1-H),andinstalltheadjustmenthelixintherigidsling
weldment(PN101-0112)usinga3/4”UNCx8”hexboltand3/4”UNCnylocknut.
65. Useacranetohoisttherigidslingweldment.Connecttherigidslingweldmenttotherigidslingmountinglugswithrigidslingpins
(PN1053-C-1C).Secureeachpinwithtwo0.148”x2.938”hitchpins.
MainTenance