Home
Framery
Indoor Furnishing
2Q
Page 38 (Attach the Roof Modules Together (Front))
Framery 2Q - Attach the Roof Modules Together (Front)
186 pages
Manual
Save Page as PDF
To Next Page
To Next Page
To Previous Page
To Previous Page
Loading...
Framery 2Q Huddle
4.
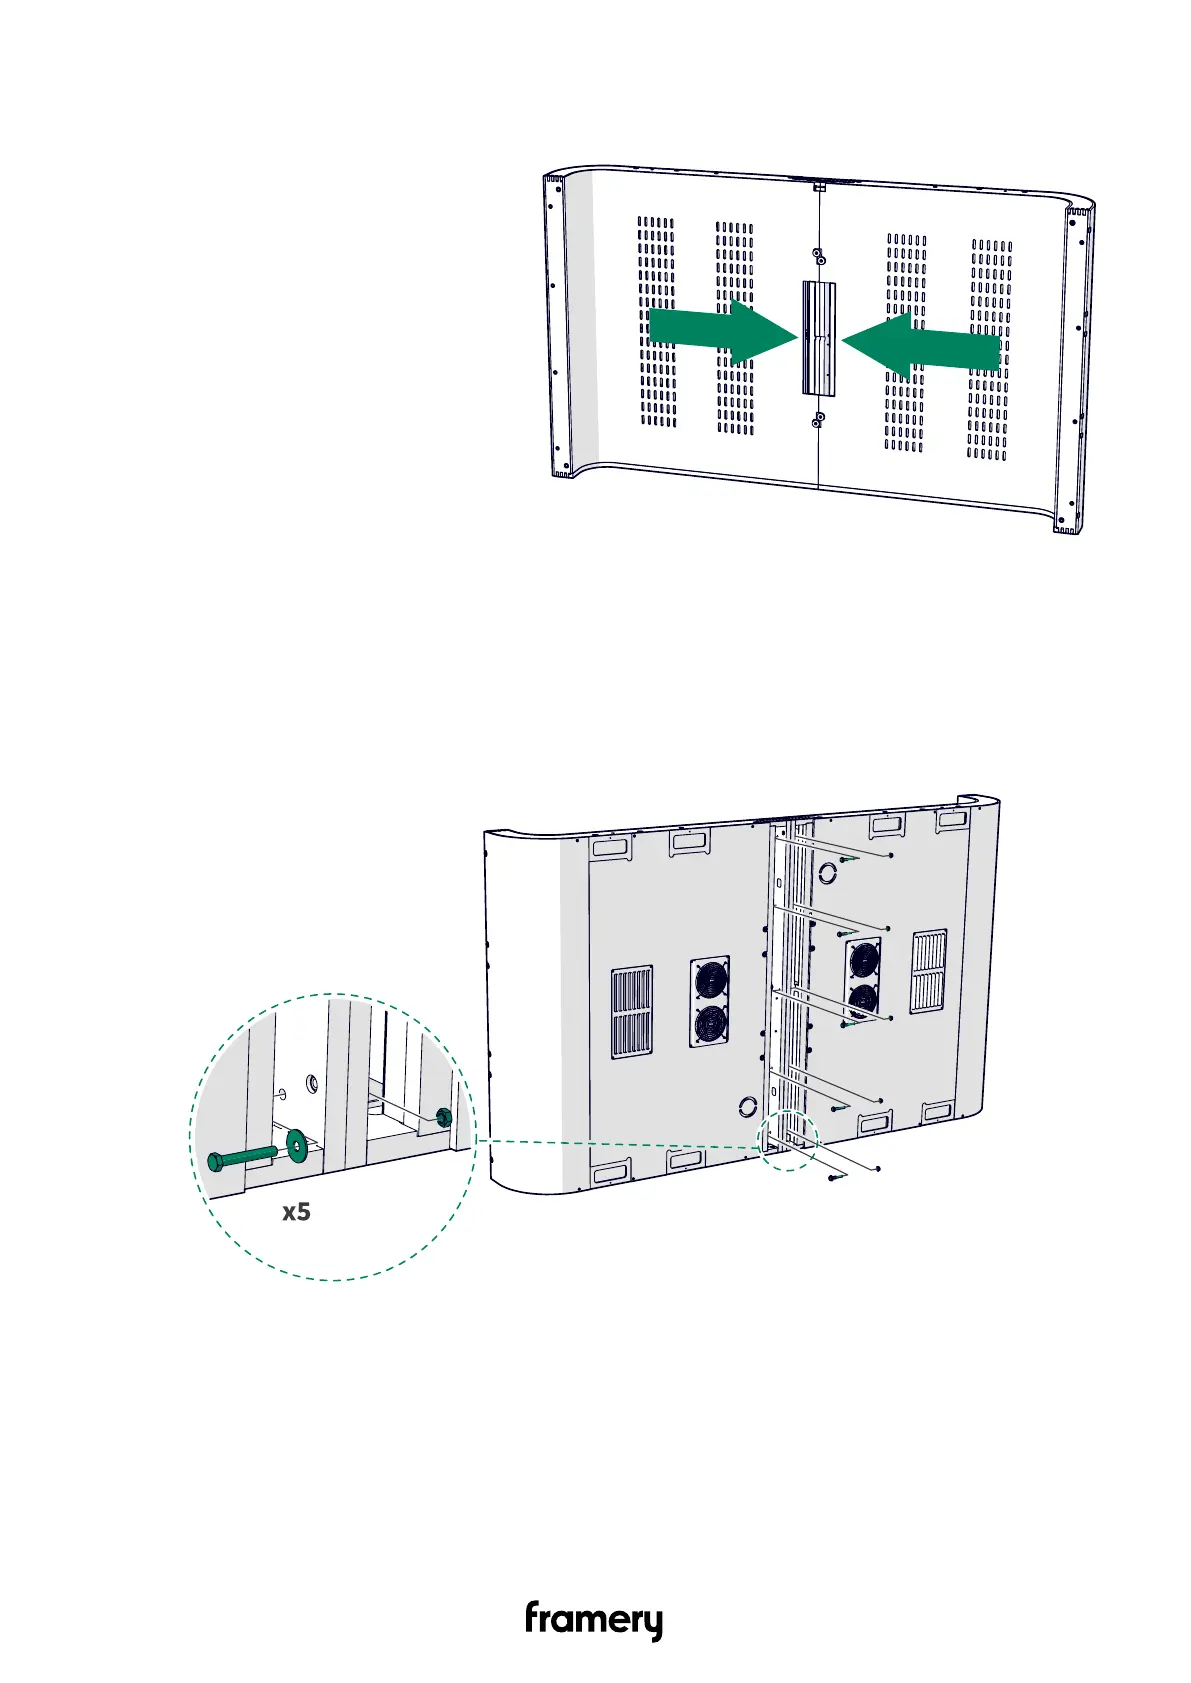
Push the roof modules together
.
6.2.2 Attach the roof modules together (front)
1.
Install M8x55 bolts (5 pcs), M8 washers (5 pcs), and flanged M8 nuts (5 pcs).
38
Installation instructions
info@frameryacoustics.com
37
39
Table of Contents
Main Page
Table of Contents
3
Warranty Checklist
7
Important Safety and Product Instructions
8
Preface
8
Product Information
8
Copyright
8
Manual Contents
8
Intended Use
8
Non-Conventional Use
8
Ambient Conditions for Use
9
Warning, Information, and Safety Symbols in this Manual
9
Main Safety Risks Related to the Installation, Maintenance, Disassembly, and Use of the Product
9
Installation, Maintenance, and Disassembly
10
Electrical Safety
10
Fire Safety
11
Use
12
Installation Requirements
14
Tools and Accessories
14
Main Dimensions
15
Installation Space
16
Operating Space
16
Prepare the Carpet for Installation
17
Install the Back Half of the Pod
18
Install the Back Half of the Floor
18
Install the Back Half of the Roof
22
Prepare the Roof Modules (Back)
22
Attach the Roof Modules Together (Back)
24
Install the Upper Frame (Back)
26
Install the Wall Modules and the Roof of the Back Half of the Pod
27
Install the Support Beam to the Wall Modules (Back)
27
Assemble the Roof Support Beams (Back)
28
Install the Back Half of the Roof to the Wall Modules
29
Install the Combined Roof and Walls to the Floor (Back)
32
Install the Front Half of the Pod
34
Install the Front Half of the Floor
34
Install the Front Half of the Roof
36
Prepare the Roof Modules (Front)
36
Attach the Roof Modules Together (Front)
38
Install the Wall Modules and the Roof of the Front Half of the Pod
41
Install the Support Beam to the Wall Modules (Front)
41
Install the Front Half of the Roof to the Wall Modules
42
Install the Combined Roof and Walls to the Floor (Front)
45
Connect the Back and Front Halves of the Pod
47
Check the Straightness of the Pod Halves after Connecting
50
Install the Back Frames and Glasses
56
Install the Left-Hand Frames
56
Install the First Side Glass and the Center Glass
59
Install the Right-Hand Frames and the Other Side Glass
60
Finalize the Installation of the Back Frames and Glasses
63
Install the Carpet
65
Install the Front Frames and Glasses
66
Install the Corner and Side Frames
66
Install the Control Panel
68
Install the Booking System Bracket (Optional)
72
Install the USB Cord into the Strike Plate-Side Glass Frame (Optional)
73
Install the Booking System Bracket (Optional)
74
Install the 5V Unit (Optional)
80
Install the Side Glasses
84
Install the Front Center Frame
88
Finalize the Installation of the Front Frames and Glasses
89
Install the Control Unit
90
Install the Control Panel Cord and the Ceiling Threshold
93
Install the Door
99
Install the Floor Threshold
99
Install the Door
100
Adjust the Closing Speed of the Door
103
Install the Lock Case
109
Install the Door Handle
110
Install the Smart Lock Handle (Optional)
113
Adjust the Strike Plate
120
Check the Lock Function
121
Adjust the Door Height
124
Adjust the Automatic Door Seal
127
Install the Interior and Electrics
129
Install the Metal Box to the Table Top
129
Install the Power Outlet to the Table Top
134
Install the Wall Bracket and Table Legs
136
Install the Power Outlet on the Table
138
Install the Power Cord from the Roof
141
Install the Seals
141
Install the Display Bracket and Display (Optional)
147
Install the Metal Trims and Cord Duct
150
Install Electrical Connections to the Control Unit
154
Install the Motion Detector
158
Install the Lights
159
Finalize the Installation of the Table and Electrics
161
Install the Cover Panels and the Body Covers
166
Install the Roof Cover Panels
166
Install the Roof Cover Plates
167
Install the Wall Cover Panels
168
Install the Bottom Body Covers
170
Install the Wall Body Covers
171
Install the Roof Body Covers
174
Finalize the Installation of the Body Covers
177
Install the Whiteboard
178
Finalize the Installation
182
Related product manuals
Framery Q Working with PAL
106 pages