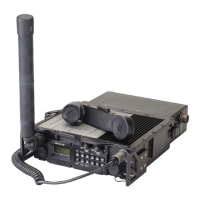
General Dynamics C4 Systems URC-200 (V2)
92
NOTE
The “more” soft key may have to be depressed for the “500 us” soft key to
be displayed.
n. Move the cursor to the Vert (Vertical) position and depress the "1 V" soft key.
NOTE
The “more” soft key may have to be depressed for the “1 V” soft key to be
displayed.
o. Move the cursor to the Pos (Position) position and depress the "move up" or "move
down" soft keys as appropriate to center the displayed scope screen trace. The TUNING
knob on the R2600 panel may be used in lieu of the "move up" or "move down" soft keys.
p. Adjust both the SQUELCH and VOLUME controls on the front panel to their maximum
CCW positions.
5. Setup the URC-200 (V2) as follows:
a. Turn the transceiver on and note the input current. It should be approximately 240mA. If
the current exceeds 330mA, a problem exists in the transceiver. Turn off the power and
troubleshoot the transceiver.
b. Adjust the URC-200 (V2) for preset channel 8. On the URC-200 (V2) set the frequency
to the preset frequency as listed in Table 21 for channel 8. Adjust the URC-200 (V2) for
the following:
FM, PT, SCN OFF, BCN OFF, SPKR ON
To configure presets, refer to Paragraph 4.4.6.
c. Adjust the SQ (Squelch) control fully counter-clockwise, past its detent, to the OFF
position.
6. Squelch Sensitivity Measurements:
a. On the R2600 front panel depress the RF key. Move the cursor to the Output Lvl (RF Output
Level) position. Using the TUNING knob on the front panel adjust the RF Output Level to
<-130 dBm.
b. Adjust the Squelch control clockwise until the speaker just squelches. Adjust the TUNING
knob that is adjusting the RF Output Level clockwise until the speaker just releases squelch.
The TUNING knob's resolution may have to be adjusted so it is controlling tenths of a dB of
RF Output Level. To do this, depress the RIGHT or LEFT ARROW CURSOR CONTROL
keys to position the cursor on the RF Output Level's tenth of a dB position.
c. Read the RF Output Level. Verify compliance with Table 1.
5.3.2.7 Scan Function
1. Set up the test equipment as shown in the Figure 16. Connect the
VERT/SINAD/DIST/DVM/COUNTER IN connector on the R2600 to Pin E (PT Out) of the
Remote connector. Pin A of the Remote connector is return ground.
2. Set the input power supply to 28 ±1 VDC.