Do you have a question about the iLumin SC-RP and is the answer not in the manual?
General introduction to the iLumin Switched Relay Controller and its capabilities.
Explains how each model is specified using a part number.
Provides examples of product part numbers and their configurations.
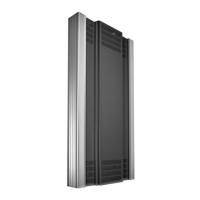
Definition of the main device containing power dimming and switching circuitry.
Description of the user interface for programming and operation.
Definition of a physical circuit for controlling electrical loads.
Virtual representation of one or more Outputs for unified control.
User interface for occupants to adjust lighting or control other devices.
Devices connected in a daisy chain on the iCAN network.
Explains how to use the control panel for programming and operation.
Description of LEDs indicating system status and communication links.
Explains how to navigate the control panel menu system using buttons.
Details functions for users to operate the system.
Details functions for engineers during commissioning and tuning.
Provides a diagram of the Operation menu structure and its options.
Options for setting up individual output behaviors and parameters.
Tool for locating and programming wallstations directly from the panel.
Configuration for Ethernet, DMX, Passwords, and Restore Defaults.
Covers initial network wiring, inspection, supply wiring, and powering the unit.
Steps to identify loads, configure output behaviors, and verify control.
Configure scenes, contact inputs, wallstations, and timeclock settings.
Configure network (Ethernet, DMX) and user passwords.
Steps to determine the CAN network layout and segment ends.
Key constraints for CAN network segments, including cable length and node limits.
Instructions for connecting devices to the CAN network.
Guide on how to set the iCAN termination jumper for end devices.
Procedures to power down the controller for inspection.
Instructions for removing the front panel door.
Details the flow and connection points for supply wiring.
Describes how load connections are made for each channel.
Guidance on sizing load wiring according to regulations.
Explanation of the neutral connection on relay cards.
Steps to reattach the front panel door.
Instructions to turn on the main breaker and power supply.
Procedure for energizing outputs to identify connected loads.
Guide to setting output parameters like Standard Type, Area, Zone, and HF Curve.
Option to quickly configure default settings for specific load types.
Assigns an Output to a Zone and Area number.
Defines the low voltage output relationship to the dimmer level.
Allows setting minimum and maximum dimming levels for an output.
Determines output behavior when minimum level is reached.
Defines how an output recovers from a power failure.
Steps to manually control outputs and verify their response.
Steps to edit scene values for individual outputs.
How to choose and apply a pre-configured scene.
Procedure to configure output levels for the emergency scene.
Explanation of the emergency scene's purpose and invocation.
Instructions for wiring external devices to contact inputs.
Steps to define actions for contact input conditions.
Guide to using the wizard to locate and program wallstations.
Method for standard wallstation configuration using templates and basic parameters.
Method for programming each button of a wallstation individually.
How wallstations announce their presence to the wizard.
Visual representation of the Quick Set Up configuration path.
Visual representation of the Advanced configuration path.
Steps to confirm wallstation programming by testing buttons.
Procedure to enable or disable the timeclock function.
Steps to set the controller's current time and date.
How to configure location and time zone settings using city or manual input.
Manual entry of Latitude, Longitude, and Time Zone.
Configuration of daylight saving time rules and dates.
How often time synchronization messages are sent.
Guide to managing automated events based on time or astronomical occurrences.
Details on event timing types, repetition, and astronomical settings.
Explains the different actions that can be triggered by events.
How to set IP address, IP mask, and gateway.
Option to reset Ethernet settings to default values.
Steps to assign SCRP outputs to DMX channels.
Procedure to set passwords for menu access.
Ability to manually control outputs or select scenes.
Feature for checking real-time power consumption.
Option to enable or disable communication methods.
Clears all configuration settings to factory defaults.
Steps to manually override individual or all outputs.
How to display voltage, current, and power for outputs.
Steps to enable or disable communication methods.
Procedure to clear all settings and return to factory defaults.
How to put wallstations into announce mode for identification.
Method to invoke announce mode on Ineo wallstations.
Method to invoke announce mode on Revio wallstations.
| Brand | iLumin |
|---|---|
| Model | SC-RP |
| Category | Controller |
| Language | English |