62
• Overdub
With this method, the newly recorded musical data
is added to the existing data.
When you perform overdub recording on a previ-
ously-recorded track, the newly recorded data will
be added to the previously-recorded data.
It is best to select this method when you wish to add
control data, or to record tempo data onto the mas-
ter track. This lets you record data without erasing
the existing data.
• Manual punch-in
With this method, the musical data previously on
the track is overwritten by the newly recorded data.
While the song is playing, you can press the [REC/
WRITE] key or a connected pedal switch at the
desired location to start or stop recording.
• Auto punch-in
With this method, the musical data previously on
the track is overwritten by the newly recorded data.
First you must specify the area that will be re-
recorded. Then playback the song, and recording
will occur automatically at the specified area.
• Loop All Tracks
This method lets you continue recording as you add
musical data.
Recording will occur repeatedly over the specified
area.
• Multi
Multitrack recording allows you to simultaneously
record onto multiple tracks, each with a different
channel. This method can be used with overwrite,
overdub, manual punch-in, and auto punch-in
recording.
Step recording
This is a method of recording where you specify the
note timing, note length, and velocity etc. in the LCD
screen, and use the keyboard to input the pitches.
Only note-on/off data can be recorded with this
method.
Event Edit and Create Control Data
Note data is the only type of data that can be recorded
in step recording. However as ways to record other
types of data outside of realtime, you can use the Event
Edit and Create Control Data functions.
Event Edit is intended as a way to edit previously-
recorded data, but you can also use it to modify pro-
gram numbers or insert control changes.
Create Control Data is a function that lets you create
and insert controller data that changes smoothly
between two specified values over the specified length
of time. This is used to input bend, after touch, and
control change data etc.
Realtime recording on a track
Preparations for recording
Before you begin recording, you need to make track
settings.
Be sure to turn off the Global mode protect setting
(☞p.38).
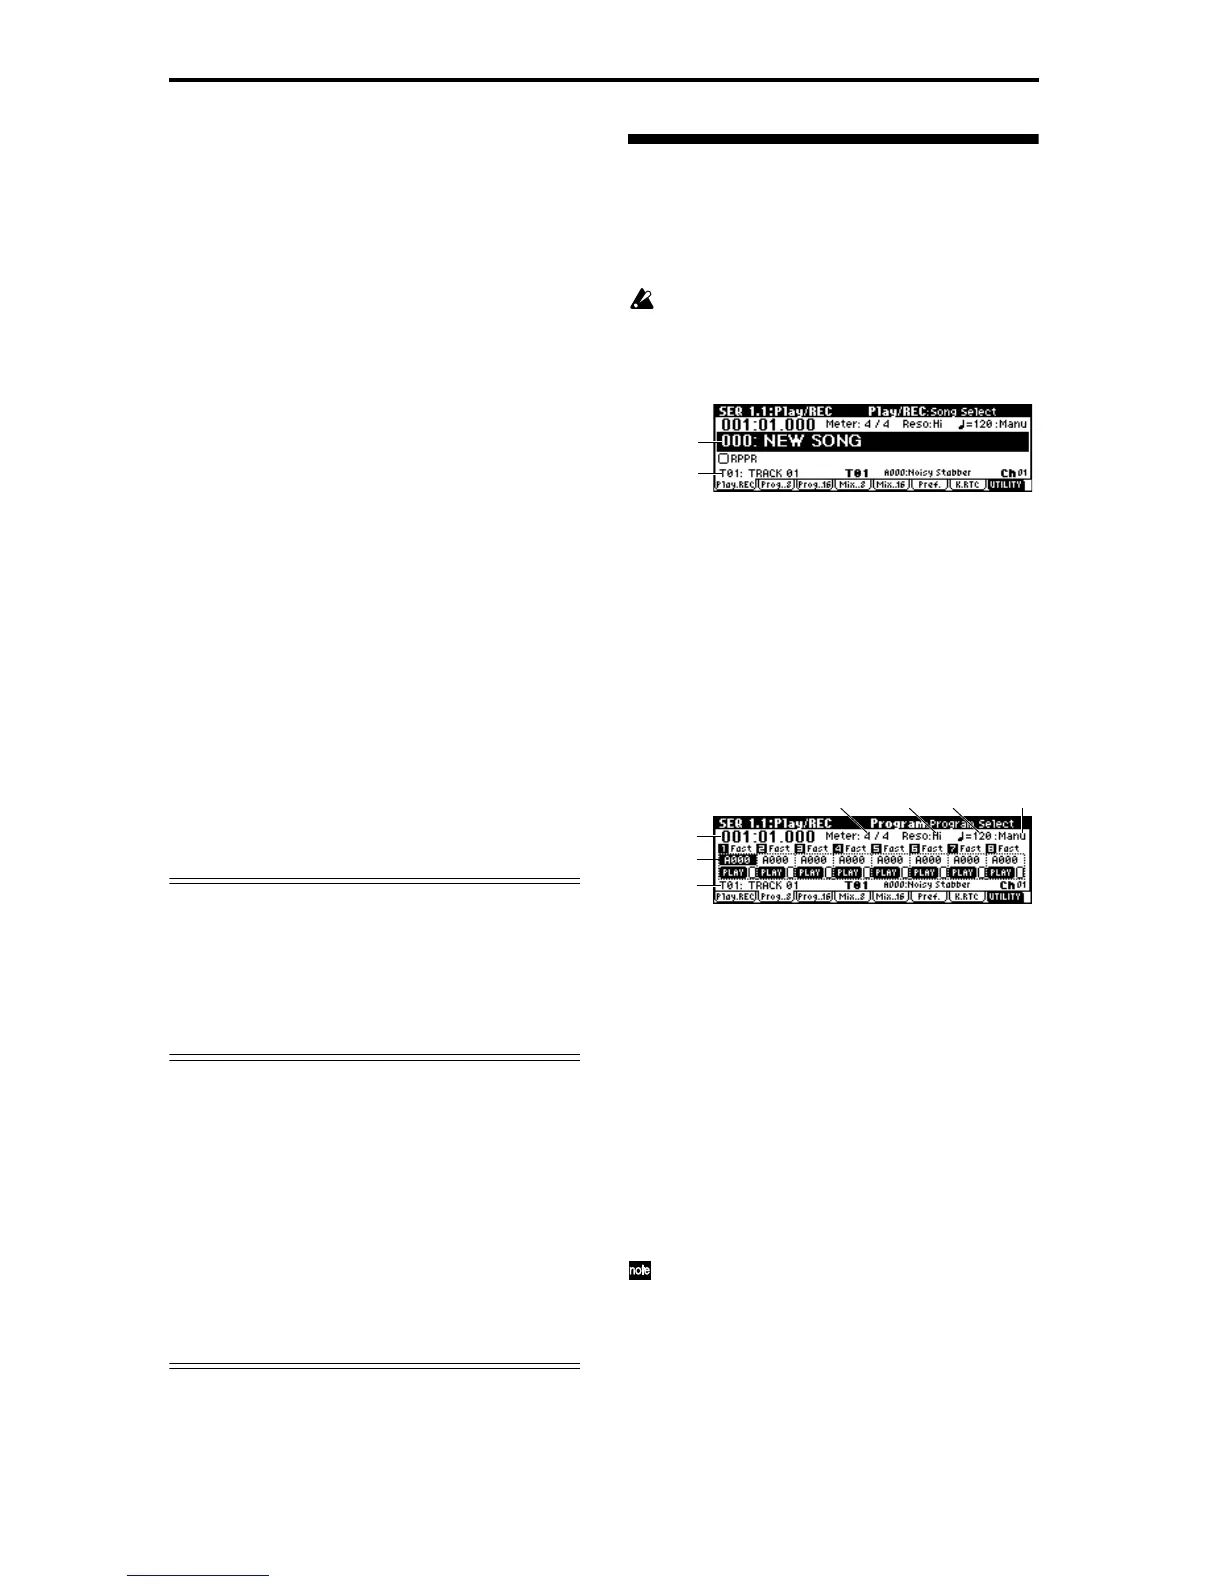
1 In Sequencer mode, select SEQ 1.1: Play/REC,
Play/REC page.
2 In “Song Select,” select the song that you wish to
record.
Select “Song Select,” and use numeric keys [0]–[9] to
enter the song number, and press the [ENTER] key.
If you select a song number that has not yet been
recorded, the Create New Song dialog box will
appear. Press the [F8] (“OK”) key.
To set the song name, use the utility menu command
“Rename Song.” (☞p.39 “Assigning a name
(Rename)”).
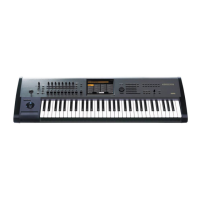
3 Select SEQ 1.1: Play/REC, program page.
4 Use “Track Select” to select the track that you wish
to record.
5 Use “Program Select” to select the program for the
track you wish to record.
Use the Prog..8 tab to select a program for tracks 1–
8, and the Prog..16 tab to select a program for tracks
9–16.
You may find it convenient to use the page menu
command “Load Template Song” and use the set-
tings from a template song (☞p.66).
If necessary, select the Mixer page and set the pan
and volume. The status and MIDI channel of each
track are set by SEQ 3.1: Param 1, MIDI page “Sta-
tus” and “MIDI Channel.”
It is a good idea to set tracks 1–16 to “MIDI Chan-
nel” 1–16 respectively. (This is the default.) Tracks
that are set to the same MIDI channel will sound
simultaneously when either track is recorded or
played.
Make sure that “Status” is INT or BTH. (☞p.58)
Song Select
Track Select
Program
Select
Track Select
Location
Meter Resolution
Tempo ModeTempo