67
Basic functions
Sequencer mode
Realtime recording to a pattern
Before you begin recording a pattern, turn off the
memory protect setting in Global mode (☞p.38).
When realtime-recording a pattern, a pattern of the
specified number of measures will playback repeat-
edly, allowing you to continue adding musical data to
it.
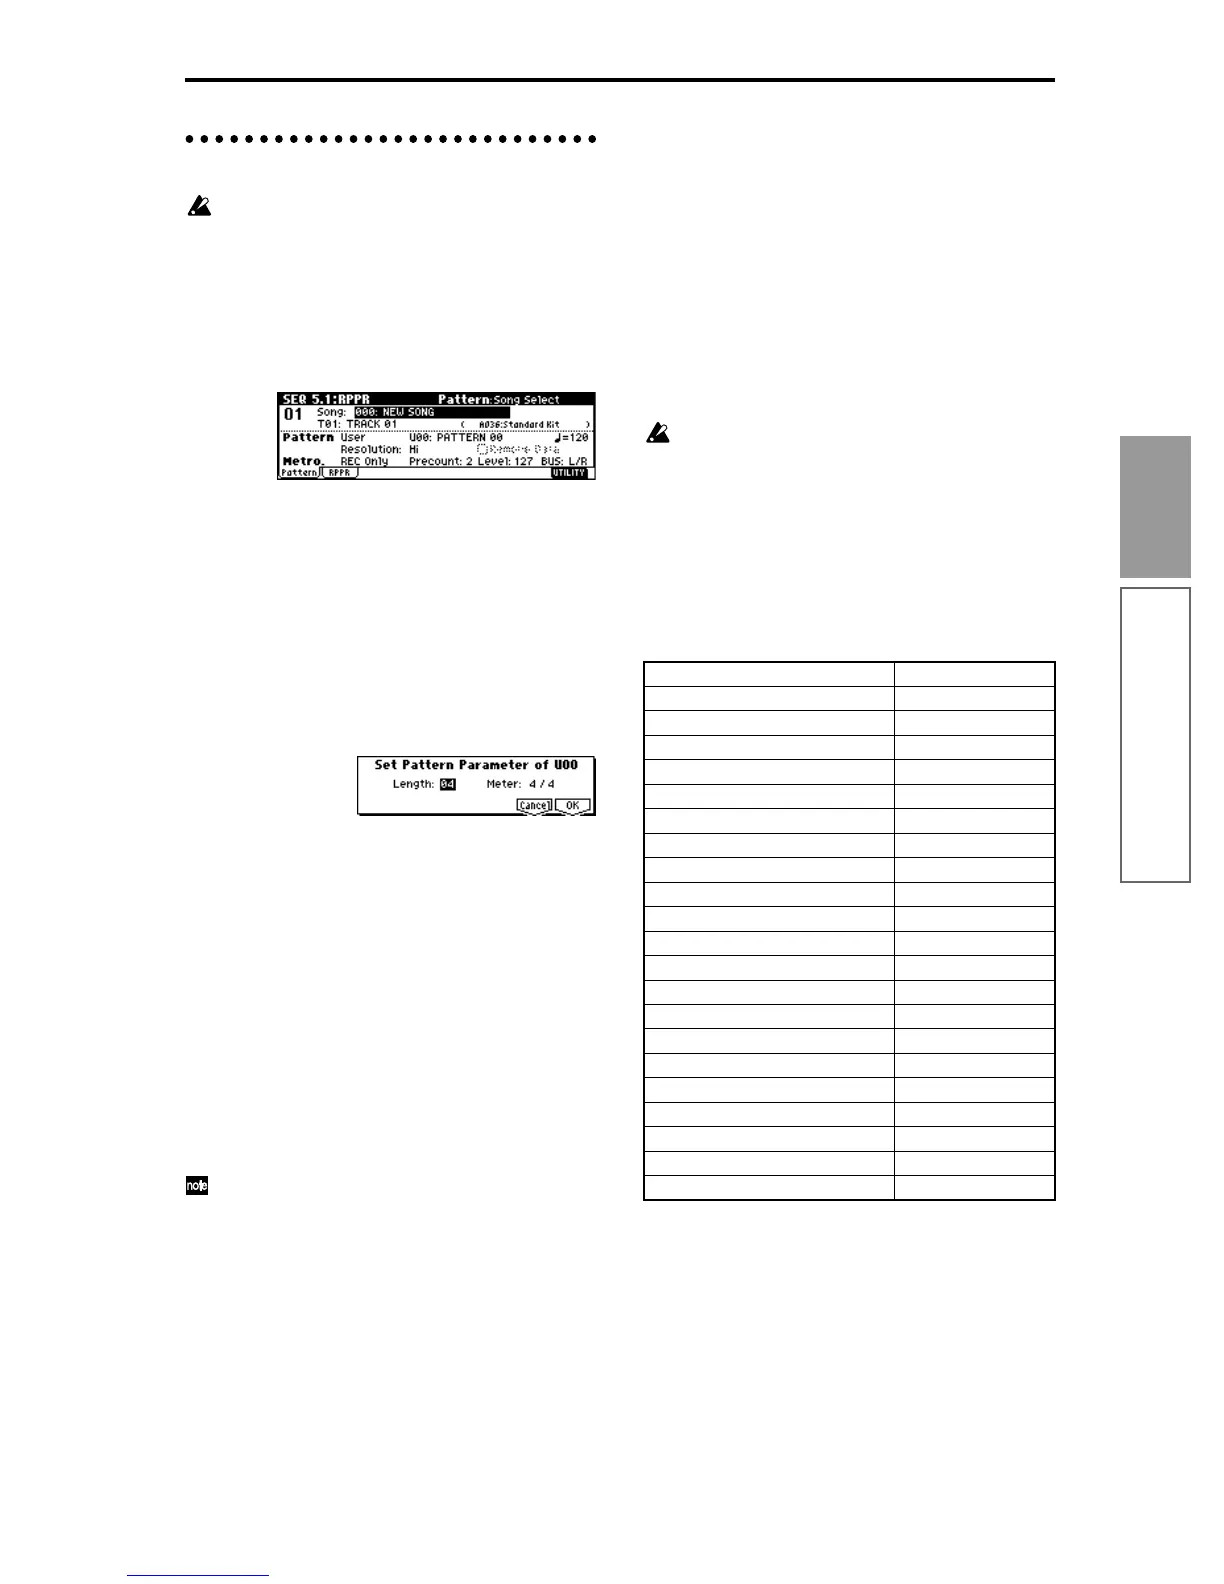
1 In Sequencer mode SEQ 5.1: RPPR, select the Pat-
tern page.
2 Use “Track Select” to select the track.
The pattern will sound with the program and set-
tings of that track.
3 Set “Pattern Bank” to User, and set “Pattern
Select” to the user pattern number U00–U99 that
you wish to record.
4 If necessary, set “Metronome” and “Resolution”.
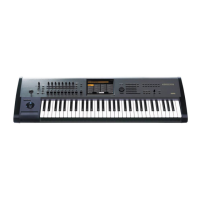
5 Select the utility menu command “Pattern
Param.”.
A dialog box will appear.
6 In “Length,” specify the length of the pattern. In
“Meter,” specify the time signature.
7 Press the [F8] (“OK”).
This completes preparations for recording.
8 Press the [REC/WRITE] key, and then press the
[START/STOP] key.
Pattern recording will begin. Play the keyboard and
operate the joystick or other controllers to record
your performance.
If the KARMA function has been set to operate on
the track that is selected by “Track Select,” the play-
back of the KARMA function will be recorded in the
pattern. For details on KARMA function settings,
refer to PG p.85 and PG p.103.
If you want the KARMA to start at the moment
that recording begins, turn on KARMA [ON/OFF],
hold down a chord on the keyboard, and then start
recording. The KARMA will start at the moment
that recording begins, and will be recorded.
When you record to the end of the pattern, you
will return to the beginning of the pattern and con-
tinue recording.
The musical data that is recorded will be added to
the previously-recorded data.
9 During pattern recording, you can erase unwanted
musical data by pressing the [REC/WRITE] key, or
by checking the “Remove Data” check box.
For details refer to “Loop All Tracks,” step 6
(☞p.64).
0 Press the [START/STOP] key.
Pattern recording will end.
To use a user pattern that was recorded in this way
(or a preset pattern), you can execute “Put to Track”
to assign the pattern to a track (
☞PG p.92).
A pattern can also be used in the SEQ 5.1: RPPR,
Setup page (☞p.70, PG p.93)
Although you may operate controllers etc. to
record control data in a pattern, you should restore
the control data to its normal value within the pat-
tern. If you fail to restore the normal value, unnec-
essary control data may remain in a “stuck”
position when you place the pattern in a song or
use the RPPR function to play the pattern. How-
ever, the following control data will be automati-
cally reset to the following values when the song
or RPPR function finishes playing the pattern, or
when playback is halted.
Controller Reset value
Modulation 1 (CC#01) 00 (zero)
Modulation 2 (CC#02) 00 (zero)
Expression (CC#11) 127 (max)
Ribbon controller (CC#16) 64 (center)
Damper switch (CC#64) 00 (zero)
Sostenuto switch (CC#66) 00 (zero)
Soft switch (CC#67) 00 (zero)
EG sustain level (CC#70) 64 (center)
Resonance level (CC#71) 64 (center)
EG release time (CC#72) 64 (center)
EG attack time (CC#73) 64 (center)
Low pass filter cutoff (CC#74) 64 (center)
EG decay time (CC#75) 64 (center)
LFO1 speed (CC#76) 64 (center)
LFO1 depth (pitch) (CC#77) 64 (center)
LFO1 delay (CC#78) 64 (center)
Filter EG intensity (CC#79) 64 (center)
SW1 modulation (CC#80) 00 (zero)
SW2 modulation (CC#81) 00 (zero)
Channel after touch 00 (zero)
Pitch bender 00 (zero)