Page 83 of 295
BL1 Mounting guidelines:
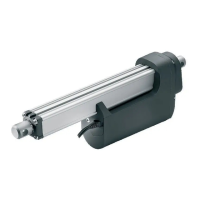
• BL1 is for use in push applications, and can be mounted in both directions (smallest profile down, or up).
Note: The cable outlet can be positioned at the top (smallest profile). If the option with integrated cable is chosen, the cable outlet can also be
positioned at the bottom (biggest profile).
No IP rating applies when BL1 is mounted with the largest profile at the top (see illustration).
• It is very simple to mount the BL1 in the application using the 4 mounting holes in both endplates.
• Use 4 self-tapping screws, in each end, for mounting to the application.
Use EJOT PT type DG Ø8, screw depth must be min. 30 mm in aluminium profile.
Screw torque: 15 - 17 Nm.
• If the column has been loosened from the application, it is very important that the self-tapping screws are mounted in the same thread,
to ensure the same strength in the thread. Therefore we recommend that the screws are loosened no more than 1 or 2 times.
BL1 is for use in push applications to obtain IPX6. The mounting direction must be with the largest profile down. It is very simple to mount the BL1 in
the application using the 4 self-tapping screws in the mounting holes of both endplates.
IPX0
IPX6
Top plate up
Top plate down
If the lifting column is mounted upside-down, there is NO ingress protection.