STEP 5
5.1 – INSTALLING THE AUTOMATION COMPONENTS
WARNINGS
• Incorrect installation may cause serious physical injury to those
working on or using the system.
• Before starting automation assembly, make the preliminary checks
as described in STEP 3.
After laying the electric cables, proceed with assembly of the mechanical parts
oftheguidesandgearmotor,inthesequencespeciedbelow.
01. Inserttheguideintheseatonthegearmotor(g. 11).
02. Insertthetravellimitmechanicalstop(a) in the guide and move it close
tothegearmotor;thenpositionplate(b) onto the stop and secure the
assemblybymeansofascrew(g. 12). Note – The screw must NOT
be tightened excessively as the limit stop must later be moved to its nal
position.
03. Use two screws to secure the ends of the chain into the groove on the
carriageplate(g. 13).
04. Join the two carriage plates; insert the screw in the support of the drive
pulley; position the drive pulley in the chain and mount the assembly onto
thedrivebracketwiththepinsupplied(g. 14).
05. Insert the chain and carriage inside the guide, taking care to observe the
following:
Fig. 15-a)positionthesideofthecarriagewiththechainxedwiththe
screws on the same side as the contro unit cover;
Fig. 15-b) position the carriage to approx. mid-way on the guide.
06. Pass the chain around the pinion of the gearmotor and close the assembly
withtheprotectioncover(g. 16).
07. Insert the bracket on the end of the guide and secure the two elements by
meansofanutandwasher(g. 17).
08. Tension the chain by tightening the nut on the screw of the drive bracket
(g. 18). CAUTION – if the chain is tensioned excessively, this may
cause excessive stress and damage the gearmotor; if under-ten-
sioned this may cause unpleasant noise.
09.
FOR UP-AND-OVER DOORS ONLY
Ifthedoortobeautomatedis“up-and-over”(projectingornon-pro-
jecting - g. 1), the oscillating arm mod. SPA5 must be tted(g.
19). Then proceed with assembly of the various arm components.
IMPORTANT – Take care to move the arm as close as possible
to the handle of the door.
For assembly of the drive rod, refer to point 10.
Note – for assembly of the accessory, follow the instructions supplied
in the pack.
10. CAUTION! – If the door is up-and-over, use the drive rod supplied
with the oscillating arm for this operation.
Beforettingthedriverod,cutthistoalengththatensuresobservanceof
recommended distance E shown in g. 3. Then use screws and nuts to
secureoneendofthedriverodtothebracket(theonetobexedtothe
doororoscillatingarm)andtheotherendtothecarriage(g. 20).
11. Fix one end of the manual release cord to the carriage and the other end
totheknob(g. 21). Note – Ensure that the manual release knob is posi-
tioned at a maximum height of 180 cm from the ground.
IMPORTANT! – Perform the operations below the door CLOSED
12. • If the door is SECTIONAL: establish the length of distance B consider-
ing the constraints of values A and E(g. 3).
• If the door is UP-AND-OVER: establish the length of distance B con-
sidering the constraints of value F(g. 4).
Note – If values A, E or F allow, the automation can also be xed directly
onto the ceiling (minimum 4 mm).
13. Fold the two ceiling mounting brackets to an “L” and mount in the vicinity
ofthegearmotor,bymeansofscrewsandnuts(g. 22).
Note – choose the most suitable hole on the brackets to observe distance
B selected in point 12.
5.2 – FIXING THE AUTOMATION TO THE WALL, CEILING, AND
DOOR
Afterassemblyoftheguideandgearmotor,xtheautomationtothewall,ceil-
ing and door as follows.
01. Usingasuitablemeansofsupport(ladder,polesorsimilar)liftthegearmotor
from the ground an position at the required height so that the guide brackets
areplacedagainsttheceilingandwallabovethedoor(g. 23). IMPOR-
TANT – (g. 23-a) align the guide and gearmotor with the vertical axis of
the door and perpendicular to the latter (90° angle). Note – In the ca se of
up-and-over doors, the guide must be aligned with the oscillating arm.
Also ensure observance of the values A, B, E in g. 3 and values B, F in
g. 4.
02. Check the position of the guide, which must be perfectly horizontal, and
markthe4bracketxturepoints,afterwhichdrilltherelativeholesand
inserttheplugs(g. 24).
03. Fix the automation to the ceiling and wall using screws and plugs suited to
thesupportmaterial(g. 26).
Notes:
• Depending on the type of wall, the bracket at the end of the guide can
be xed by means of the rivets or screws and plugs.
• Take care when choosing the method of bracket xture to the ceiling,
taking into account the following:
– the bracket at the end of the guide must withstand the force required to
open and close the door;
– the ceiling mounted brackets must withstand the weight of the gearmotor.
In both cases possible wear and deformation over time must be taken into
account.
04. Use a saw to cut off the excess section of the ceiling-mounted brackets
(g. 26).
05. (With the door closed) Pull the release knob and slide the carriage until the
anchoring bracket is positioned on the upper edge of the sectional door,
oruntilitreachestheconnectionoftheoscillatingarm(up-and-overdoor).
Thenalignthedriverodalongthetrajectoryoftheguideandxthebracket
tothedoorusingrivetsorscrewssuitedtothedoormaterial(g. 27).
INSTALLATION: COMPONENT ASSEMBLY
AND CONNECTIONS
Note 1 – The cables required for the set-up of the system (not included in the pack) may vary according to the quantity and type
of devices envisaged for the installation.
Note 2 – The connections to terminals 1-2 (Stop), 4-5 (Step-step) and 3-5 (Photo) can be made using a single cable with several
internal wires.
CAUTION! –
The cables used must be suited to the installation environment; for example a cable type H03VV-F for indoor
environments is recommended.
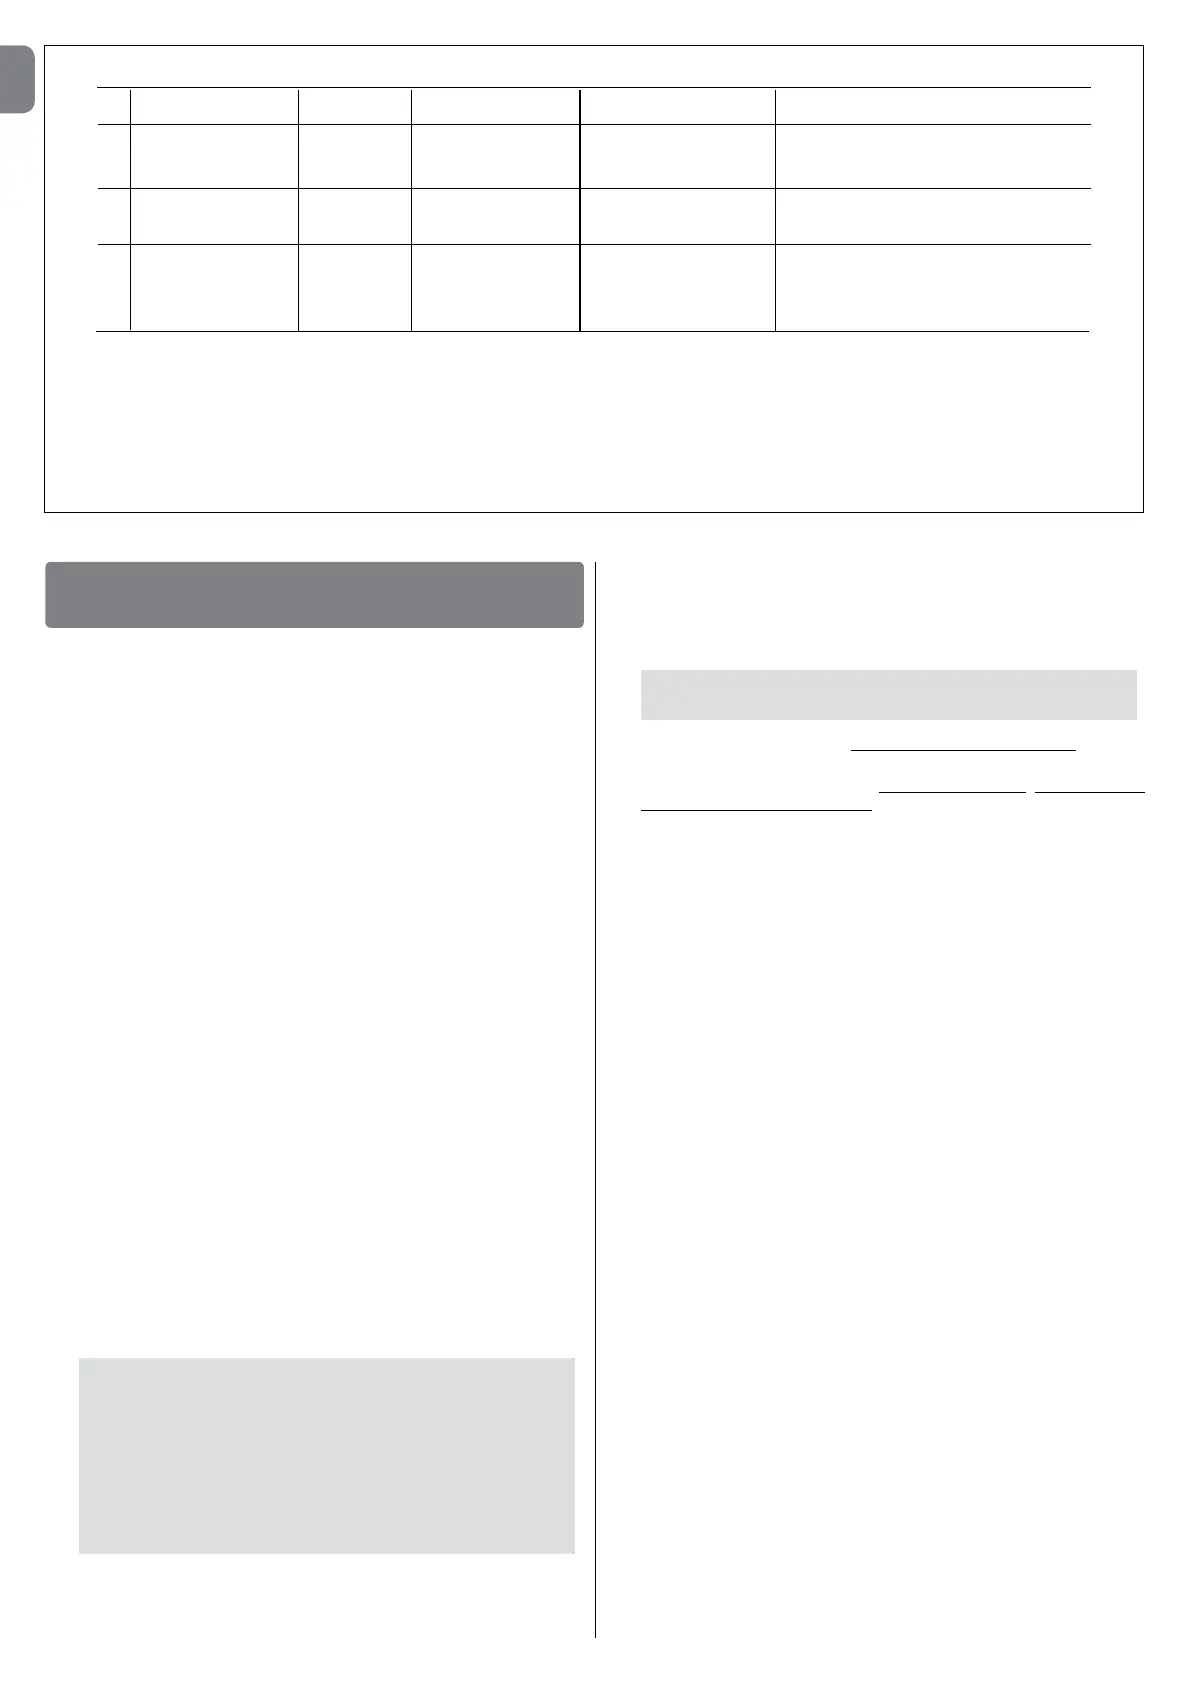
Technical specications of electric cables(note 1)
Devices
Safety
photocells
Control
pushbutton
Safety pushbutton
– sensitive edges
– etc.
Terminals
3 - 5
3 - 4
1 - 2
Maximum admissible length
20m(note 2)
20m(note 2)
20m(note 2)
20m(note 2)
Function
PHOTO input
Input
STEP-STEP
STOP Input
Cable type
TX Cable 2 x 0,25 mm
2
RX Cable 3 x 0,25 mm
2
Cable 2 x 0,25 mm
2
Cable 2 x 0,25 mm
2
4 – English
EN
A
B
C
 Loading...