EnForcer™ SCR Service Manual I.B. 1561
27
3) Connect the negative potential of your tester to the positive buss bar.
4) Connect the positive potential of your tester to the input connection of the SCR/Diode Block under test. Then by
using a jumper wire touch the SCR/Diode Block gate pin (white lead connects there) to the SCR/Diode Block
input connection. The tester will light.
NOTE: If your tester lights before connecting to the SCR/Diode Block input, then the SCR/Diode Block is
defective. Test one SCR/Diode Block at a time to find the faulty one(s).
5) Disconnect the jumper wire to the SCR/Diode Block gate pin. The tester should remain lit.
6) The SCR/Diode Block is defective if the tester did not remain lit.
DIODE TEST
Please follow these steps before testing the diode:
Disconnect the battery.
Disconnect the AC power.
You will be testing the diode to see if it is shorted.
1) Disconnect the three phase input wires to the SCR/Diode Blocks.
2) Use an analog meter set to its X1 scale, or use a DVM set to its diode scale.
3) Connect the meter’s negative lead to the input connection of the SCR/Diode Block.
4) Connect the meter’s positive lead to the (-) buss bar.
5) If you are using an analog meter, it should read close to 0 ohms.
6) If you are using a DVM, it should read a .7V drop on the diode scale.
7) Reverse the wires on the meter.
8) The needle should not move on the analog scale (measurement of infinity). The DVM should not get a reading.
9) The SCR/Diode Block is shorted if the meter measures zero current for both directions (polarities).
10) The SCR/Diode Block is open if the meter reads infinity for both directions (polarities).
AC AND DC FUSES
Please follow these steps before testing the fuses:
Disconnect the battery.
Disconnect the AC power.
You will be testing each fuse to see whether there is continuity across it.
1) Using an ohmmeter, set to its X1 scale, test each fuse.
2) If a fuse tests as an open circuit (infinity), replace it.
3) If there is continuity across the fuse (less than 1 ohm), it is working properly.
PRINTED CIRCUIT BOARD FUSES AND VOLTAGES
Measure the voltages on the bottom terminals of the circuit board fuses with the charger AC power connected
and the battery disconnected.
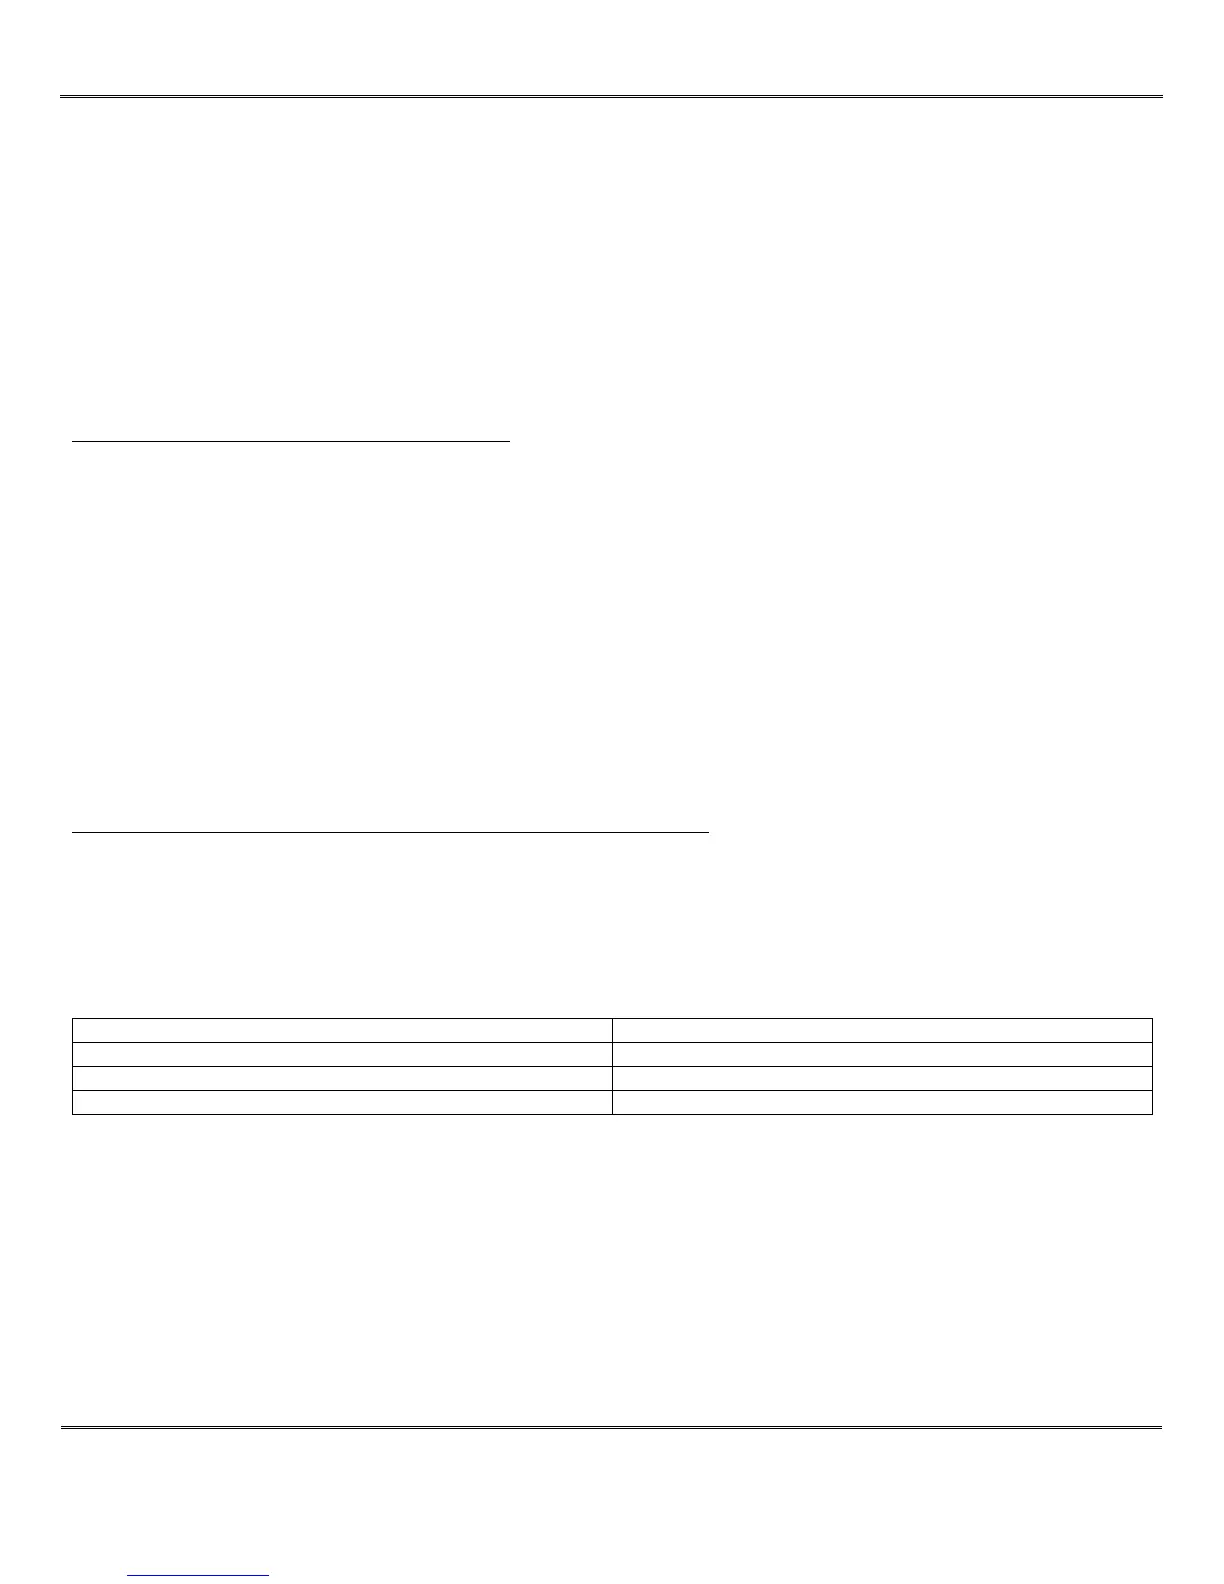
Measurement Expected voltage (VAC)
F5-F8 10 ± 10%
F6-F8 10 ± 10%
F7-F8 10 ± 10%
Please note that these voltages are dependent on the line voltage.
PRINTED CIRCUIT BOARD
The printed circuit board is not field calibrated. No pots or jumpers are contained on the control board. In order to verify
proper operation, insure that all USER and SERVICE parameters are set properly, especially the charger/battery cell size
and amp hour ratings. Please follow these steps before testing the PC Board:
Set correct control board battery and charger cell size and amp hour ratings in USER/SERVICE parameters.
1) Connect appropriate size battery to charger. Battery terminal voltage should be at around 2 volts/cell.
2) Charger should detect battery and start a charge cycle. If charger does not respond, check wiring and ensure that
DC battery voltage is being read at the control board..
3) Faulty control boards cannot be field modified. Replace faulty control boards and return to factory for evaluation.