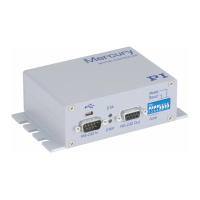
46 Version: 2.0.0 MS205Equ C-863 Mercury Controller
Switching on the C-863
Connect the power cord of the power supply with the power socket.
The C-863 copies information from the nonvolatile memory to the volatile
memory.
The STA LED on the front panel of the C-863 displays the state of the C-863:
− green: C-863 is ready for normal operation
− off: If DIP switch 8 is in the "ON" (upper) position, the C-863 is in firmware
update mode. Otherwise the C-863 might be defective.
If DIP switch 8 is in the "OFF" (lower) position and the STA LED does not light
after switching-on, contact our customer service department (p. 91).
7.4 Establishing Communication
The procedure for PIMikroMove is described in the following.
INFORMATION
Use the USB Daisy Chain and RS-232 Daisy Chain tabs in the PC software for
establishing communication only if you have actually connected a daisy chain
network to the PC.
INFORMATION
A non-networked controller must have the address 1, if it is to be used in
PIMikroMove. Details see "Controller Address" (p. 43).
7.4.1 Establishing Communication via RS-232
Prerequisites
You have read and understood the General Notes on Start-Up (p. 41).
The C-863 is connected to the RS-232 interface of the PC (p. 36).
You have made the following settings with the respective DIP switches prior to
switching on the C-863 (p. 42):
− controller address = 1
− appropriate baud rate