Chapter 7: Installation 91
Mounting the
Chartplotter
7. Drill four 5mm (
3
/
16
in) holes in the marked locations.
8. Complete the installation of the power data cabling, GPS input, and any
other accessory cables to the console (see Section 7.5).
12
D3346-3
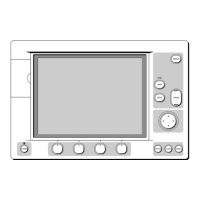
1 Gasket 2 Thumb nuts (4 off) 3 Thumb studs (4 off)
9. Slide the unit into the panel cut-out. A suitable sealant may be used between
the gasket (1) and panel to prevent moisture entering the panel.
10. Fix the chartplotter to the panel using the four thumb studs and four thumb
nuts supplied.
 Loading...