Chapter 5: Using Stored Lists (EDIT) 55
The Route
List
5.4 The Route List
Whenever you create a route, its details are added to the Route List. You can
store data for up to 20 routes in the chartplotter’s memory.
The Route List option allows you to perform the following tasks:
• View the Route List
• Display and edit the waypoints for a selected route
• Display a selected route on the chart
• Follow or reverse a selected route
• Delete a route
• Edit the details of an existing route, or construct a new route by selecting
existing waypoints
You select the option in the same way as described for the Waypoint List
option (see Section 5.2).
Viewing the Route List
➤ To view the Route List:
1. Select the ROUTE LIST option from the EDIT menu.
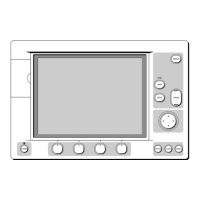
D3816-2
CURSOR
50°36.68 N
009°47.60 E
COG SOG
208°M 1.4$
DEPTH IN FEET
100$
To Cursor
BRG
RNG
218°M 415.2$
SCROLL
DIGITS
CLEAR
CANCEL
ENTER
ACCEPT
SELECTION
ROUTE LIST
001 001WPT
002 002WPT
003 003WPT
004 004WPT
005 005WPT
00 ROUTE 00
01 ROUTE 01
02 (EMPTY)
03 (EMPTY)
04 (EMPTY)
ROUTE DETAILS DISPLAY DELETE SELECT
The first five waypoints are listed for the currently highlighted route.
2. Use the trackpad to scroll through the list.
3. If you cannot identify a route from its name and the first 5 waypoints, you
can display it on the chart as described below.
 Loading...