76-00-00
page 54
July 01/2008
Effectivity 914 Series
Edition 1 / Rev. 2
d04355
BRP-Rotax
Maintenance Manual
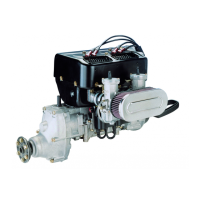
Disassembly and assembly - Variant 1
Remove connection wiring harness (11) of 3-way solenoid
valve (1).
Cut off tie wraps (6).
Loosen 3x clamps (12) from 3-way solenoid valve and remove
lines.
Remove 3-way solenoid valve.
Connect adapter cable (2) to wiring harness.
Install bracket (3) onto airbox.
Tighten 3-way solenoid valve with allen screw (4) and lock nut
(5). Tightening torque 8 Nm (70 in. lb).
■■
■■
■ CAUTION: Route all pressure connections such that there
will be no sharp bends or chafing.
Push lines onto fittings as far as they will go and secure with
clamps (12).
Position lines and adapter cable (2) and secure with clamps (6).
07234
11
1
6
12
12
Variant 1
2
3
5
4
12
12
07233
Fig. 76-50
 Loading...