Initial Startup
Operating Instructions Arium
®
Comfort I, Comfort II 33
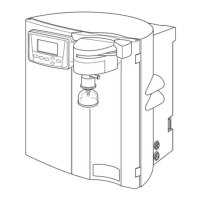
6.11 Inserting Final Filter
t Remove sampling tubing from the dispenser unit and attach final filter.
Pos. Description
1 Quick connector
2 Vent valve
3 Bell assembly
The final filter is supplied together with a bell assembly. To assemble the
final filter, proceed as follows:
t Attach the bell assembly to the final filter.
t Press the final filter into the quick connector of the display | dispenser unit.
t Then confirm with “OK”.
y After assembly of the final filter, the display switches to the operating
mode.
y The timers for the UV lamp and the final filter will be reset.
When an application is TOC critical, we recommend rinsing the bag (Tank
Rinsing) after the initial startup. Tank rinsing can be started from the
maintenance menu (under Tank Rinsing).
6.12 Rinsing the Final Filter
t Place a collection vessel under the final filter. The collection vessel must
be suitable for the rinse volume of the final filter (rinse volume, see final
filter instructions).
t If a Sterile Plus (sterile filter) final filter is used: Open the vent valve.
t Remove the protective cap from the bell assembly.
t Open the water dispenser and rinse the final filter with the specified
amount of water (rinsing process and required amount of water, see
instructions for Sterile Plus or Cell Plus final filter).
t When the rinsing process is complete: Attach the protective cap to the
bell assembly.
t If a Sterile Plus (sterile filter) final filter is used: Close the vent valve.
Startup is complete.
Startup
Remove sampling tubing and
attach final filter as described
in the Operating Instructions
OK
1
2
3
 Loading...