SEA SYSTEMS
INSTALLATION AND USE MANUAL
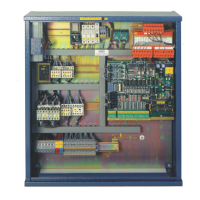
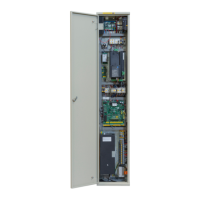
CONTROL PANEL and PREWIRED SYSTEM STK1
For Electric and Hydraulic Lifts
MSTK12-GB
Rev.01
30/12/05
SETRONIK1 Pagina 14 di 54
2.7.FIXING AND CONNECTION ON THE CAR ROOF
2.7.1.JUNCTION BOX FIXING AND FLEXIBLE CABLE CONNECTIONS:
1. Fasten the junction box with appropriate retaining screws;
2. Bring the flexible cables coil into the shaft pit;
3. Connect the flexible cables (ground side, with eyebolts) to the car box connectors as
per installation diagrams and secure them to the box with appropriate clamps (P/N P-
00074);
4. Rivet the flexible cables to the car through the appropriate cable brackets (P/N P-
00089) and plugs (P/N P-00102) on the roof and beneath the car (see fig. 2.1);
5. Connect the flexible cables (ground side, no eyebolts) to the control panel as per
installation diagrams;
6. Fasten the wedge side bracket (P/N P-00086) to the shaft, about halfway, with
appropriate plugs (P/N P-00102);
7. Anchor the flexible cables to the wedge side bracket in such a point that when the car
has been lowered all the way down, the flexible cables box does not touch the
bottom of the pit (see fig.2.1);
WARNING
To solve the issue in connection with too big a box and too many flexible cables in
the pit, shift the wedge side bracket upwards.
Take into account that every time the bracket gets 1 meter higher, the box rises
approximately by ½ meters.
8. Make sure that flexible cables are not entangled in the pit, otherwise, unplug the
connectors from the control panel, pull them straight and reconnect them;
9. Secure one of the cable brackets (P/N P-00089) to the pit wall, where flexible cables
start rising vertically along the shaft.
2.7.2.CAR PUSH BUTTON AND DOOR OPERATOR CONNECTION
Connect the car push button and the operator according to the installation diagrams.
HIGHLIGHT
In case it’s necessary to use the wireway (Cod. P-00087) to fit the cables on the
car roof, fix it at the roof with screws (cod. P-00101)