Start-up
MCS100FT · Operating Instructions · 8011893 V2-1 · © SICK AG 29
Subject to change without notice
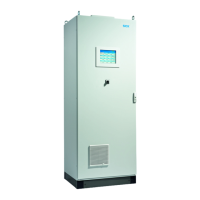
4.3 Switching on the MCS100FT
1 Switch the MCS100FT on with the device switch (
p. 15, §2.5.1) (position “ON”).
2 The SICK logo appears after a few seconds.
3 The green “POWER” LED goes on after a few seconds.
4 A brown progress bar is displayed.
5 The monitor switches off for a few seconds.
6 A blue progress bar, a gray status bar and a clock symbol with rotating segments are
displayed.
This process takes a few minutes (depending on the number and type of analyzers con-
nected).
Fig. 10 Operator panel
7 The Start screen with the Measuring screen is shown.
p. 33, §5.4
(Start screen default:
p. 40, §5.6.6.)
Fig. 11 Measuring screen (example)
8 The MCS100FT is in Measuring mode when both status fields (
p. 33, §5.4.1) are
green.
“POWER“ LED
Clock symbol
Progress bar
701
0.00
0.00 0.00
0.00
0.00
0.00 0.00
0.00
0.00
0.00
0.00
0.00
0.00
701
17.3
126
Measuring
5
/System Control Unit/Measuring/Measuring Screen 1
Component
Unit
SCU
MCS100FT
25.05.10
14:01
Component
Unit
Component
Unit
NN
a.u.
NN
a.u.
NN
a.u.
NN
a.u.
NN
a.u.
NN
a.u.
NN
a.u.
NN
a.u.
NN
a.u.
NN
a.u.
NN
a.u.
NN
a.u.
Operation of the MCS100FT
p. 31, §5
If the system does not switch to Measuring mode:
Error message, see menu MCS100FT/Diagnosis/Logbook (
p. 62, §5.7.8.2).