The preliminary adjustments of contrast, brightness,
chroma and phase are carried out with the CONTROL
PRESET ADJ menu, to set the preset values to the
knobs for the above-mentioned adjustments.
Preset values can be set either commonly to all
channels or separately for individual channels.
Preset values can be set in the following ways:
•Adjustment with the MANUAL knobs (MANUAL
menu)
•Automatic adjustment (AUTO menu)
An external color bar signal is necessary.
This section explains the setting lists displayed in the
menu.
How to read the setting lists
•For purposes of explanation, each setting list is
preceded by a menu number. These numbers are not
displayed on the screen.
For more information about the menu number, see “About
menu numbers” on page 23.
Overview
•The arrow mark (÷) refers you to another setting list
that appears after you make the setting, or to an
operation that is carried out as a result of the setting.
When there is no arrow mark, the menu does not have
any sub-list.
[A] CONTROL PRESET ADJ menu
Select either PRESET or CH SET. ÷[A1]
PRESET... : Set common values.
CH SET... : Set values for each individual channel.
MATRIX...: Set the data area for each individual
channel when CH SET is selected. ÷[A2]
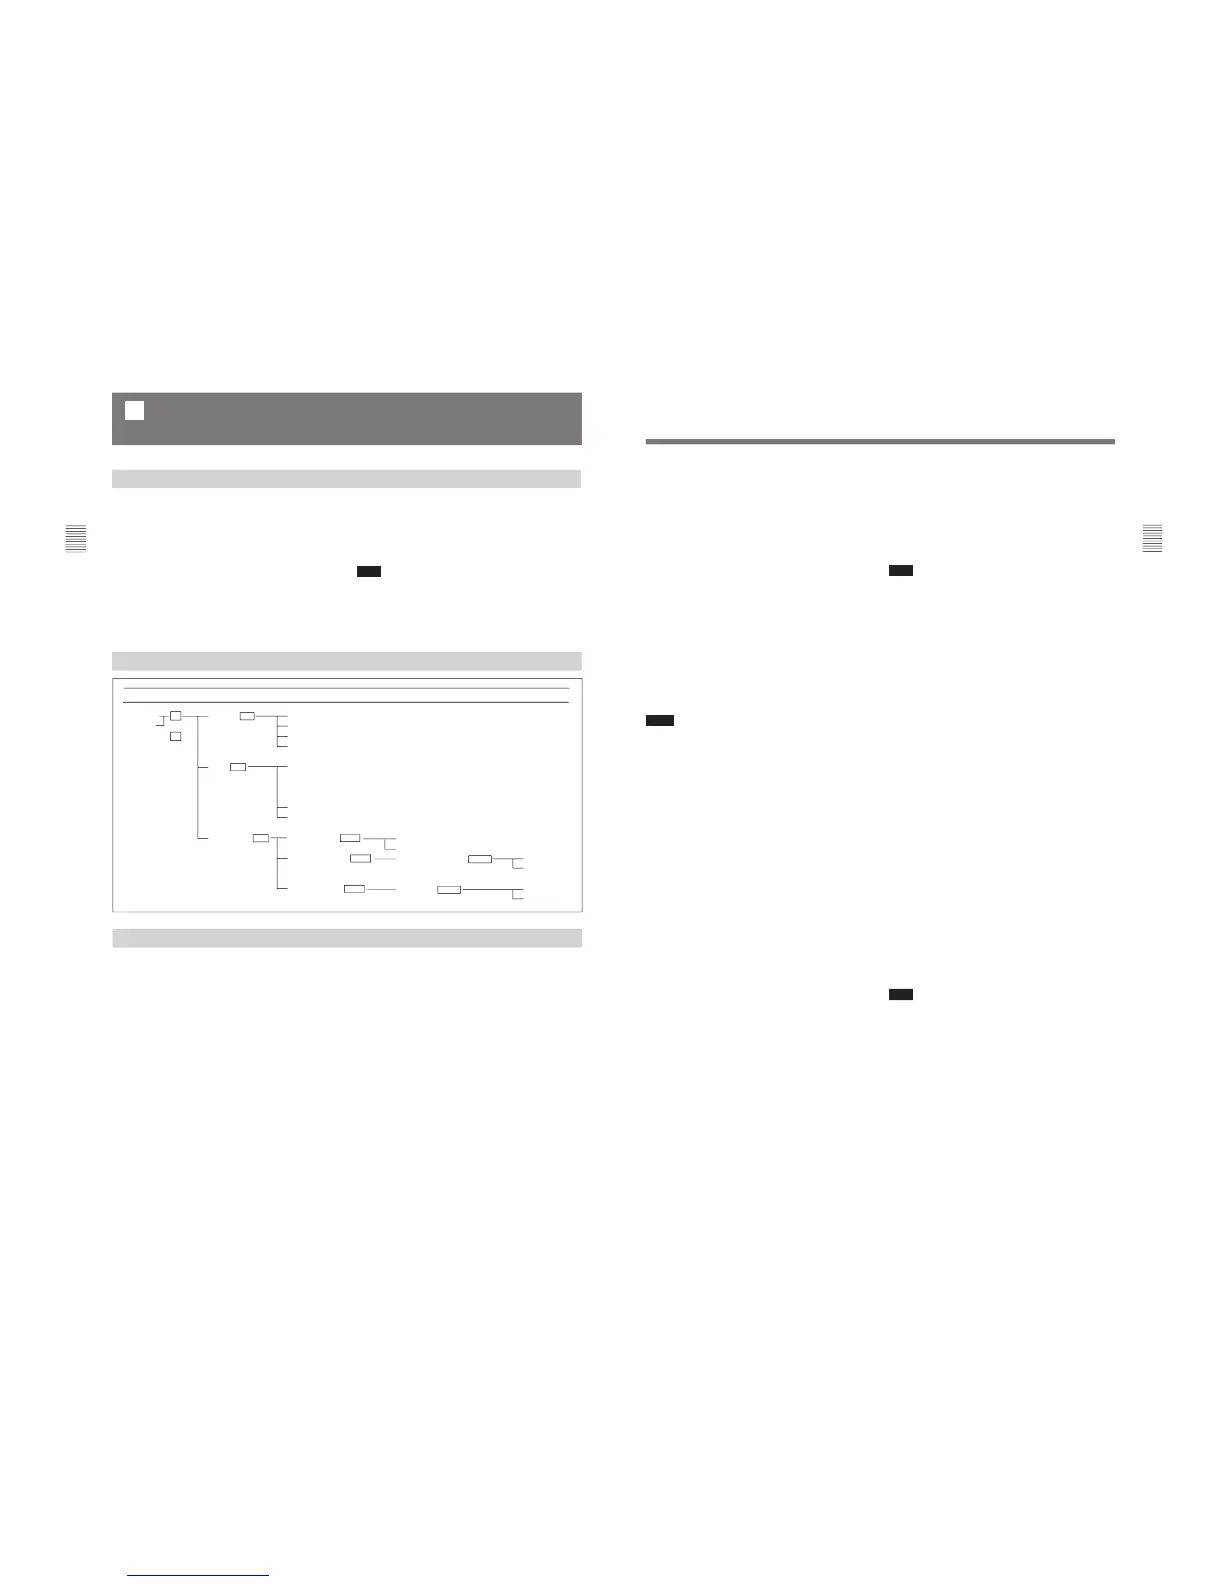
Setting Lists in the CONTROL PRESET ADJ Menu
Structure of the CONTROL PRESET ADJ Menu
A Preset Adjustment of the Picture Level Control
Knobs — CONTROL PRESET ADJ Menu
Level 1 Level 2 Level 3 Level 4 Level 5
•Copying data (COPY FROM menu)
Copying data from other channels, common data, or
other BVM-DxxE/DxxF series monitors that have
been connected via the serial remote connector, or
from data stored in monitor memory cards
Note
Data copy is impossible between monitors other than
BVM-DxxE/DxxF series.
29
Chapter 2 Menu
[A1] PRESET menu/CH SET menu
Select the setting method.
MANUAL... : Set with the MANUAL knobs. ÷[A11]
AUTO... : Set by automatic adjustment. ÷[A12]
COPY FROM... : Copy data from elsewhere. ÷[A13]
[A2] MATRIX menu
Select the data area for the YP
BPR (SMPTE/EBU-N10),
SDI 4:2:2 and HD SDI signals. The ITU 709, ITU 601
or SMPTE 240M can be selected for each signal format.
The selected data area is common to all the channels.
The factory settings are as follows:
1080/60I: ITU 709 (default)
1080/50I: ITU 709 (default)
1080/48I: ITU 709 (default)
1035/60I: SMPTE 240M (default)
720/60P: ITU 709 (default)
575/50P: ITU 601 (default)
575/50I: ITU 601 (default)
480/60P: ITU 601 (default)
480/60I: ITU 601 (default)
Notes
•When PRESET is selected, the same MATRIX data as
the above are used automatically.
•The ITU 601 data is used for the COMPOSITE, YC,
YP
BPR (BETACAM), GBR and SDI (D2) signals,
regardless of the settings on the MATRIX menu.
[A11] MANUAL menu
Adjust values by turning the PHASE, CHROMA,
BRIGHT, and/or CONTRAST knobs. After the
adjustment, press the ENTER or Ent button to confirm
the adjusted values.
PHASE: xxxx BRIGHT: xxxx
CHROMA: xxxx CONTRAST: xxxx
When you want to erase characters from the screen
while adjusting manually
Press the [F1] button. The characters disappear. To
display characters, press the [F1] button again.
To reset the setting to the default
Press the corresponding MANUAL button. The adjusted
value is reset to 1000 (default).
[A12] AUTO menu
Select the color bar signal to be used for automatic
adjustment. ÷Adjustment is carried out.
8COLOR BAR 100%: 100% full-field 8-color bar
(white, yellow, cyan, green, magenta, red, blue
and black)
8COLOR BAR 75%: 75% full-field 8-color bar
(with 100% white signal, effective for 15K
signal only)
7COLOR BAR 100%: 100% full-field 7-color bar
(white, yellow, cyan, green, magenta, red and
blue) (with 100% white signal, not selectable for
15K signal)
SMPTE COLOR BAR: SMPTE standard color bar
(effective for 15K signal only)
EIA COLOR BAR: EIA standard color bar (effective
for 15K signal only)
Note
When you execute the AUTO menu, SYNC button
should be set to OFF (INT SYNC).
EXT SYNC will cause an error abortion of auto
adjustment procedure.
[A13] COPY FROM menu
Select the source to be copied from.
OTHER VALUE... : Copy data from another channel
or common data. ÷[A131]
OTHER MONITOR... : Copy data from another
monitor. ÷[A132]
MEMORY CARD... : Copy data from a memory card.
÷[A133]
[A131] OTHER VALUE menu
Choose either PRESET or CH SET.
÷ Copy is carried out.
PRESET: Copy common data.
CH SET: Copy data set for another channel. Input the
number of the channel from which the data will be
copied.
[A132] OTHER MONITOR menu
Input the address of the monitor from which the data
will be copied. ÷ [A1321]
MONITOR ADDRESS: Input the address number.
[A1321] MONITOR ADDRESS menu
Choose either PRESET or CH SET.
÷ Copy is carried out.
PRESET: Copy common data.
CH SET: Copy data set for another channel. Input the
number of the channel from which the data will be
copied.
[A133] MEMORY CARD menu
Select the file name. ÷ [A1331]
FILE NAME: Select the file name.
Note
The input signal is not displayed during the data loading.
[A1331] FILE NAME menu
Choose either PRESET or CH SET.
÷ Copy is carried out.
PRESET: Copy common data.
CH SET: Copy data set for another channel. Input the
number of the channel from which the data will be
copied.